Using MIT PC/IP with SLiRP & a virtual Cisco Router

In this video I’ll be covering the circa 1985 MIT PC/IP stack running on 86box trying to connect to a user mode network library, SLiRP. After that fails I’ll show how to break the stack apart so we can use WireShark to inspect the traffic, then how to replace the direct connection to SLiRP by using Dynamips to emulate a cisco 7200 router.

Caution it’s all command line!

I’ll cover adding a loop back adapter, installing WireShark, how to find the GUID’s of the interfaces, how to configure a HecNET bridge, and set it up to relay to a stand-alone version of SLiRP, then how to setup a virtual cisco router to do NAT, and also forward to SLiRP, along with taking network captures to show what is really going on!

Software used (in no particular order)

Or for those who prefer the written way…

what is going on?

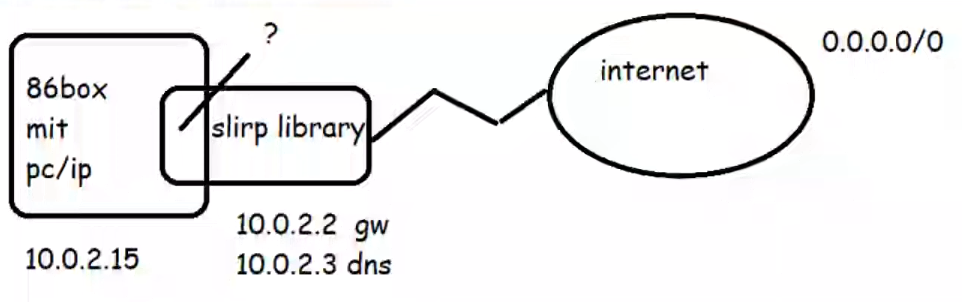
In 86box, you have the ability to use the SLiRP library directly from the emulator. Which is all find and good, but sadly it gives you no visibility when things go wrong. And with MIT PC/IP things go wrong. Looking at the data through Wireshark sure would be nice, but how to we get it into there?

Well the simplest way is to just break it apart.

Broken apart into it’s components

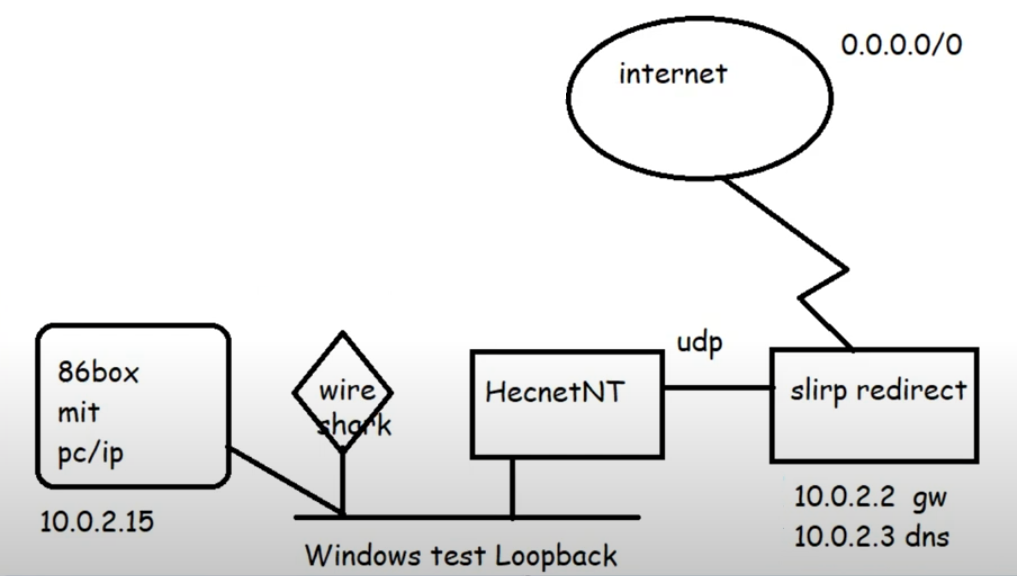
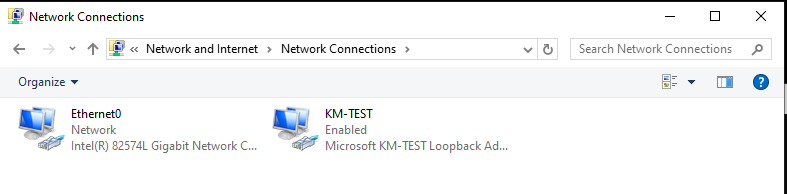
Adding in a KM TEST loopback adapter to Windows now gives us a private network we can now attach programs to via the pcap API. Hecnet is a l2 bridge that can inspect and look for l3 traffic and then forward it via udp to another program. In this case I had made a version of SLiRP that will communicate via UDP, perfect for stuff like this!

One thing to keep in mind is that the ‘GUIDS’ of the network interfaces are unique to each system, the ethlist program will show you which is which. It’s also why renaming interfaces only helps you when dealing with old libpcap stuff!

Rename stuff so it makes sense! Otherwise, everything is Ethernet

Becomes:

C:\hecnet>ethlist.exe
Network devices:
  Number       NAME                                     (Description)
  0  \Device\NPF_{E7EB72FA-7850-4864-B721-2A3B38737214} (KM-TEST)
  1  \Device\NPF_{649448CA-969D-486E-AAC8-99F1993C701A} (Ethernet0)
Press Enter to continue...

C:\hecnet>

With this information in hand, creating the bridge configuration is quite simple:

[bridge]
Loop \Device\NPF_{E7EB72FA-7850-4864-B721-2A3B38737214}
update 127.0.0.1:5001

[tcpip]
Loop
update

The bridge is for an uncompressed normal bridge connection between the KM TEST loopback interface and a UDP connection listening on port 5001 on localhost. Of note it’ll be forwarding TCP/IP related packets. Since we want the bridge to listen on UDP port 5000 we simply run it like this:
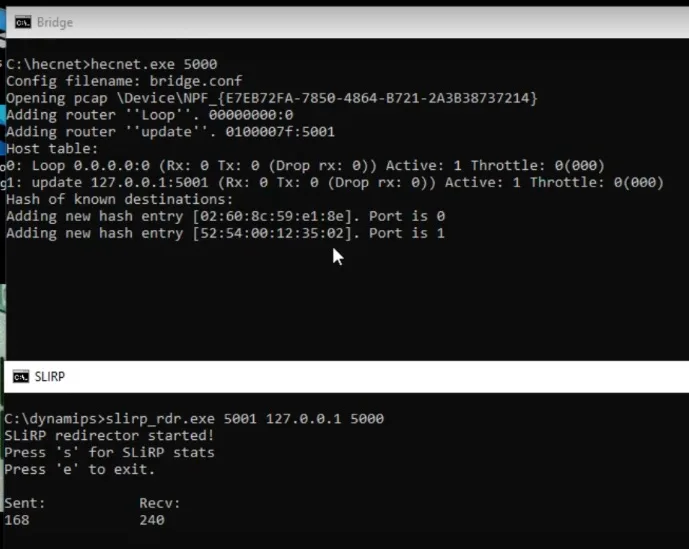
hecnet.exe 5000

Running the SLiRP redirector is just a simple matter of telling it which port to listen on, and where to forward traffic. In this case we’ll listen on port 5001 and forward traffic to 5000 on the localhost

slirp_rdr.exe 5001 127.0.0.1 5000

Thankfully, it’s that simple!

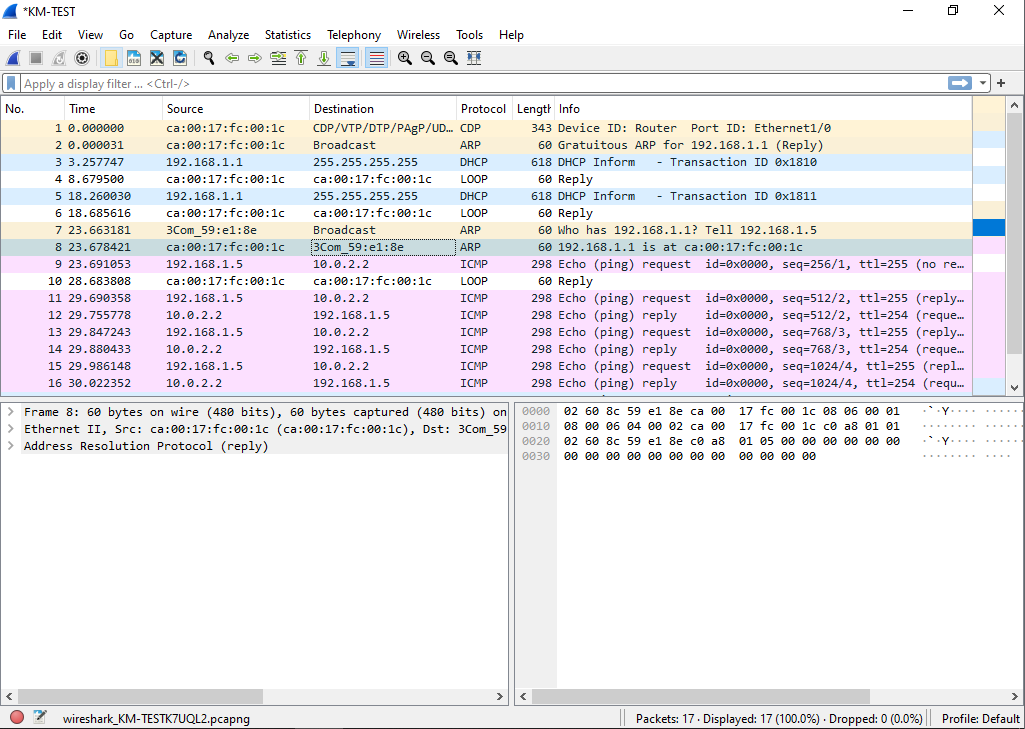
Running a ping fails (yet again) but this time we can see that they are doing ARP but for some reason PC/IP does not acknowledge the SLiRP library.

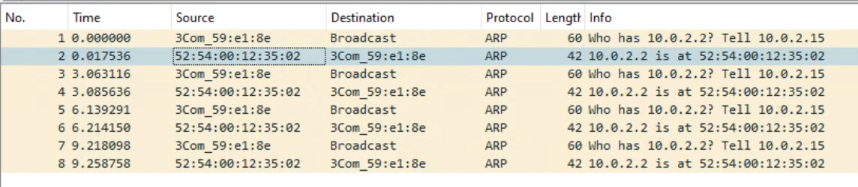
Just to verify, the HecnetNT bridge does see the source and destination address, and the SLiRP does indicate traffic in and out as expected.

Clearly the fault is on the PC/IP side, and most likely because it’s so old.

I then decided to build another network, this time using Dynamips to add in a virtual router.

Adding in a router

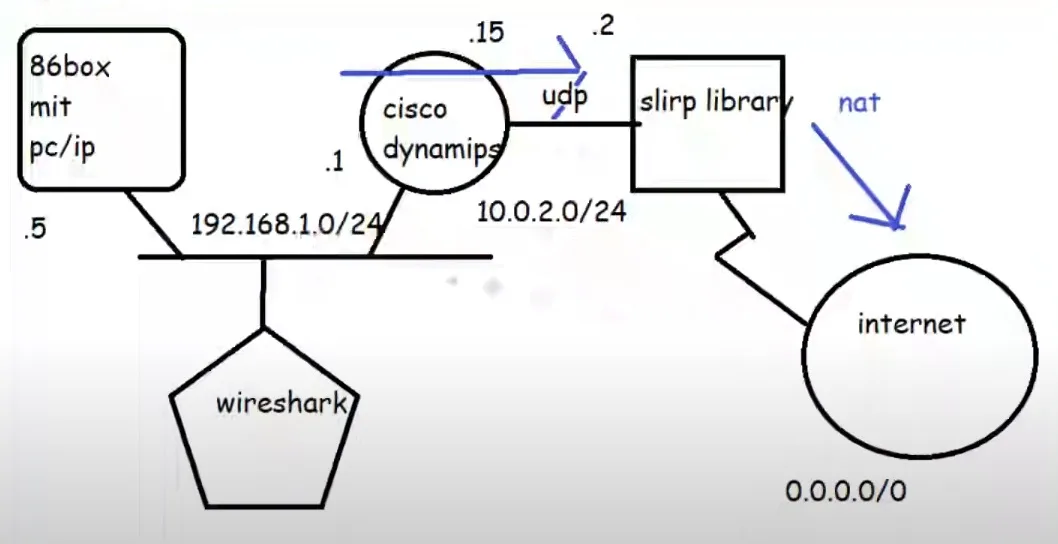
This complicates things as I’m not sure how to control the internal routing of the SLiRP library so the router has to NAT the PC/IP traffic to SLiRP, which in turn ‘NATs’ it to the internet. But rest assured double NAT (or even more) is quite common these days.

Configuring the router is somewhat straight forward, we are going to use pcap to listen on the KM TEST loopack, replacing the HecnetNT bridge. But it’s going to talk to the SLiRP redirector in the same manner:

set loopback=\Device\NPF_{E7EB72FA-7850-4864-B721-2A3B38737214}
set IOS=..\c7200-is-mz.19991126.bin
set NPE=npe-100
set RAM=64 -X

@attrib *.* -r
..\dynamips.exe -P 7200 %IOS%  ^
-m %RAM% ^
-t %NPE%  ^
-p 0:C7200-IO-FE ^
-p 1:PA-4E  ^
-s1:0:gen_eth:%loopback% ^
-s1:1:udp:5000:127.0.0.1:5001

This creates a basic 7200 router with a 4 port ethernet card, with one port connected to the KM TEST loopback, and the other connected to the SLiRP library.

Configuration of the router is not very complicated either:

!
no ip domain-lookup
!
interface Ethernet1/0
 ip address 192.168.1.1 255.255.255.0
 no ip directed-broadcast
 ip nat inside
!
interface Ethernet1/1
 ip address 10.0.2.15 255.255.255.0
 no ip directed-broadcast
 ip nat outside
!
ip default-gateway 10.0.2.2
ip nat inside source list 1 interface Ethernet1/1 overload
ip classless
ip route 0.0.0.0 0.0.0.0 10.0.2.2
no ip http server
!
access-list 1 permit 192.168.1.0 0.0.0.255
!

This defines our default route for both the routing table, and the management engine to the SLiRP library, defines the NAT inside/outside interfaces along with specifying the ‘overload’ address will be the 10.0.2.15 NAT’ing the PC/IP traffic behind the usual SLiRP user address.

Pinging the SLiRP gateway

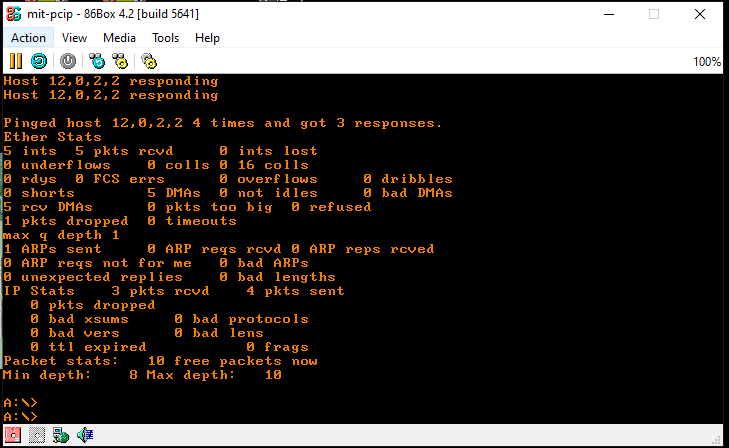
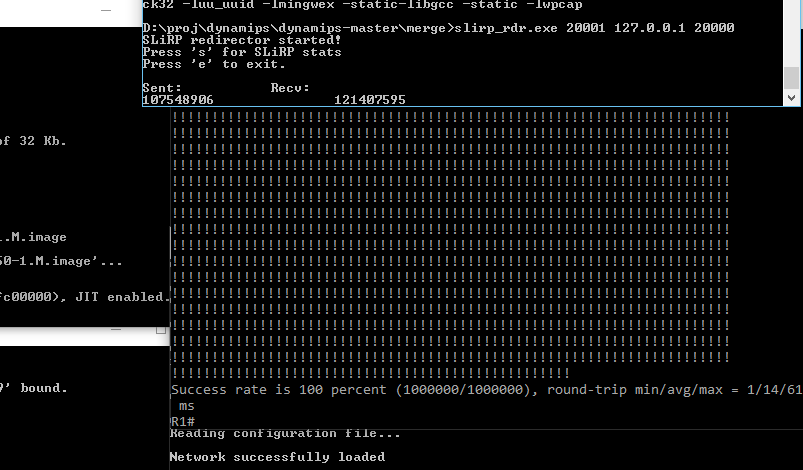
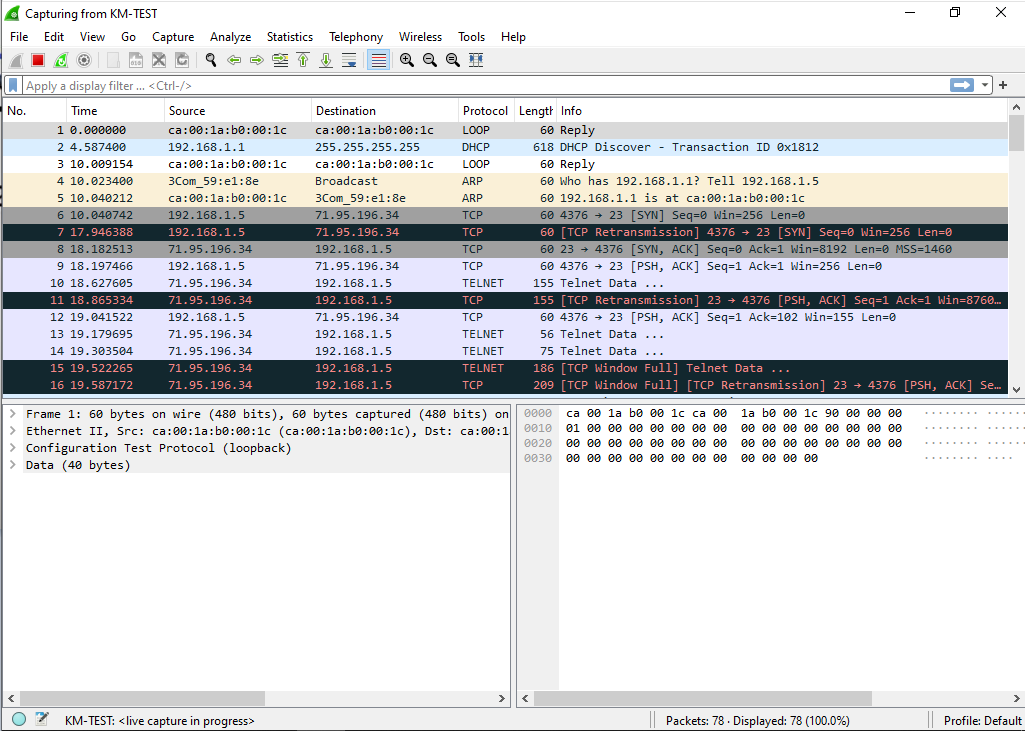
This allows us to ping SLiRP, and get the expected response.

Working ARP/ICMP with cisco router

Checking the capture, we can see that yes ARP is working as expected, and the ping works without any issues.

On the router we can see the NAT translation.

Router#show ip nat translations
Pro Inside global      Inside local       Outside local      Outside global
tcp 10.0.2.15:4376     192.168.1.5:4376   71.95.196.34:23    71.95.196.34:23
Router#

And we can also check the SLiRP redirector for information on the current session.

SLiRP redirector started!
Press 's' for SLiRP stats
Press 'e' to exit.

Sent:           Recv:
stats!          4859

Proto[state]     Sock     Local Address, Port  Remote Address, Port RecvQ SendQ
tcp[ESTABLISHED]  632         10.0.2.15  4376    71.95.196.34    23     0   600
tcp[REDIRECT]     616         10.0.2.15    23        10.0.2.2 42323     0     0

Plus, we also have the Wireshark capture going showing the start of the TCP conversation

TCP connected!
Connected to VERT

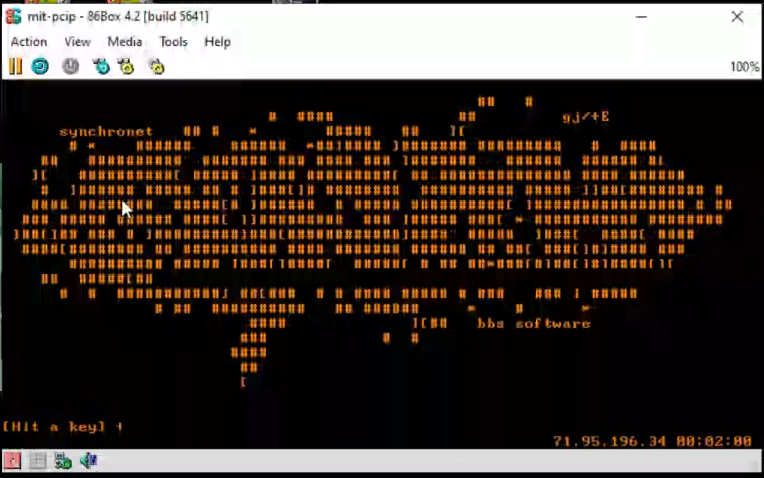
So now we’ve connected to the internet and by breaking the process appart we can now inspect what is going on, and made modifications like adding a cisco router.

I figured that this may be something that other people may be interested in, as you can build far more complex virtual networks this way!

Re-visiting the SUN-2 emulator: Adding SLiRP!

While I’ve covered Brad Parker (lisper)’s ‘emulator-sun-2before, booting into SunOS isn’t anything that new.

However, with the latest updates, from github, adding in a prior botched attempt, and some messing around, and finally, I got it to ping at first, then it was a matter of where to place the ‘slirp tick’. I first though putting it on the interface poll was a good spot, but for some reason the machine causes a deadlock/stall on boot before the PROM can even initialize. I’m not sure why. Searching further I found a good timer portion and injected the code. And sure enough I was greeted with the login banner:

I’ve been able to paste in about 100kb of a uuencoded tar file, and it didn’t lock the VM, and I was able to uudecode it, and actually build the source (Infotaskforce ’87 if anyone cares). So I’m at the point I think it’s stable enough to shove into the world, although I guess until I revisit it again.

You can download it on sourceforge: sun2.zip

Patching GCC 4.1.2 to build under GCC 8

What started as a spriling out of control build of SLiRP for User Model Linux (UML) I had so many issues with GCC 8, I figured I’d try v4 where I recall it building easily. Well that was. Fun.

Anywas I’m using Linux (Debian 10.5), and the build tools currently has me running GCC 8.3.0. Anyways a straight build introduces this fun:

../.././gcc/toplev.c: At top level:
../.././gcc/toplev.c:524:1: error: redefinition of ‘floor_log2’
 floor_log2 (unsigned HOST_WIDE_INT x)
 ^~~~~~~~~~
In file included from ../.././gcc/toplev.c:59:
../.././gcc/toplev.h:175:1: note: previous definition of ‘floor_log2’ was here
 floor_log2 (unsigned HOST_WIDE_INT x)
 ^~~~~~~~~~
../.././gcc/toplev.c:559:1: error: redefinition of ‘exact_log2’
 exact_log2 (unsigned HOST_WIDE_INT x)
 ^~~~~~~~~~
In file included from ../.././gcc/toplev.c:59:
../.././gcc/toplev.h:181:1: note: previous definition of ‘exact_log2’ was here
 exact_log2 (unsigned HOST_WIDE_INT x)
 ^~~~~~~~~~
make[2]: *** [Makefile:2064: toplev.o] Error 1
make[2]: Leaving directory '/home/jsteve/src/gcc-4.1.2/host-x86_64-unknown-linux-gnu/gcc'
make[1]: *** [Makefile:3905: all-gcc] Error 2
make[1]: Leaving directory '/home/jsteve/src/gcc-4.1.2'

Ugh isn’t this fun. Well it turns out it’s largely from the confusion from how GCC now handles inline functions.

I’ve uploaded the patch here. It’s not great, I know but I got a working C compiler out of it, however I had to manually place xgcc/cc1/cpp from gcc-4.1.2/host-x86_64-unknown-linux-gnu/gcc

Naturally YMMV as always.

I did see further hints on this ‘gist‘ that also boils down to using GCC in 1989 mode for inlines:

gcc -fgnu89-inline

And also this ‘stack exchange‘ that mentions that toplev also has issues with the same inline issues. Naturally if you just define inline to nothing you’ll end up with two floor_log2 and exact_log2’s from libiberty. And both are different. Fun times ahead!

As for slirp, well I took the version from the Debian source project, and manually applied all the patches and I ended up not only having to manually create some missing headers, but after getting it to build it’d just crash immediately. Bummer.

I rebuilt it as a 32bit exe, and wow it ran just fine. Go figure. For anyone crazy enough to want to build it on it’s own, this patch take slirp-1.0.16 to a ’17’ with all the current Debian patches, and my sad patch, was what I did to get it to compile with GCC 4. Note you will want to save aside the ‘.p files’ which are the headers, as the configure will remove them and either save them as empty files, or files that don’t work. … Well at least they didn’t work for me!

The whole thing started as a ‘oh wow Linux is now in 5.1.0 release’ and I figured the easiest way to check it out was to use UML. I found this page with a quick ‘how to build and roll’ your own UML’s, although the SLiRP config is a bit off in the host, as it should be 10.0.2.15 for the UML kernel.

The new killer feature is UML can mount a directory as a filesystem so you don’t have to mess around like crazy to make disk images. It makes the experience more docker like, which I enjoy.

./linux root=/dev/root rootfstype=hostfs rootflags=/home/jsteve/linux/linux-5.1.17/uml-demo2 rw mem=64M init=/bin/sh

So no I end up running this in the VM to kick off the required mounts and networking.

mount -t proc proc proc/
mount -t sysfs sys sys/
ifconfig eth0 10.0.2.15 netmask 255.255.255.0 broadcast 10.0.2.255
route add default gw 10.0.2.2
ping -c 2 10.0.2.2

Oh one thing worth pointing out is that 5.1.16 breaks 32bit compiles, you have to build 5.1.17 to get a 32bit kernel.

I should touch more on building UML but I’ve already sat on this for a week, and I’m too busy moving (yet again) to a smaller island. Hopefully a more peaceful one.

Added UDP to Qemu0.90

Yes, I know it’s kinda pointless as it’s horribly out of date, but I’m still having fun. Anyways now it’ll integrate with dynamips!

So yeah, in this example, instead of the usual “-net user” and the built in SLiRP stack, this uses UDP to talk to a stand-alone SLiRP stack. This will let you plug your Qemu into virtual Ethernet switches/hubs and interfaces of virtual routers. Even mixing and matching connections to different emulators that use UDP to exchange packets.

In this case I have a VMDK loaded with a NE2K-PCI driver, and QuakeWorld for MS-DOS. I also made the MPU401 external although it’s hanging on a secondary flag…

qemu.exe -L pc-bios -m 64 -soundhw sb16,adlib -mpu401 xx -net nic,model=ne2k_pci -net socket,udp=127.0.0.1:4000,remote=127.0.0.1:4001 -hda qworld.vmdk

This has the Qemu instance listen on UDP port 4000, and connect to the same physical host on port 4001.

The recipical for the SLiRP stack from my bashed Dynamips is:

slirp_rdr.exe 4001 127.0.0.1 4000

Which in this case listens on port 4001, and connects back on port 4000.

Hopefully it makes some sense to someone.

Download it, if you want!

Download Qemu090b

User Mode Linux revisited (UML) aka SLiRP networking

So my uh ‘friend’ that got into trouble when he found out that his ‘dedicated’ machine turned out to be a VM which he couldn’t launch nested KVM VM’s, and instead found that User Mode Linux (UML), would allow them to run their touchy ancient Linux application in a psudo VM/Container.  Well they finally bit the bullet and decided to move to something better.

And by better, it was cheaper.  And why was it cheaper?  Because it is even a more restricted VM.

Great.

So naturally the panic call was made, because TUN/TAP networking was not permitted in this new VM.  So what to do.

Well, keeping in mind how Qemu gets around this problem, it binds in a copy of SLiRP.  And it turns out that UML can actually call SLiRP directly!  So cool we have an ‘out’.  First things first, we need SLiRP on the host machine.  I’m old, so that means I build it from source.That means I’m downloading slirp-1.0.16.tar.gz, along with the 1.0.17 patch.  I’m not sure if I need to go into how to extract source, patch, running configure and compiling.

One thing of note is that you really really really want to set the “FULL_BOLT” option either in the Makefile, or in config.h

With SLiRP built, I just copy it into /usr/local/bin .. I’m sure there is packages and stuff out there, but heh I’m old.

OK next up I make a small script to call SLiRP, in this case, I’m going to redirect port 80 directly into the VM.  And for a test port 2323 which then goes into port 23 (why not ssh? .. sigh don’t go there).

So my script looks like this:

#!/bin/sh
/usr/local/bin/slirp “redir 80 80” “redir 23 2323”

Pretty simple right?  I’m using a script as there will be more than one VM, so relying on .slirprc isn’t a solution for me.

./linux-2.6.24-rc7 ubd0=junk.ubda eth0=slirp,,/virtual/sl.sh

And away we go!

Inside the VM we can configure it with the usual SLiRP config:

ifconfig eth0 10.0.2.15 255.255.255.0
route add default gw 10.0.2.2

And now we can access the internal http server!

Add in some magic to /etc/resolv.conf such as:

nameserver 10.0.2.3

and it’ll automatically use whatever the host is configured to do.

One million packets served!

one million ICMP packets!

Success rate is 100 percent (1000000/1000000)!

So over in my work on porting Dynamips to MinGW, I’ve created a version of SLiRP that sends and receives data over UDP.  In retrospect, something I should have done a long time ago, as it makes troubleshooting it easier as now if it were to crash it’s a stand alone program, so it won’t crash the emulator.

The good news is that I’ve been able to copy files into the virtual router using HTTP.  I’ve even been able to access my OS/2 machine over FTP and load a file!

R1#copy ftp://10.12.0.14/README disk0:
Destination filename [README]?
Accessing ftp://10.12.0.14/README…
Loading README !
[OK – 76743/4096 bytes]

76743 bytes copied in 8.740 secs (8781 bytes/sec)

R1#dir disk0:README
Directory of disk0:/README

12 -rw- 76743 Sep 18 2015 09:01:08 +00:00 README

66875392 bytes total (41652224 bytes free)

Which is very cool!

Part of the ‘trick’ is that you should set your time out to be as long as possible to send a million packets.  I just set the maximum values.

line con 0

exec-timeout 35791 23
stopbits 1

line aux 0

stopbits 1

line vty 0 4

exec-timeout 35791 0
timeout login response 300
password cisco
login

!
end

In addition, a 7200 with idle performs MUCH better than a 1700 without idle.  There is something up with ptask, and only dispatching packets every so often.  I’m guessing it’s done that way for a reason.

Also one other cool IOS trick I learned today is that you can redirect to a file resource! Say you want that ‘show tech-support’ as a file on the disk? No problem!

show tech-support | redirect disk0:tech.txt

And of course the newer versions of IOS have a ‘do’ command that you can run from config mode to execute user commands.

R1(config)#do who
Line User Host(s) Idle Location
* 0 con 0 idle 00:00:00
2 vty 0 idle 15:24:11 10.0.2.2
3 vty 1 idle 14:59:56 10.0.2.2
4 vty 2 idle 13:43:44 10.0.2.2
5 vty 3 idle 11:23:44 10.0.2.2

 Take that Junos!

For anyone interested, the binary is included in the latest binary snapshot, and using it is pretty simple:

slirp_rdr.exe 20001 127.0.0.1 20000

This will listen on port 20001, and send traffic to 127.0.0.1 on port 20000.  Easy right?

Manually interfacing from the hypervisor can be the ‘fun’ part.  I haven’t tested with any of the tools, as I don’t know if they will let you leave something ‘listening’ that isn’t connected. For my tests I end up building something with their UI, then loading up my hypervisor that logs, and seeing what it is actually doing so I can inject stuff like this:

nio create_udp nio_udp99 20000 127.0.0.1 20001
ethsw add_nio S1 nio_udp99
ethsw set_access_port S1 nio_udp99 1

This creates a udp nio, and attaches it onto the virtual etherswitch S1, and puts it on VLAN 1.  As you can see it listens on UDP port 20000, which is where slirp_rdr is setup to send it’s data to, and it’ll send to 20001 where slirp_rdr is listening.

I’ve hard coded port 42323 to telnet into 10.0.2.15.  As always SLiRP is hard coded to have the following ip address schema:

Gateway 10.0.2.2
DNS 10.0.2.3
Netmask 255.255.255.0

Be sure to set your router to 10.0.2.15/24 for this to work, and add 10.0.2.2 as your default gateway.

The ONLY address that will respond to ping is 10.0.2.2 .  This is just the way SLiRP is.  HTTP and TCP based stuff works best, things like PPTP will not.  It’s really hit and miss, but the cool thing is that it doesn’t require any device drivers, it’s all user mode code!

More progress on PCem and networking

SLiRP tcp redirects now working

SLiRP tcp redirects now working

PCem is different from other emulators in that when it starts up, reboots it’ll tear itself apart, and re-kick all the components.  Normally other emulators do this once, and as a result I never noticed that slirp_exit doesn’t actually purge the socket state.  And calling the socket teardown call causes a mbuf explosion in the code.  Sadly GDB is pretty useless trying to debug it, since it’s claiming all the structure members don’t exist.  Very strange.

Luckily I could duplicate the debug feature to go though current socket redirects, and close the sockets on the Windows side with a simple closesocket.

In this version I’ve setup the following TCP port redirects:

ExternalPORT    Internal Port
42322                 22
42323                 23
42380                 80
42443                 443

I still haven’t messed with the rc file, so there is no GUI config, instead you have to do it in the text files.  I have some notes on the whole thing on the pcem forum here.

Download the executables and source here:

http://vpsland.superglobalmegacorp.com/install/pcem/PCem-0657320820ab-pcap-slirp.7z

And for those interested, the diff against mainline 328 is here.

Adding SLiRP to PCem

So PCem is an incredible emulator for the IBM PC platform.  One thing that has been missing, and really missed has been networking.  So a while ago, SA1988 came up with a patch that incorporated the BOCHS ne2k.cc into PCem.

So as requested, I took the copy of SLiRP I’ve used in SIMH, Cockatrice and Previous, and got it working in PCem.

Telnet

Telnet from MS-DOS

This has to be one of the easier ports since PCem doesn’t use threads.  But yes, it appears to work, although I haven’t done any major testing.

For those who want to experiment, here is a binary/source blob of the project.  Right now we are just past the OMG it compiled phase to OMG it SENT and RECEIVED data phase.

If anyone wants to play, the NE2000 is set to 0x300 IRQ 10.

And you need to manually add the following to your pcem.cfg file:

netinterface = 1
netcard = 1

And you should be good to go. I think.

QuakeWorld

QuakeWorld

And yes, it’ll run QuakeWorld!

Previous 0.52 (trunk 391) + slirp

So I got this request to add in some SLiRP to Previous, the NeXT computer emulator.  Sadly work got in the way, and I trashed my windows dev machine.  To make it worse I also trashed my MacBook Air, but with a bit of screwing around I got X-code removed, and re-installed.

So Here is my wonderful work, some 50 lines of code + the SLiRP from Cockatrice all hacked up.

ICMP to 10.0.2.2 seems to work fine, UDP seems to not work, so no DNS.  I don’t know why either.  I can telnet to my BBS just fine, which is about all the testing I’ve done.

Previous to the BBS

Previous to the BBS

Inbound TCP seems to be broken too, but I could be initializing slirp_redirect incorrectly too.

In case you want to follow up on this the NeXT computer forums is the place to be.  Networking with NeXTSTEP is involved.

And for anyone who want’s my files, the source is here, and an OS X 10.10.3 binary is here.  Be sure to install the SDL2 framework ahead of time!

SheepShaver with pcap support

It "works", just incredibly slowly

It “works”, just incredibly slowly

so I got it to “work” on OS X….. well 10.6 in VMWare. I have no idea if this means it will work on your setup.

  • If AppleTalk packets get passed early in the boot stage, it will crash.
  • If JIT is enabled, it will crash
  • Performance is horrible, I’m getting 150k/sec on my LAN, Basilisk II with no JIT blows this thing away.
Honestly I feel kind of hesitant releasing this, but I know it was desired, and I guess it’ll help someone somewhere being able to have an easier conversation… So I’m going to upload my source tree, including binaries built with GCC 4.0 & 4.2 with either O2 or Os flags. I’m not sure which is more stable/faster…So here is my source tree. Sorry you still have to deal with the changing password thing, but cancel it, and it’ll tell you the password.Other lessons learned… SheepShaver’s segfault model only works when the CPU thread is the main thread. Even though you “can” stuff the CPU into a subordinate thread, it doesn’t play nice once it segfaults, it’ll just spin waiting for something that clearly isn’t going to happen.In config.h I added in USEGLOBALvideo as a way for main to call the screen update to end the vast majority of pool leakage. I also added SHEEPSHAVER_CURSOR to enable the hardware cursor. I was having some issues installing OS 8.x when the ‘hand’ was drumming the fingers waiting for the OS to install it crashed many times, while disabling the hardware cursor made it play nicer. Maybe it’s my setup, I’m not sure.

Also in this version I don’t read .sheepshaver_prefs but rather sheepshaver_prefs in the current working directory. I didn’t want to trash any other prefs. I have to test again but I think this should work on 10.10 … As I found out the hard way x86_64 binaries can no longer mess with the zero page, so this is a 32bit only build, but I was running it with my SLiRP fixes ok on my macbook air.

This hasn’t been extensively tested. I hate to even call it tested, I just copied a few MB of stuff over an NT server running AppleTalk,a nd viewed some flash video with Internet Explorer 5.1 …. I’m sure there are PLENTY of things broken. JIT should work with these binaries (Quake 1 is quite playable), but DOOM crashes hard (isn’t it a 68k binary?). DOOM runs ok on Basilisk II so does it matter?

If you want speed, JIT + SLiRP is the way to go. Since this is basically the same as the version I was using with BasiliskII I think it’s more stable than the generic version as I could at least run all kinds of programs with some of my fixes vs the ‘stock’ github version.

I should add that I’ve been primarily testing with that PowerMac 9500 v1 ROM, along with MacOS 8.6. I found 8.0 and 8.1 too unstable, 7.x & 9.0.4 uninteresting.

To get around the early crashing while booting 8.6, I rigged it to drop the first 30 packets. I’ve successfully booted 10/10 times, so I’m almost OK with that. I’d rather know when the OS is ok, and go with that, but I’m not sure. I thought about a timer, and say ignore the network for the first 30 seconds, and maybe that is the better way to go. When you launch this you’ll see some message updating about packets and “wait for 30->” and a number… once it reads “wait for 30->30” , the message will no longer update, and it’ll start to forward packets into the machine. You probably will have to disable and re-enable AppleTalk from the chooser to see the network (or I had to). You may have to get creative to generate the needed packets on your network to get it over 30, as those are packets received. Broadcast packets work too, so maybe you can work with that… As long as Sheep Shaver isn’t alone something should be looking for other devices.