Rebuilding Darwin from source: Part 3 Debian makes the world go ’round

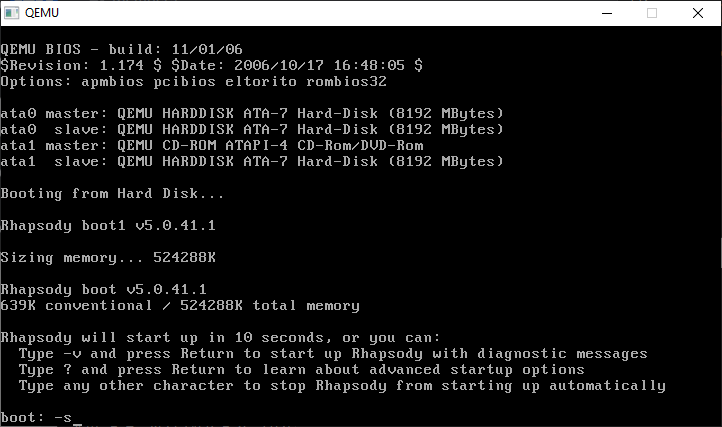
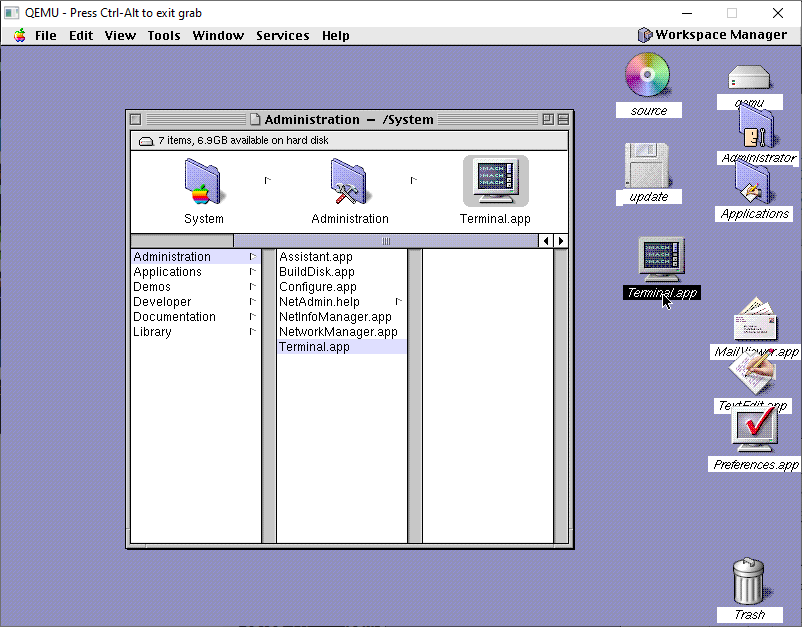
In the previous posts, we’ve gone through the excruciating fun of installing Rhapsody DR2, and of course built the Rhapsody kernel from source. But now it’s time to build the software that can build software.

Enter the apt*

Of course we can’t just start building apt, rather we need to start at the 1990’s super star scripting language that revolutionized massive, shared code libraries, accelerating web development, and building the modern web, of course I’m talking about PERL.

Even back in the original effort building Perl was a slog. Even with temporary wins with miniperl it quickly fell apart from missing symbols. When it comes to the system libraries Darwin is not complete, rather it’s a lot of amputations from OPENSTEP. Which of course, itself was amputated from NeXTSTEP. I’m not sure what held back NeXTSTEP from being ‘open’ back when ‘open’ meant published specifications, not open source, or open in any other sense of the way, like The Open Group being a gatekeeping organization that is NOT open at all.

Anyways, Perl from the Darwin 0.1 downloads & the 0.3 CD-ROM don’t build. I gave up and moved to the OS X Server version and that one did build! As much as I could diff them out and find the breaking difference, honestly, it’s just easier to stick with what works.

/pub/Darwin/PublicSource/Darwin

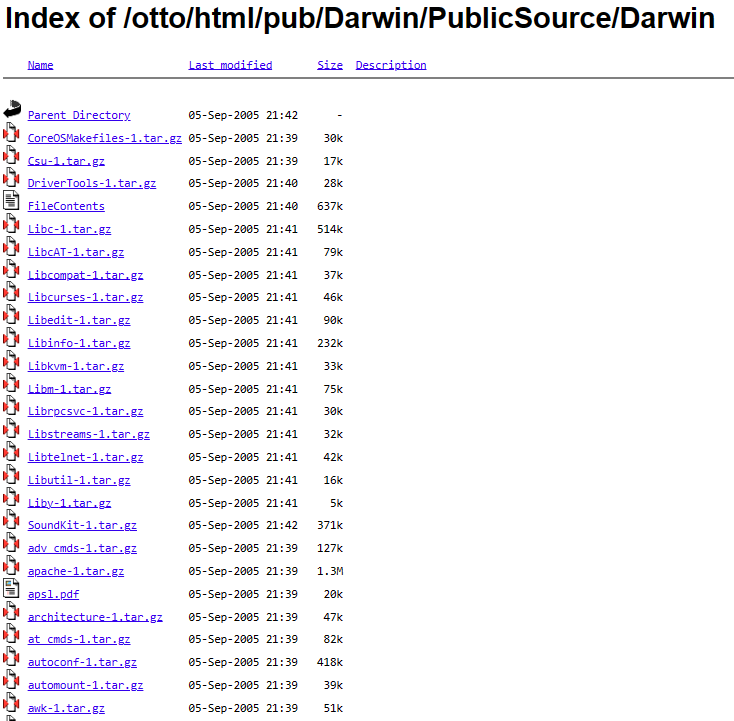
I should point out that the source to Darwin was preserved on this now defunct site “next.68k.org”, which in turn was also preserved on the defunct site “nextftp.onionmixer.net“. Amazing how mirrors go. Other fun things on the ftp site include MacOSX-Server public sources, which did include the Perl that we built.

Darwin 0.3

Darwin 0.3 however was pressed onto CD-ROM, and distributed out to the masses. It took me a short while to get a tip to a hidden server that had a copy, which really was a massive breakthrough as it had a far more complete set of files than the 0.1 ftp dump. However at the same time there are files in the 0.1 dump that are not in the 0.3. Was there ever a 0.2? I have no idea, the mailing lists don’t seem to have been preserved so I really don’t know. Does anyone have any other ftp site archives? Not to my knowledge but I’d be more than happy to be wrong.

With a working Perl the next thing to do is to patch the buildtools & dpkg to not be PowerPC centric. It’s no secret that all the official effort going on was to get OpenSTEP up and running on Apple PowerPC’s and to transition away from OPENSTEP to Rhapsody, the MacOS 8 Platinum feeling type OS, where everyone was going to love the ‘Coca’ API, and dump the old MacOS stuff or be forced to run it in the ‘BlueBox’ MacOS 8 emulator. Obviously this future didn’t happen as developers were not interested in rewriting for Steve’s decade+ fever dream of a Unix for the ‘rest of us’, instead they wanted their existing software to ‘just work’ and the Carbon API had to be created, along with a drastically different and modern looking OS X.

-    $flags->{'RC_CFLAGS'} = '-arch i386 -arch ppc ' . &liststring (@cflags);
-    $flags->{'RC_ARCHS'} = 'i386 ppc';
+    $flags->{'RC_CFLAGS'} = '-arch i386 ' . &liststring (@cflags);
+    $flags->{'RC_ARCHS'} = 'i386';

Frequently in the build tools it’s a matter of looking for ppc/powerpc and replacing them with i386. It’s really no surprise that Darwin always built on intel, and it had to, as it’s life depended on it. Back when NeXT hit their first real big stumbling blocks of being a vertical platform is that they just couldn’t compete in the hardware space. But dumping the 68k based black boxes, they could now take their software and port it to the much more coveted RISC platforms, and shipping with NeXTSTEP 3.3 they supported both SPARC & HPPA. There had always been talks of further platforms like MIPS or DEC Alpha, but these never materialized, much like the i860 which had been relegated to a simple Postscript co-processor.

Anyways.. Keeping with yesterday’s setup, and of course the .darwin-builder-04-23-2024.iso CD-ROM with all the stuff we need, let’s DOIT!

phase 2 completed

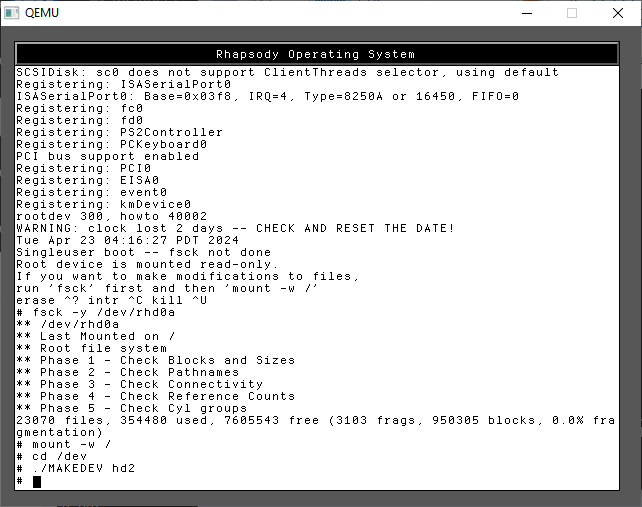
With phase 3 completed we are now ready to build the rest of the system. I hope you are excited! As I’m sure hoping you kept the original disk layout from the prior setup, or I’ve totally trashed your system by now.

I should say that deb files are just specially tagged ‘ar’ archives, that contain a data & control files telling apt how to process them. In this case I’ve taken the cc_783.1-1_i386-apple-darwin.deb file and modified it to contain the OS X 10.0 modified CC compiler. Apt had stumbled on building it, and I’m not interested into troubleshooting why or how. Basically, use ar to extract the contents of the deb, then tar to expand the data, replace the files, tar to put the files back into the data tar file, and ar to rebuild the archive.

ar r cc_783.1-1_i386-apple-darwin.deb debian-binary control.tar.gz data.tar.gz

In this case, debian-binary is a text file that simply contains ‘2.0’. Amazing!

The first thing to do is build a manifest of what needs to be built. I just simply extract all the ‘fixed’ source that I’d used last time to build Darwin, apply patches were needed, and then kick off the process with a darwin-buildall.

ls -l | awk '{print "dir /usr/src/"$9 " all"}' | tail -n +2 | grep -v gdb |grep -v cc- > /tmp/manifest.txt

In this case I skip building the C compiler, as it takes too long, and I’ve already done it. If you really want to do it, you can do so at your own leisure. GDB has issues building, and I haven’t even begun to tackle them. As you can guess the format of the manifest is pretty simple:

dir /usr/src/CoreOSMakefiles-1/ all
dir /usr/src/Csu-1/ all
dir /usr/src/Libc-1/ all
dir /usr/src/LibcAT-1/ all

Debian uses deb’s to populate a fake root directory in order to cross compile the packages. This is like installing multiple copies of the operating system, and that is why we use a separate scratch disk. This can consume several gigabytes when it’s done.

Also this presented the chicken/egg problem with how do you make debs from a system that needs debs? Thankfully NCommander had done extensive work with Debian / Canonical and was able to fake enough of a ‘build-base’ fakery that satisfied the build system just enough to start building stuff. In this weird way all roads lead back to the first build-base. Thankfully we live in the future where VMs are fast, and virtual disks are cheap.

I then create the /built directory, where the compiled deb’s will be populated, and copy in my modified compiler Debian into the built directory so that it’s used in all the compiling. On the CD-ROM I have 2 selections of deb files, the ‘deb’ directory from when I’d originally done this back in 2017, and the ‘fresh’ directory that I’ve just built. You can always manually source where the debs some come.

Kicking off the build is as simple as running:

darwin-buildall /tmp/manifest.txt /source/fresh /built

This will take.. a while. It’s a lot of files to copy & expand, and compiling takes a fair bit of a toll on the olde CPU.

By default, 118 of the 127 can be built.

  • boot-2 the sarld won’t compile as.. there is nothing to compile. I’m lost. Also some driverkit headers didn’t make it into the packe!
  • cvs-1 is upset about bison grammar not being in usr local lib?!
  • flex is also upset about bison grammar locations.
  • libgpp ppc/ppc-nextstep/_G_config.h missing?!
  • perl.. should be patched __environ vs _environ
  • bootstrap-cmds “multiple definitions of symbol _migcom_untypd_VERS_STRING”
  • volfs seems plain broken but subdirecotories okay?
  • netinfo missing netinfo.defs and headers?! arpa/nameser.h missing (can just touch)

That just leaves AppleTalk & HFS not building. Which I believe is period correct.

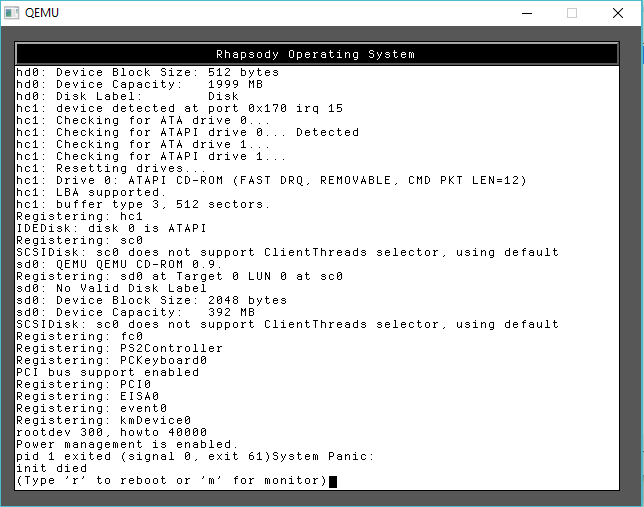
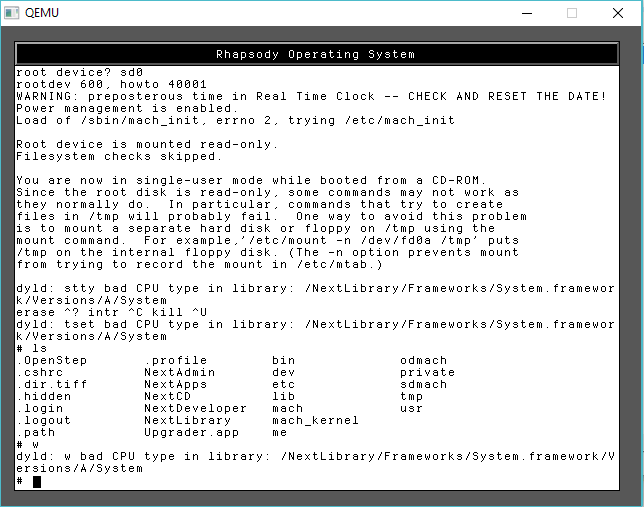
The good news is that the kernel that was built boots up seemingly fine.

Rhapsody Kernel 5.5

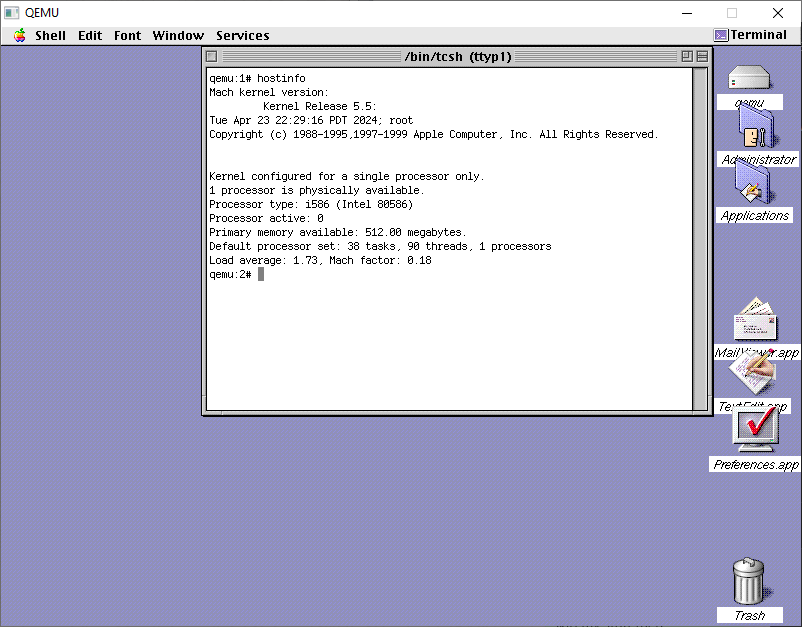
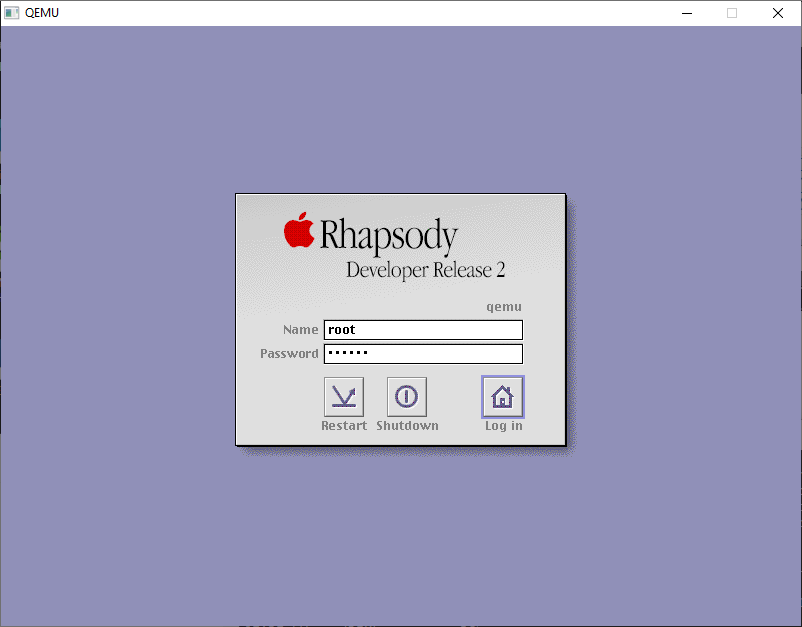
The NeXTSTEP, of course is to now setup a new disk image, and see what is involved in booting up!

Rebuilding Darwin from source: Part 2 Building the kernel

Re-creating the steps from 7 years ago the first phase was to build the Darwin kernel. Like everything else, once you know what is involved, it’s not all that difficult. But as always finding out the steps to get there is half the fun!

I’m going to assume if you want to follow along, that you’ve completed the first part of this exercise, and you have a Rhapsody DR 2 system up and running. Due to some issues I’ve had with creating a lot of files & filesystem corruption, we are going to create and add two more disks to the system. On Qemu we need to add them via the CLI:

qemu-img create -f vmdk source.vmdk 8G
qemu-img create -f vmdk scratch.vmdk 8G

Adding them to the command line gives us something like this:

qemu -L pc-bios -m 512 ^
-k en-us ^
-rhapsodymouse ^
-hda rhapsody.vmdk ^
-hdb source.vmdk ^
-hdd scratch.vmdk ^
-cdrom darwin-builder-04-23-2024.iso ^
-fda nic.flp ^
-net nic,model=ne2k_pci,vlan=1 ^
-net socket,udp=127.0.0.1:5001,remote=127.0.0.1:5000,vlan=1 ^
-boot c ^
%1 %2 %3 %4 %5 %6 %7

Additionally you’ll also need to download the current ‘darwin builder’ ISO that I’ve put up on sourceforge. As of today it is darwin-builder-04-23-2024.iso

Step one is to boot into single user mode. As we need to prep & format the disks under Darwin before the system starts up.

We need to check the hard disk, and then create the device names for the third hard disk.

fsck -y /dev/rhd0a
mount -w /
cd /dev
./MAKEDEV hd2

Now we need to run the ‘disk’ command which will abstract the whole volume creation. There are numerous flags, but we don’t need all that many.

disk -i -l 'src' /dev/rhd1a
disk -i -l 'scratch' /dev/rhd2a

The output scrolls off the screen, so I didn’t capture it, but you’ll see all the inodes being created, it’s a lot of output!

With the disks created, we can now shut down the VM

shutdown -h now

and then restart Qemu, and let it boot up normally. We’ll get to the login screen, login as the root user.

The first thing I’d recommend is to drag the Terminal.app from /System/Administration to the desktop to make it easier to get to. Rhapsody, unlike NeXTSTEP & OPENSTEP doesn’t have any dock, as the goal back then was to make Rhapsody look and feel more like Platinum MacOS.

The next thing to do is to make the system very insecure by allowing remote root logins. It’s just easier to deal with. You could use sed or just copy the one I provided from the CD-ROM.

cp /source/ttys /etc

And with that in place, its easy enough to telnet into the VM so you can copy/paste stuff in and out with ease!

You should now be able to verify that all 3 disks are mounted:

# mount | grep hd.a
/dev/hd0a on / (local)
/dev/hd1a on /src (local)
/dev/hd2a on /scratch (local)

From here it should be very simple to kick off the build process:

/source/phase1.sh

And this will kick off the build, recreating all the fun steps I’d gone through so many years ago. These projects now are building in the following order:

  • kernel-1
  • driverkit-139.1-1
  • cc-798
  • bootstrap_cmds-1
  • objc-1

The first phase of the script will unpack both the kernel & driverkit and install their respective header files into the OS. NeXT a bunch of symlinks are created to link the system to the driverkit. Next I decided to build the ObjectiveC compiler from 10.0, hoping it’s more bugfixed and slightly more optimized than what was available back in 1999. Building the compiler is a little involved, as a good GCC tradition is to be cross compiled first, then re-compile itself with itself, then do that again and verify that the 3rd recompile outputs the same as the second one. Yes it’s a thing. Yes it’s slow. Yes you are lucky to live in the future, this was really painful back in the day.

With the kernel compiled, we can then compile the bootstrap commands, and the objectiveC runtime that is used by the kernel. Nothing too exciting here.

DriverKit however….

The PCMCIA code was not included in any of the 0.x Darwins, so for laptop enthusiasts you are basically SOL. As a matter of fact, a lot of weird stuff was pruned out, that either could be ‘touched’ or borrowed from the PowerPC port and massaged into place. Luckily I had at least figured out a simple fix for PCIKernBus.h so at least PCI works.

Likewise for the kernel, there was some guessing on the EISA config, which also overlaps ISA, along with having to remove the PCMCIA cardbus .. bus.

APM crash

I had issues with the APM (Advanced Power Management), another laptopisim I suspect. I had to amputate that.

for testing purposes

Naturally the cpuid code is broken much like early NT (I wonder if both were contributed by intel?), so it doesn’t detect any half way modern Pentium processors correctly which causes it to fall all the way back to the i386, which unfortunately, Rhapsody is compiled as 486 (remember NeXTSTEP had fat binaries allowing you to recompile for different processors and ship a single binary that can be ‘lipo’d into the appropriate one for the host). So being degraded to a 386 means nothing works.

bad CPU type in library!

yay.

Luckily patching the cpuid was pretty simple just force it always to be a Pentium. It is 1999 afterall.

I’ve done my best to make this a single script to run, and all being well you’ll get something that looks like errors, but it should be fine?!

System/Library/Frameworks/System.framework/Versions/B/Headers/bsd/i386/table.h
System/Library/Frameworks/System.framework/Versions/B/Headers/bsd/i386/types.h
System/Library/Frameworks/System.framework/Versions/B/Headers/bsd/i386/user.h
System/Library/Frameworks/System.framework/Versions/B/Headers/bsd/i386/vmparam.h
private/
private/dev/
private/dev/MAKEDEV
private/tftpboot/
private/tftpboot/mach_kernel
mach_kernel
tar: private/dev: Could not change access and modification times: Permission denied
tar: private/dev: Cannot change mode to 0755: Permission denied
tar: private/dev: Cannot chown to uid 0 gid 0: Permission denied
tar: Error exit delayed from previous errors

A quick look around shows that there is tgz files indicating that things have been compiled. I did backup the old original kernel as “rhapsody-gcc.tgz” in case you ever need it. Can’t imagine why but who knows?

qemu:13# ls -l /usr/src/*.tgz
-rw-r--r--  1 root  wheel   173706 Apr 23 15:25 /usr/src/bootstrap_cmds.bin.tgz
-rw-r--r--  1 root  wheel  2184460 Apr 23 15:33 /usr/src/cc-798-bin.tgz
-rw-r--r--  1 root  wheel  2747289 Apr 23 15:36 /usr/src/driverkit-kern-bin.tgz
-rw-r--r--  1 root  wheel  1264957 Apr 23 15:26 /usr/src/kernel-driverkit-hdrs.tgz
-rw-r--r--  1 root  wheel   116343 Apr 23 15:26 /usr/src/objc-bin.tgz
-rw-r--r--  1 root  wheel  2173005 Apr 23 15:26 /usr/src/rhapsody-gcc.tgz
qemu:14# ls -l /mach_kernel*
-r--r--r--  2 root  wheel  1459520 Apr 23 15:36 /mach_kernel
-r--r--r--  1 root  wheel  1404116 Apr 23 15:38 /mach_kernel-rhapsody

You should now be able to reboot into the kernel that you’d compiled!

Next up is Phase 2, where we compile the tools to enter the dark magic that is the Debian build system. Yes, you read that right, Apple/NeXT was all in on Debian.

Porting Sarien to OS/2 Presentation Manager

Originally with all the buildup of compilers & GCC ports to OS/2, I had a small goal of getting Sarien running on OS/2. I did have it running on both a 286 & 386 DOS Extender, so the code should work fine, right?

To recap, years ago I had done a QuakeWorld port to OS/2 using the full screen VIO mode, a legacy hangover from 16bit OS/2. It works GREAT on the released 2.00 GA version. I went through the motion of getting the thunking from 32bit mode to 16bit mode, to find out that it doesn’t exist in the betas!

No VIO for you!
No VIO access from 32bit

So that meant I was going to have to break down and do something with Presentation Manager.

So the first thing I needed was a program I could basically uplift into what I needed, and I found it through FastGPI.

Donald Graft’s FastGPI

While it was originally built with GCC, I had rebuilt it using Visual C++ 2003 for the math, and the Windows NT 1991 compiler for the front-end. As you can see it works just fine. While I’m not a graphical programmer by any stretch, the source did have some promise in that it creates a bitmap in memory, alters it a runtime, and blits (fast binary copy) it to the Display window. Just what I need!

  for (y = 0; y < NUM_MASSES_Y; y++)
  {
    for (x = 0; x < NUM_MASSES_X; x++)
    {
      disp_val = ((int) current[x][y] + 16);
      if (disp_val > 32) disp_val = 32;
      else if (disp_val < 0) disp_val = 0;
      Bitmap[y*NUM_MASSES_X+x] = RGBmap[disp_val];
    }
  }

It goes through the X/Y coordinate plane of the calculated values, and stores them as an RGB mapping into the bitmap. Seems simple enough right?

  DosRequestMutexSem(hmtxLock, SEM_INDEFINITE_WAIT);

  /* This is the key to the speed. Instead of doing a GPI call to set the
     color and a GPI call to set the pixel for EACH pixel, we get by
     with only two GPI calls. */
  GpiSetBitmapBits(hpsMemory, 0L, (LONG) (NUM_MASSES_Y-2), &Bitmap[0], pbmi);
  GpiBitBlt(hps, hpsMemory, 3L, aptl, ROP_SRCCOPY, BBO_AND);

  DosReleaseMutexSem(hmtxLock);

It then locks the screen memory, and then sets up the copy & uses the magical GpiBitBlt to copy it to the video memory, then releases the lock. This all looks like something I can totally use!

I then have it call the old ‘main’ procedure form Sarien as a thread, and have it source the image from the Sarien temporary screen buffer

disp_val = ((int) screen_buffer[y*NUM_MASSES_X+x] );

Which all looks simple enough!

Y/X instead of X/Y!

And WOW it did something! I of course, have no keyboard, so can’t hit enter, and I screwed up the coordinates. I turned off the keyboard read, flipped the X/Y and was greeted with this!

Welcome to OS/2 where the memory is the total opposite of what you expect.

And it’s backwards. And upside down. But it clearly is rendering into FastGPI’s gray palette! I have to admit I was really shocked it was running! At this point there is no timer, so it runs at full speed (I’m using Qemu 0.80 which is very fast) and even if there was keyboard input it’d be totally unplayable in this reversed/reversed state.

The first thing to do is to flip the display. I tried messing with how the bitmap was stored, but it had no effect. Instead, I had to think about how to draw it backwards in RAM.

  {
    for (x = 0; x < NUM_MASSES_X; x++)
    {
      disp_val = ((int) screen_buffer[y*NUM_MASSES_X+x] );	//+ 16);
      if (disp_val > 32) disp_val = 32;
      else if (disp_val < 0) disp_val = 0;
      Bitmap[((NUM_MASSES_Y-y)*(NUM_MASSES_X))-(NUM_MASSES_X-x)] = RGBmap[disp_val];
    }
  }
Running in the correct orientation

Now comes the next fun part, colour.

I had made the decision that since I want to target as many of the OS/2 2.0 betas as possible they will be running at best in 16 colour mode, so I’ll stick to the CGA 4 colour modes. So the first thing I need is to find out what the RGB values CGA can display.

This handy image is from the The 8-Bit Guy’s video “CGA Graphics – Not as bad as you thought!” but here are the four possible sets:

All the possible CGA choices

And of course I got super lucky with finding this image:

So now I could just manually populate the OS/2 palette with the appropriate CGA mapping, just like how it worked in MS-DOS:

First define the colours:

#define CGA_00 0x000000
#define CGA_01 0x0000AA
#define CGA_02 0x00AA00
#define CGA_03 0x00AAAA
#define CGA_04 0xAA0000
#define CGA_05 0xAA00AA
#define CGA_06 0xAA5500
#define CGA_07 0xAAAAAA
#define CGA_08 0x555555
#define CGA_09 0x5555FF
#define CGA_10 0x55FF55
#define CGA_11 0x55FFFF
#define CGA_12 0xFF5555
#define CGA_13 0xFF55FF
#define CGA_14 0xFFFF55
#define CGA_15 0xFFFFFF

Then map the 16 colours onto the CGA 4 colours:

OS2palette[0]=CGA_00;
OS2palette[1]=CGA_11;
OS2palette[2]=CGA_11;
OS2palette[3]=CGA_11;
OS2palette[4]=CGA_13;
OS2palette[5]=CGA_13;
OS2palette[6]=CGA_13;
OS2palette[7]=CGA_15;
OS2palette[8]=CGA_00;
OS2palette[9]=CGA_11;
OS2palette[10]=CGA_11;
OS2palette[11]=CGA_11;
OS2palette[12]=CGA_13;
OS2palette[13]=CGA_13;
OS2palette[14]=CGA_13;
OS2palette[15]=CGA_15;
CGA on PM!

So now it’s looking right but there is no timer so on modern machines via emulation it runs at warp speed. And that’s where OS/2 shows its origins is that it’s timer ticks about every 32ms, so having a high resolution timer is basically out of the question. There may have been options later one, but those most definitively will not be an option for early betas. I thought I could do a simple thread that counts and sleeps, as hooking events and alarms again suffer from the 32ms tick resolution problem so maybe a sleeping thread is good enough.

static void Timer(){
for(;;){
	DosSleep(20);
	clock_ticks++;
	}
}

And it crashed. Turns out that I wasn’t doing the threads correctly and was blowing their stack. And somehow the linker definition file from FastGPI kept sneaking back in, lowering the stack as well.

Eventually I got it sorted out.

The next big challenge came of course from the keyboard. And I really struggled here as finding solid documentation on how to do this is not easy to come by. Both Bing/google want to suggest articles about OS/2 and why it failed (hint it’s the PS/2 model 60), but nothing much on actually being useful about it.

Eventually through a lot of trial and error, well a lot of errors I had worked uppon this:

    case WM_CHAR:
      if (SHORT1FROMMP(parm1) & KC_KEYUP)
        break;
pm_keypress=1;
      switch (SHORT1FROMMP(parm1))
      {
      	case VK_LEFT:
	key_from=KEY_LEFT;
	break;
	case VK_RIGHT:
	key_from=KEY_RIGHT;
	break;
	case VK_UP:
	key_from=KEY_UP;
	break;
	case VK_DOWN:
	key_from=KEY_DOWN;
	break;

	case KC_VIRTUALKEY:
	default:
	key_from=SHORT1FROMMP(parm2);
	break;
      } 

I had cheated and just introduced 2 new variables, key_from, pm_keypress to signal a key had been pressed and which key it was. I had issues mapping certain keys so it was easier to just manually map the VK_ mapping from OS/2 into the KEY_ for Sarien. So it triggers only on single key down events, and handles only one at a time. So for fast typers this sucks, but I didn’t want to introduce more mutexes, more locking and queues or DIY circular buffers. I’m at the KISS stage still.

I’m not sure why it was dropping letters, I would hit ‘d’ all I wanted and it never showed up. I then recompiled the entire thing and with the arrow keys now mapped I could actually move!

Roger walks for the first time!

And just like that, Roger Wilco now walks.

From there I added the savegame fixes I did for the 286/386 versions, along with trying to not paint every frame with a simple frame skip and…

Sarien for OS/2 running at 16Mhz

And it’s basically unplayable on my PS/2 model 80. Even with the 32bit XGA-2 video card.

I had to give it a shot under 86Box, to try the CGA/EGA versions:

CGA

It’s weird how the image distorts! Although the black and white mapping seems to work fine.

Sarien on EGA

I should also point out that the CGA/EGA versions are running on OS/2 2.0 Beta 6.123, which currently is the oldest beta I can get a-hold of. So at the least I did reach my goal of having a 32bit version for early OS/2.

I would imagine it running okay on any type of Pentium system, however. So, what would the advantage of this, vs just running the original game in a dos box? Well, it is a native 32bit app. This is the future that was being sold to us back in 1990. I’m sure the native assembly that Sierra used was far more efficient and would have made more sense to just be a full screened 16bit VIO application.

So how long did it take to get from there to here? Shockingly not that much time, 02/20/2024 6:02 PM for running FastGPI, to 02/20/2024 10:56 PM For the first image being displayed in Presentation Manager, and finally 02/21/2024 10:39 PM to when I was first able to walk. As you can see, that is NOT a lot of time. Granted I have a substantially faster machine today than what I’d have in 1990 (I didn’t get a 286 until late 91? early 92?), compiling Sarien on the PS/2 takes 30-40 minutes and that’s with the ultra-fast BlueSCSI, compared to even using MS-DOS Player I can get a build in about a minute without even compiling in parallel.

I’ve put the source over on github: neozeed/sarienPM: Sarien for OS/2 (github.com)

I think the best way to distribute this is in object form, so I’ve created both a zip & disk image containing the source & objects, so you can link natively on your machine, just copy the contents of the floppy somewhere and just run ‘build.cmd’ which will invoke the system linker, LINK386 to do it’s job. I have put both the libc & os2386 libraries on the disk so it should just work about everywhere. Or it did for me!

So that’s my quick story over the last few days working on & off on this simple port of Sarien to OS/2 Presentation Manager. As always, I want to give thanks to my Patrons!

NASA Saturn V LVDC

I really can’t add anything to this excellent resource for preserving the LVDC!

https://www.ibiblio.org/apollo/LVDC.html#gsc.tab=0

Note that this is NOT the Apollo guidance, rather this is the IBM provided ballistic launch programs. As told, it’d be a terrible ICBM program as it’s geared towards getting payloads into orbit, such as Skylab & Apollo.

And I really cannot add anything as I’m not an american citizen:

We’re currently treating LVDC code as if it is restricted for export from the U.S. by the International Traffic in Arms Regulations (ITAR).  If you legally qualify as a “U.S. person” and can provide evidence of that status, contact us directly to arrange to receive a copy of the code.
From the ibibilo page

Well at least it’s not completely lost as the last time I checked on this, all the LVDC’s were at the bottom of the ocean, and no printouts survived. At least some printouts have been found.

All I can do is call attention to it.

Zork for the PDP-11 / RT-11 recreated

I know this is a weird one, but I’ve always wanted to run Infocom games from ever since I found out it was a thing.

The cover of the RT-11 Zork that sold on ebay for $2,348.31

I know you maybe thinking of the FORTRAN port of the full Zork game, which does run on the same system. But this is NOT the FORTRAN reverse engineered game, rather it’s a port of the Z-Machine to the RT-11 / PDP-11.

Also this is NOT a 3rd party reverse engineering effort, it is the official Infocom Z-Machine source.

;       Proprietary documentation of:
;
;               Infocom, Inc.
;               55 Wheeler St.
;               Cambridge, MA 02138
;
;       Copyright (C) 1982, 1983 Infocom, Inc.  All rights reserved.

Yes it’s the real deal!

Ok so what or where to do this?! First you need SIMH or any other good PDP-11 emulator, a copy of RT-11, and of course the source to the interpreter oddly enough named PDP11.ZIP. Just keep in mind that this is NOT a pk-zip file, it’s a text file. It’s Macro-11 assembler source.

First you need a very simple config/type in to the SIMH PDP-11 emulator:

attach rk0 rtv4_rk.dsk
attach ptr pdp11.zip
boot rk

All being well you should boot into RT-11.

Now we copy the source into the machine through the paper tape reader. Just type in ‘COPY PC: ZIP.MAC’

.COPY PC: ZIP.MAC
 Files copied:
PC:            to DK:ZIP.MAC

.

This will create a .mac or macro assembler source file. The extension matters as it will tell the compiler what file it is and what to do. But luckily this is a single file, and assembles quite easily. As a tip to Unix folk, I found that making the assembly source in MS-DOS CR/LF made life easier.

Compiling & linking is very straightforward

.COMPILE ZIP.MAC
ERRORS DETECTED:  0

.LINK ZIP.OBJ

. 

Now we need to import a game file. I usually test with Planetfall, so I grabbed the data file, and placed it into the working directory and then attached it to the emulator

Simulation stopped, PC: 152644 (BR 152622)
sim> att ptr planetfa
sim> c


.COPY PC: PLANET.IML
 Files copied:
PC:            to DK:PLANET.IML

.

Notice the filenames are short, very 8.3 for some strange coincidence! Also I named it planet.iml, as that is what the interpreter is expecting. Now we can just run the zip and point it to the game data file!

.RUN ZIP
Line width (default is 80, end with LF for status line):
File name (current default is DK:$GAME$.IML) *dk:planet.iml
PLANETFALL
Infocom interactive fiction - a science fiction story
Copyright (c) 1983 by Infocom, Inc. All rights reserved.
PLANETFALL is a trademark of Infocom, Inc.
Release 37 / Serial number 851003

And there we go! We are now running Planetfall on our simulated PDP-11!

There is quite a few great 80’s systems in the github repository, I have no doubt the rest can be built, but I thought I’d tackle a system that was another bigfoot, a thing of pure legend!

Building MS-DOS 2.11

I thought I’d slap together some github thing with MS-DOS 2.11 that’s been made buildable thanks to a whole host of other smart people. The default stuff out there expects you to build it under MS-DOS using the long obsoleted ‘append’ utility which can add directories to a search path. Instead I created a bunch of makefiles that take advantage of MS-DOS Player, and let you build from Windows.

dos211: just the MS-DOS 2.11 sources, I re-aranged stuff and made it (slightly) easier to rebuild on Windows. (github.com)

building should be somewhat straightforward, assuming you have the ms-dos player in your path. JUST MAKE SURE YOU UNZIP as TEXT mode. If you are getting a million errors you probably have them in github’s favourite unix mode.

D:\temp\dos211-main\bios>..\tools\make
msdos ..\tools\masm ibmbio.asm ibmbio.obj NUL NUL
The Microsoft MACRO Assembler , Version 1.25
 Copyright (C) Microsoft Corp 1981,82,83


Warning Severe
Errors  Errors
0       0
msdos ..\tools\masm sysimes.asm sysimes.obj NUL NUL
The Microsoft MACRO Assembler , Version 1.25
 Copyright (C) Microsoft Corp 1981,82,83


Warning Severe
Errors  Errors
0       0
msdos ..\tools\masm sysinit.asm sysinit.obj NUL NUL
The Microsoft MACRO Assembler , Version 1.25
 Copyright (C) Microsoft Corp 1981,82,83

DOSSYM in Pass 2

Warning Severe
Errors  Errors
0       0
msdos ..\tools\LINK IBMBIO+SYSINIT+SYSIMES;

   Microsoft Object Linker V2.00
(C) Copyright 1982 by Microsoft Inc.

Warning: No STACK segment

There was 1 error detected.
msdos ..\tools\exe2bin.exe IBMBIO IBMBIO.COM < 70.TXT
Fix-ups needed - base segment (hex): 70
del -f ibmbio.obj    sysimes.obj   sysinit.obj ibmbio.exe

D:\temp\dos211-main\bios>

As an example building the bios by running make. For the impatiend you can download dos211.zip, which includes a bootable 360kb disk image, and a 32Mb vmdk!

FOSBIC1 compiler

Or Basic compiler/system in Fortran IV

I came across fosbic1 on github by accident, so intrigued by the description:

This is the FOSBIC1 compiler developed at the University of Gießen, Germany
in the late 70s for the CDC 3300 batch system.

It is a BASIC compiler and runtime system which is written in FORTRAN IV.

The text book from which the source code was copied implies that it is
a modified version of a BASIC compiler named UWBIC from the University of Washington, developed by William Sharp in 1967, for their IBM 7094.

So, without going into it much further I went ahead and made a few minor changes to get it running on Microsoft Fortran

Compiled!

Instead of some boring example, I thought I’d try some Mandelbrot, so going through this collection on rosettacode, I thought the OS/8 version looked simple enough to work with.

Sadly it doesn’t seem to be very ASCII so it doesn’t understand numerical characters. Maybe I’m doing it wrong I didn’t see anything. Just as my attempt to set a string variable to itself + a new letter then print that string strangely failed. Also it does weird stuff with strings, again it maybe me, but I’m impatient. This is terrible, and yeah I know.

                                        TESTCOMPILER -- BASIC BWL 5 GIESSEN -- VERSION 6/76-04

                   10 X1=59
                   11 Y1=21
                   20 I1=-1.0
                   21 I2=1.0
                   22 R1=-2.0
                   23 R2=1.0
                   30 S1=(R2-R1)/X1
                   31 S2=(I2-I1)/Y1
                   40 FOR Y=0 TO Y1
                   50 I3=I1+S2*Y
                   60 FOR X=0 TO X1
                   70 R3=R1+S1*X
                   71 Z1=R3
                   72 Z2=I3
                   80 FOR N=0 TO 30
                   90 A=Z1*Z1
                   91 B=Z2*Z2
                   100 IF A+B>4.0 GOTO 130
                   110 Z2=2*Z1*Z2+I3
                   111 Z1=A-B+R3
                   120 NEXT N
                   130 REM PRINT CHR$(0062-N);
                   131 IF N=0  THEN 200
                   132 IF N=1  THEN 202
                   133 IF N=10 THEN 204
                   134 IF N=11 THEN 206
                   135 IF N=12 THEN 208
                   136 IF N=14 THEN 210
                   137 IF N=15 THEN 212
                   138 IF N=16 THEN 214
                   139 IF N=17 THEN 216
                   140 IF N=19 THEN 218
                   141 IF N=2  THEN 230
                   142 IF N=20 THEN 232
                   143 IF N=22 THEN 234
                   144 IF N=23 THEN 236
                   145 IF N=24 THEN 238
                   146 IF N=25 THEN 240
                   147 IF N=3  THEN 242
                   148 IF N=30 THEN 244
                   149 IF N=31 THEN 246
                   150 IF N=4  THEN 248
                   151 IF N=5  THEN 250
                   152 IF N=6  THEN 252
                   153 IF N=7  THEN 254
                   154 IF N=8  THEN 256
                   155 IF N=9  THEN 258
                   200 PRINT 'A';
                   201 GOTO 439
                   202 PRINT 'B';
                   203 GOTO 439
                   204 PRINT 'C';
                   205 GOTO 439
                   206 PRINT 'D';
                   207 GOTO 439
                   208 PRINT 'E';
                   209 GOTO 439
                   210 PRINT 'F';
                   211 GOTO 439
                   212 PRINT 'G';
                   213 GOTO 439
                   214 PRINT 'H';
                   215 GOTO 439
                   216 PRINT 'I';
                   217 GOTO 439
                   218 PRINT 'J';
                   219 GOTO 439
                   230 PRINT 'K';
                   231 GOTO 439
                   232 PRINT 'L';
                   233 GOTO 439
                   234 PRINT 'M';
                   235 GOTO 439
                   236 PRINT 'N';
                   237 GOTO 439
                   238 PRINT 'O';
                   239 GOTO 439
                   240 PRINT 'P';
                   241 GOTO 439
                   242 PRINT 'Q';
                   243 GOTO 439
                   244 PRINT 'R';
                   245 GOTO 439
                   246 PRINT '-';
                   247 GOTO 439
                   248 PRINT 'T';
                   249 GOTO 439
                   250 PRINT 'U';
                   251 GOTO 439
                   252 PRINT 'V';
                   253 GOTO 439
                   254 PRINT 'W';
                   255 GOTO 439
                   256 PRINT 'X';
                   257 GOTO 439
                   258 PRINT 'Y';
                   259 GOTO 439
                   439 REM
                   440 NEXT X
                   450 PRINT '-EOL'
                   460 NEXT Y
                   461 PRINT 'END'
                   470 END

It runs in batches, so it’s not interactive. Very mainframe/1960’s minicomputer like. I guess it’s fitting again being in FORTRAN.

******************* EVERYTHING SEEMS OK -- LET'S GO AHEAD

                    PERCENT OF AVAILABLE STORAGE USED               31.081
                    PERCENT OF AVAILABLE DATA STORAGE USED            .000
                    PERCENT OF AVAILABLE NUMBERED STATEMENTS USED   30.294

AA    A    A    A    A    B    B    B    B    B    K    K    K    K    K
K    K    K    K    K    K    K    K    K    K    Q    Q    Q    Q    Q
Q    T    T    T    U    X    F    D    E    T    Q    Q    Q    Q    K
K    K    K    B    B    B    B    B    B    B    B    B    B    B    -EOL

I’m not sure what is up with the AA and after that, it’s all tabulated. I ended up running it through sed to remove the spaces, and using notepad to stitch the lines together. I guess I could have bash’d it some more but.. I’m impatient.

So yeah, it looks like it worked! Very amazing. And of course it’s crazy fast but that should be expected I suppose. I don’t like the hard coded table, but I just wanted to get it to generate an image.

Sadly, the author of the compiler, Weber seems to have disappeared, and the publisher Paul Haupt died in 1978, a year after this being published.

Missing Neko98

Neko on ARM

With the collapse of my vpsland archive, Neko has become lost once more again. Thankfully I had some fragment backups so I have been able to bring Neko back from the grave. again.

First I dumped everything I had over on sourceforge. With a bit more digging I found the old RISC versions as well. I even found the Itanium version, although I lost the ARM version. Im not sure I have an 8gb pi4 anymore, but I’d like to get one when/if prices stop being insane. Anyways I also uploaded the source to github, since it’s more hip and acceptable for zoomers. I do have to say the git mirror command was everything I’d hoped it’d be.

git push --mirror https://github.com/neozeed/neko98.git

It literally was that easy.

I put a binary built with Visual C++ 2010 SP1 over there too. Although if you need Visual C++ 2010 runtimes, I put them on sourceforge.

Also I should add in the settings make sure you click “Always On Top”, otherwise Neko will be hidden to the desktop surface and you won’t see him.

I hope you enjoy!

Missing link for Basilisk I found

Actually I held onto this, as I wanted to do something crazy for that Marchintosh thing but life got in the way it fell by the wayside, and well now it’s September, and I already have a Qemu instance running A/UX so my ‘at best’ hope of Basilisk II with MMU emulation is all but moot.

Captain, oh Captain!

While it may look like 2 very old emulators, which they are, the interesting thing here is that this old version of Basilisk that only has Macintosh Classic emulation is using the 68000 emulation core from UAE 0.6.8. It took a lot of downloading stuff, a lot of other nonsense, but I eventually found it, and was able to diff around to find the changes made were rather inconsequential, there by letting me rebuild UAE back on top of Basilisk.

My plan had been to either use far newer UAE cpu core, say from Previous as it has working MMU support, or Musashi.

I was building hard coded for TDM GCC 5.1.0 on MinGW. It doesn’t matter anymore but I threw it up on github since that is where all the cool kids are.

https://github.com/neozeed/basilisk-uae-merge

It’s absolutely pointless I guess, but maybe someone will find it interesting.