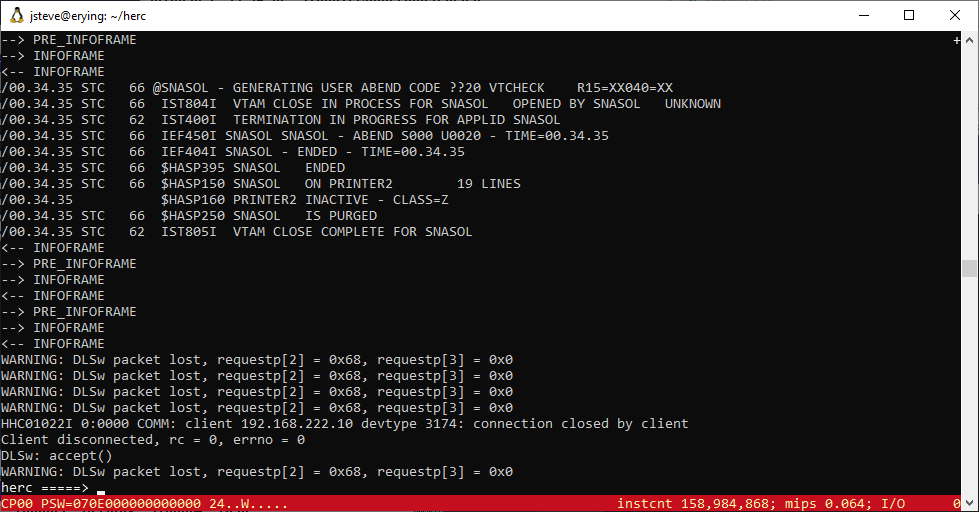
or the Unbridled rage of living on the trailing edge.
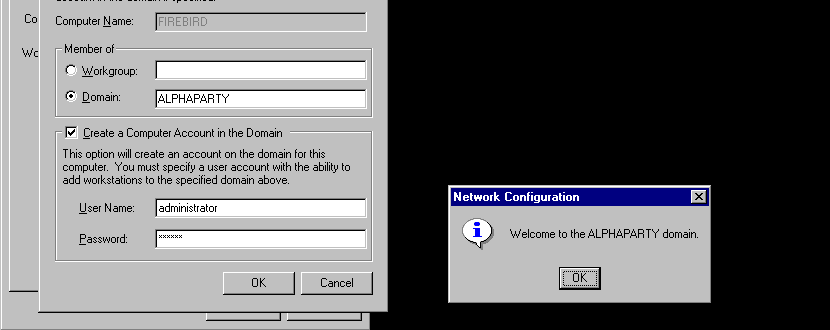
I hosted a Porting Party last where where I setup my Dec Alpha as a terminal server allowing people from all over the world to connect in and cross compile software for the 64bit version of Windows for the Dec Alpha. While many problems were overcome, and many more remain, I have to say the most annoying thing was joining a domain hosted by a SAMBA server.
In my mind, I though the easiest way to get files in & out of the Alpha was not to use something like IIS/FTP where it would probably lead to end-less issues with text/binary/active/passive modes, but rather I should rent a VPS, install the OS default SAMBA and just map drives. The benefit of the VPS is that it has a public address, so no NAT is required. The VPS had an option for either CentOS (no) or Debian 10. I went with the Debian, and did an in place upgrade to 11, then 12. Nothing special.
I’d never actually used SAMBA as a domain controller before, but I thought this would be a fun experiment. So the idea is then that the VPS running SAMBA is the Domain Controller, and my Alpha joins it as a member server. Everyone else can use Windows or any SAMBA client and map drives, and then copy files to the VPS, and then copy back and forth from the Alpha to the VPS. This part worked fine.
What didn’t work was SAMBA version 4.
I had come up with this config, based on the fragments of the default config, and and hints from samba.org.
[global]
    netbios name = PDC
    passdb backend = tdbsam
    server max protocol = NT1
    username map = /usr/local/samba/etc/username.map
    workgroup = ALPHAPARTY
    server string = Samba Server
    security = user
    hosts allow = 127.0.0.1, <<<peoples networks...>>>
    load printers = yes
    log file = /usr/local/samba/var/log.%m
    max log size = 50
    passdb backend = tdbsam
    local master = yes
    os level = 33
    domain master = yes
    preferred master = yes
    domain logons = yes
    wins support = yes
    dns proxy = no
    add user script = /usr/sbin/useradd %u
    add group script = /usr/sbin/groupadd %g
    add machine script = /usr/sbin/adduser -n -g machines -c Machine -d /dev/null -s /bin/false %u
    delete user script = /usr/sbin/userdel %u
    delete user from group script = /usr/sbin/deluser %u %g
    delete group script = /usr/sbin/groupdel %g
[homes]
    comment = Home Directories
    browseable = no
    writable = yes
[printers]
    comment = All Printers
    path = /usr/spool/samba
    browseable = no
    guest ok = no
    writable = no
    printable = yes
[public]
    comment = share for everyone
    path = /public
    public = yes
    writable = yes
    printable = no
    creaet mask = 0777
I had endless issues with the machine account not being either created correctly or not being authenticated. I tried manually creating it, to no avail. No matter what I tried it didn’t work.
Working with NT 4.0 must be depreciated or something but no matter what I tried IT JUST DIDN’T WORK.
Feeling outraged, I purged the old Samba, downloaded the source code to 3.6.25, built that, and using the same configuration I had tried to put together, it just worked.
Creating both a Linux user & directory, and the SAMBA credentials. On the terminal server, all that remains was assigning a local home directory & profile directories, as you really don’t want those over the WAN.
I have no idea if this is a warning to others, or whatever the larger issue is.
Porting Party II
At any rate I’ll be running another porting party this coming weekend. I can host cross compiling fine, but we need people with the 64bit Whistler beta installed to test. The best way to get details is over on discord. Lately the IRC bridge is down more than it’s up, and I can’t effectively send out passwords & get your network block to allow access to the RDP, since I’m not going to open up worldwide access to a Windows NT 4.0 SP5 machine.
Porting Party II
So for anyone interested in porting their C/C++ to either the 32bit Alpha Windows, or 64bit Alpha Windows come join us on discord!
I’ll fire up the Alpha on Friday afternoon GMT and expect the event to run all weekend!
First thing to take care of, is if you have the old pcap on Windows running around. If you have it, you’ll know as you’ll get spammed with “FATAL Bad Memory Block.”, although things will continue to operate just fine.
Win10Pcap!
C:\dynamips\netware\qemu-0.90-pcap-client>qemu -m 16 -L pc-bios -M isapc -hda client.disk -soundhw sb16,adlib -net nic,macaddr=52:24:00:22:00:01 -net pcap,devicename={BFA868ED-E508-4436-B085-EC815C4C544C}
Eth: opened {BFA868ED-E508-4436-B085-EC815C4C544C}
Could not open '\\.\kqemu' - QEMU acceleration layer not activated
FATAL Bad Memory Block.
FATAL Bad Memory Block.
FATAL Bad Memory Block.
FATAL Bad Memory Block.
So be sure to dump that for the one over on npcap!
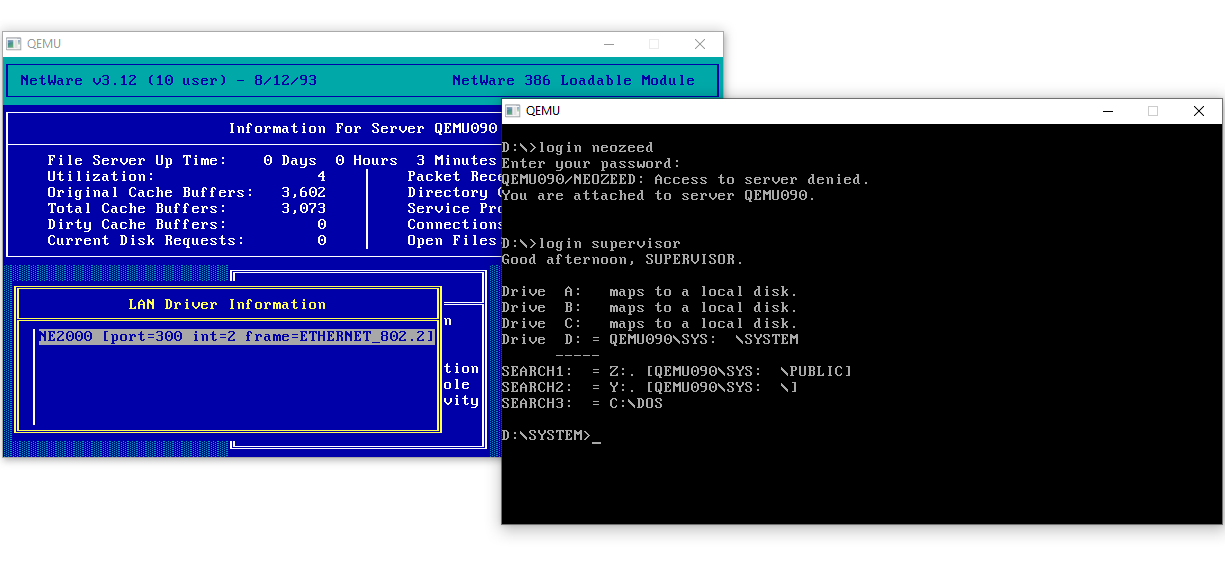
The old times, actually running Netware 3.12
There was a time when Windows NT didn’t dominate the 1990’s data centre. Instead as a carryover from the 1980’s the majority of corporate LANS were instead based on Netware. And the only way Windows NT was going to make space in this environment was to dress up in sheep’s clothes and mingle among them unnoticed. That brings us to this GEM:
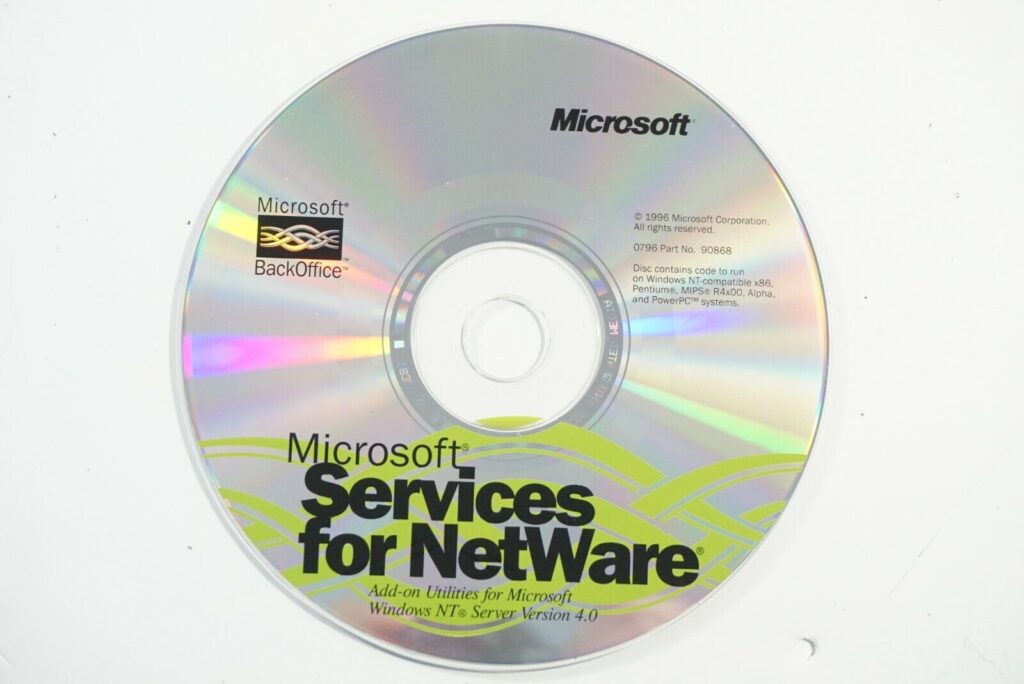
Services for NetWare
This fun CD will let our NT 4.0 server emulate a NetWare server! The first thing in one of these stealth migrations was to just join the existing network.
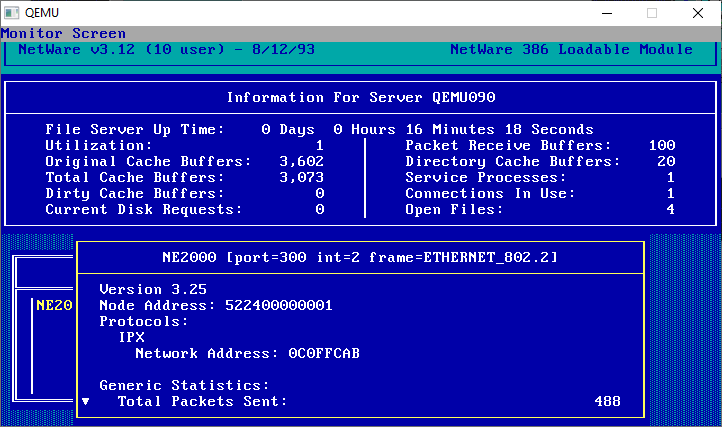
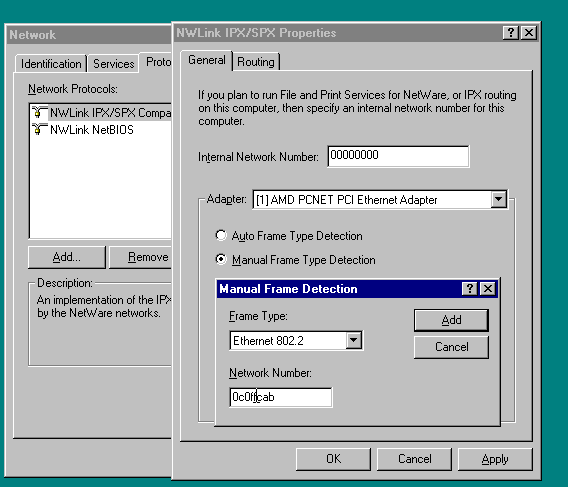
The existing network is 0C0FFCAB
In order to do this, the two bits of information we need is the frame type, since NetWare supports so many, and the network address. In this case its 0C0FFCAB.
default IPX is no good
By default the NT server will just listen to the network, and participate on what it sees. This is fine if you are just playing along as a dynamic node, but being a NetWare node requires you to step it up, and have these values set, as it is very possible that you could be the first one (or only one) live on the network, and you don’t want clients trying to think on their own.
I also gave mine an internal network number of 1381, because you know, it’s NT 4.0.
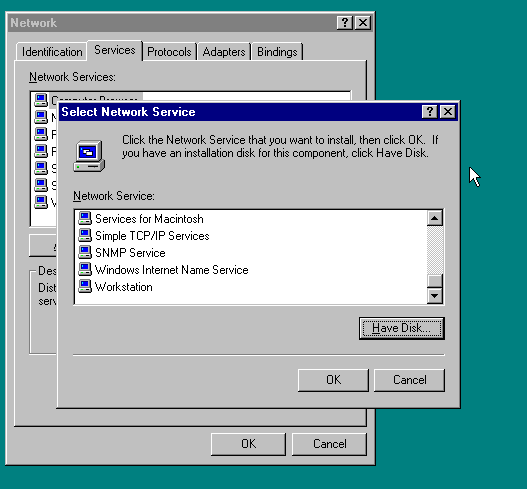
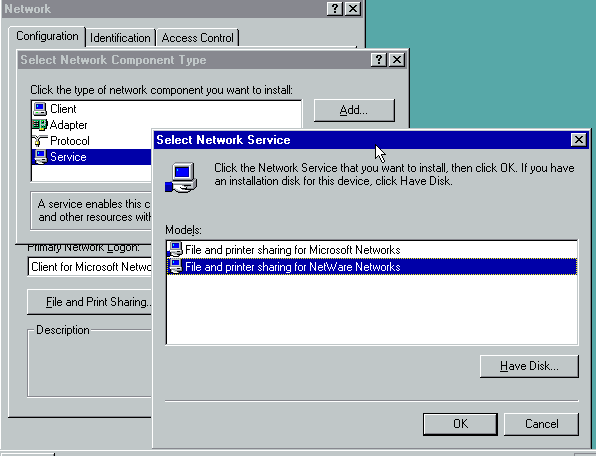
To add the FPNW, you need to add it as a new service. Just tell it you have a disk
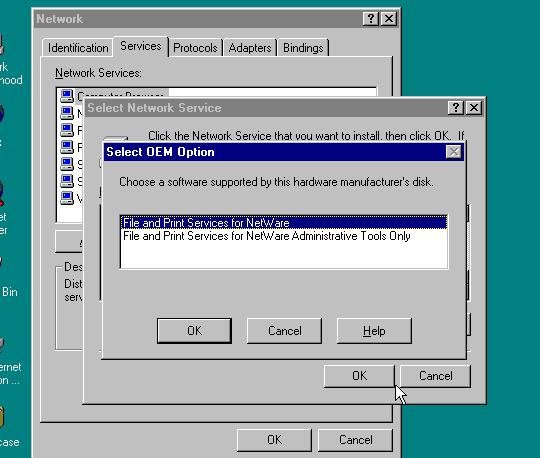
You’ll then have to point it to the path of the install. This is honestly the hardest part.
Selecting the first option will install the NetWare Server emulation on the NT server.
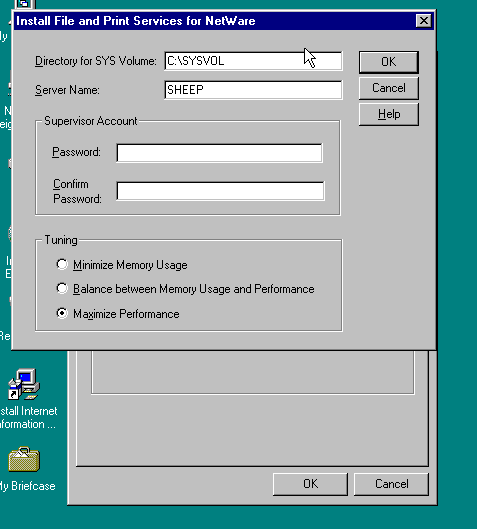
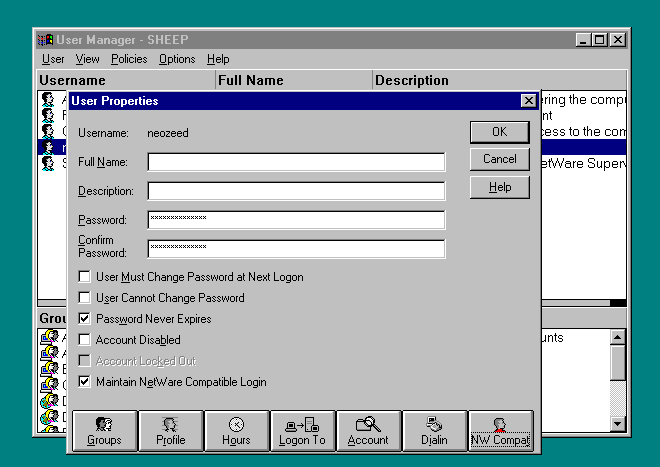
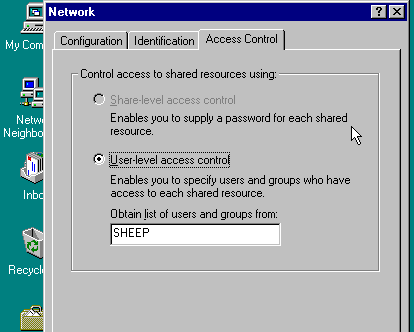
I went ahead and named my NetWare emulation as SHEEP, as I NT to blend into the existing NetWare network, with nobody being the wiser.
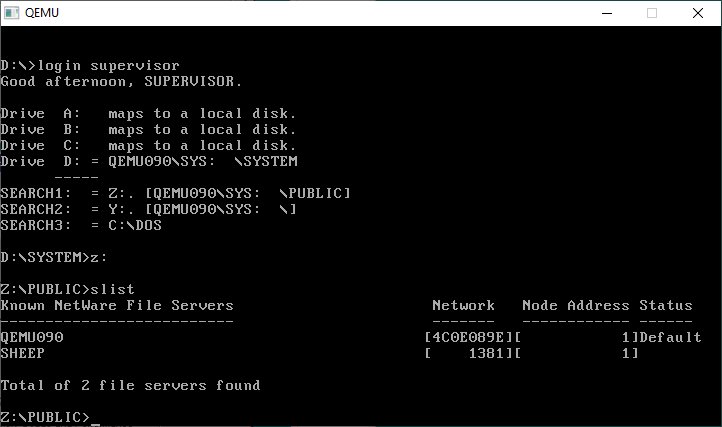
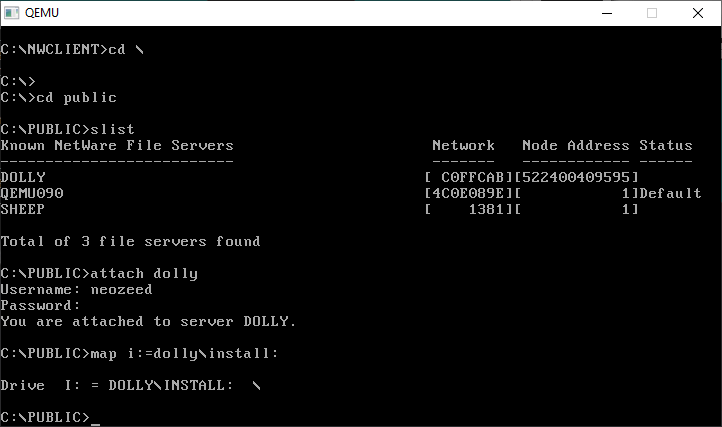
indeed, on our client that was already connected to the Qemu server before I built WOLF, I ran an slist command to show all the servers on the network, and there is my Wolf in Sheep’s clothes.
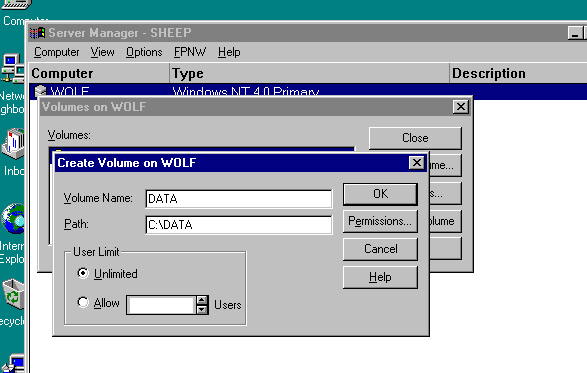
Creating NetWare compatible volumes is done in the Server Manager, under the FPNW option. It’s pretty self explanatory, nothing too exciting there.
The truth is during the period where this was important the NT 3.51-40 timeframe, NetWare was still a dominant force. But once Windows 95 had launched, and the explosion of people wanting MORE, the natural interest of people going to NT was just amazing to see in corporate space. While there was an early beta of the newshell for NT 3.51, when NT 4.0 shipped it was just amazing as all the reservations for running NT had just evaporated. We’d gone from hiding among the sheep to full on eating them all. It was staggering how fast we were backing up NetWare volumes to only re-format the servers to NT, and get people converted to using them. Before NT 4, the consensus was that rolling out the client config was going to be a nightmare, and that being able to emulate NetWare was the way to go, as it would just work (see the MS-DOS VM talking to NT with an unmodified NetWare client). Instead we saw a massive drive to Windows 95, which ended up changing the client landscape and upending NetWare completly.
About the most difficult thing was user mappings, there was tools to do this kind of thing, and I believe we had something to even proxy passwords, but it was easier to make people just login to the NT side.
Of course this is ONE of the emulators, you might be asking, okay, what is the other?
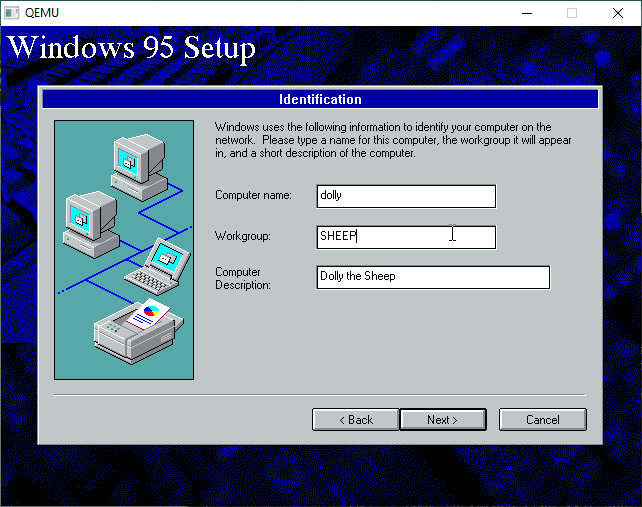
Why, it’s WINDOWS 95.
YES.
I’m joining the NT domain for the full experence, but the NetWare emulation relies on NetWare servers for authentication. You could use an actual NetWare server, or of course a FPNW server.
Adding file and printer sharing for NetWare workgroups under Windows 95 is done by adding a Service to the network stack. It’s even on the floppy version.
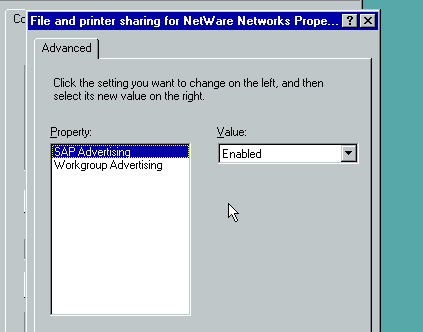
To maximize the functionality and the pain, be sure to turn on SAP Advertising. This way it’ll appear in server lists.
SAP on!
So with all of this in place, yes you can map drives from the MS-DOS client to the Windows 95 workstation acting as a server.
Mapping a drive on 95, authenticated by the WOLF hiding as a SHEEP
And there we go, I can now see the Windows 95 workstation on the SLIST, and connect and map drives. My user account of course exists on the NT side.
While professionally I didn’t rely too much on this feature, but it was nice in that era where you still had MS-DOS/MacOS/OS2 desktops with NetWare clients to quickly share stuff. But in a large organisation this would lead to major issues.
The fundamental flaw in NetWare is that there is no directory service. Instead, all the servers have to broadcast that they exist, along with what services they provide.
On my tiny demo network this isn’t that much traffic. But on a larger network that spans continents this becomes a problem. With thousands of servers there can be an incredible amount of this SAP announcement traffic. Since there is no directory service, the other problem is that when a new client is booted up, it’ll do what is known as a GNS or Get Nearest Server request in order to find the closest server to attach to, in order to facilitate a login. And EVERY server will reply.
And as you can see some servers even will reply more than once. And this can have other effects where people reboot servers during the day, something that is very natural for a Windows 95 user, which could create issues for other users, even forcing them to reboot! And yes, anecdotally I ran into this so many times where people with laptops with this feature turned on, and they would screw up the local office building (impacting hundreds of people). Even when they weren’t winning the GNS elections.they are still generating extra traffic, and occasionally they will win. This was another problem we had with all these wolves hiding in sheep’s clothing.
In the end, NetWare was utterly removed from the data center’s by the end of 1997. Windows NT just scaled too well for SMP and large disks (I had one server with 1TB! It was using 4GB disks it was massive!), along with being able to easily install stuff like SQL Server & SNA Server, unlike NetWare where any NLM conflict will bring the entire thing down. Not having a name lookup server was a giant pain, but the final nail was also in 1997 with the rise of the internet, and normal people now getting involved the entire LAN/WAN was going TCP/IP, where it had only been a fringe protocol used for managing cisco routers, and tftp/ftp some files around, Windows NT’s ability to encapsulate named pipes, and NETBIOS over TCP/IP let them embrace this new world where the TCP/IP stack on NetWare 3.12/4.11 was only good for sending SNMP alerts.
But don’t cry for NetWare, they made so much money they were able to coast for decades before being bought out in 2010 by a Mainframe Terminal Emulation company of all things, The Attachmate Group, who was later in turn bought out by Micro Focus, a COBOL language company. I guess in the end, the Mainframes won?
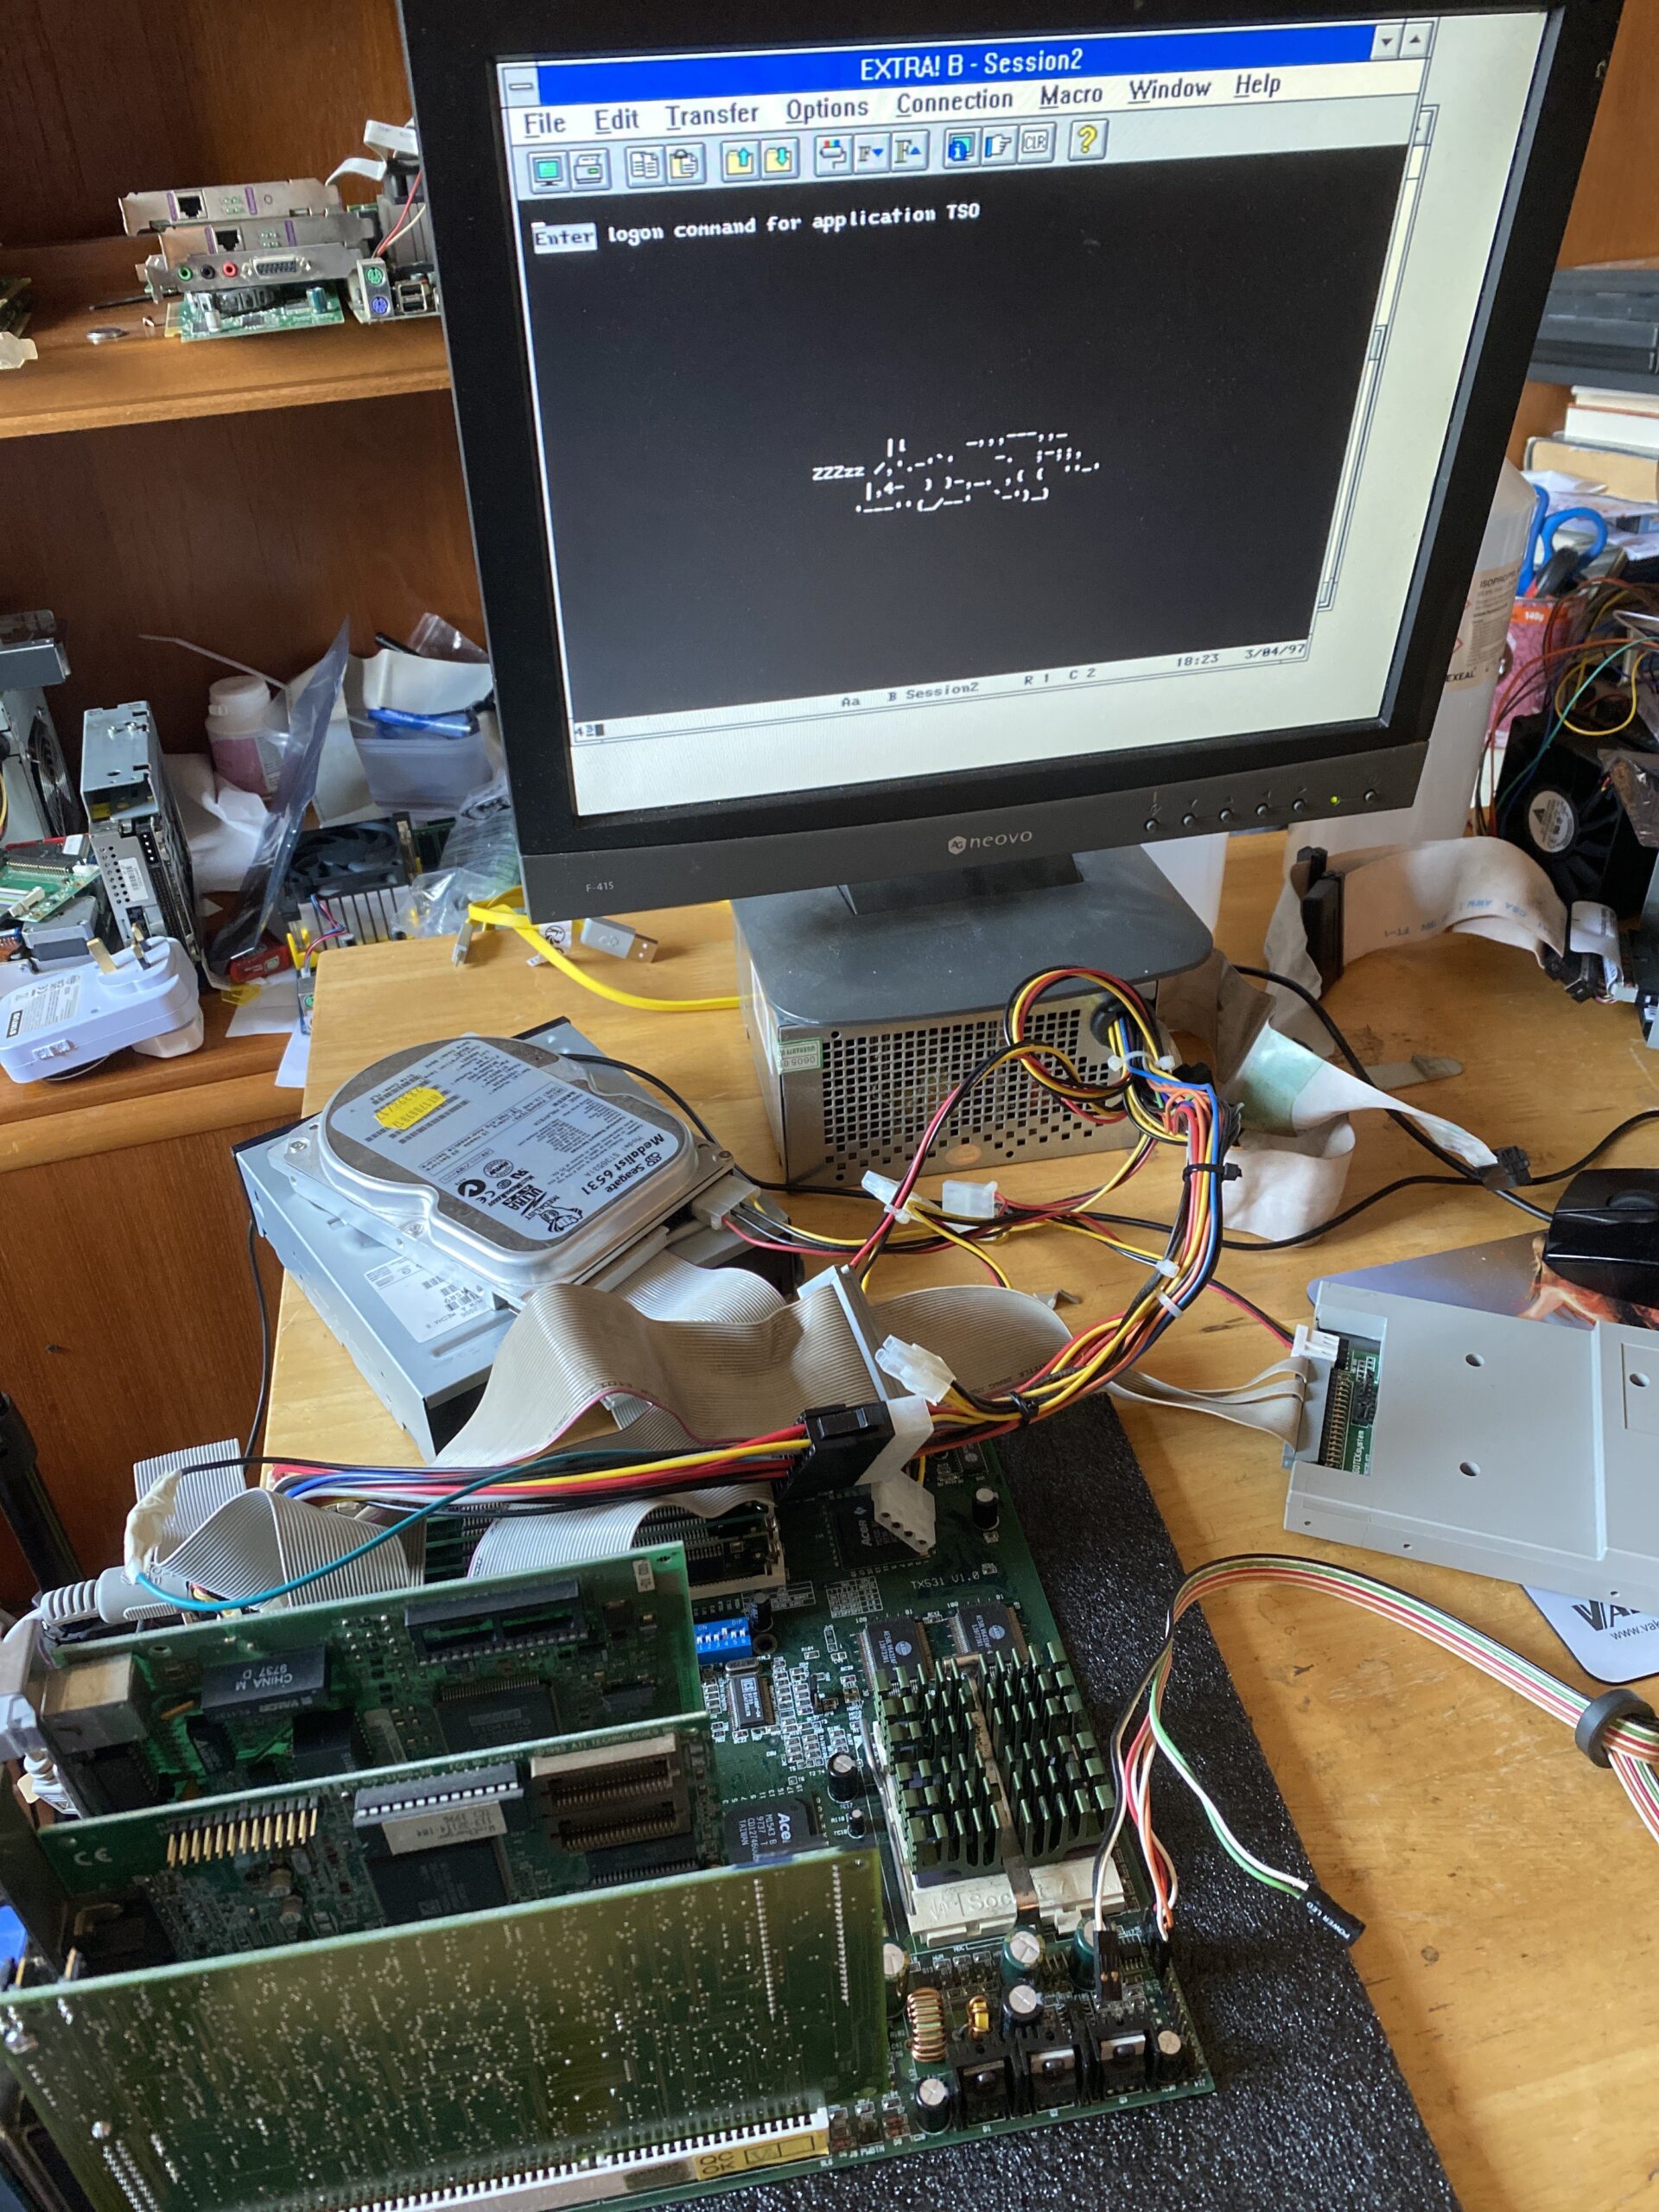
So I have been fighting the Mainframe thing for a while (see part1/part2) and getting nowhere. I couldn’t shake the feeling that it was working, but something on the mainframe side was broken. I just don’t know enough about MVS/VTAM on the host side. Although I have setup and deployed quite a few cisco routers in production doing remote ring groups, translational bridges, and the like, a DLSw connection to SDLC was something I’d never done as I’d always had direct token-ring access to the FrontEndProcessor.
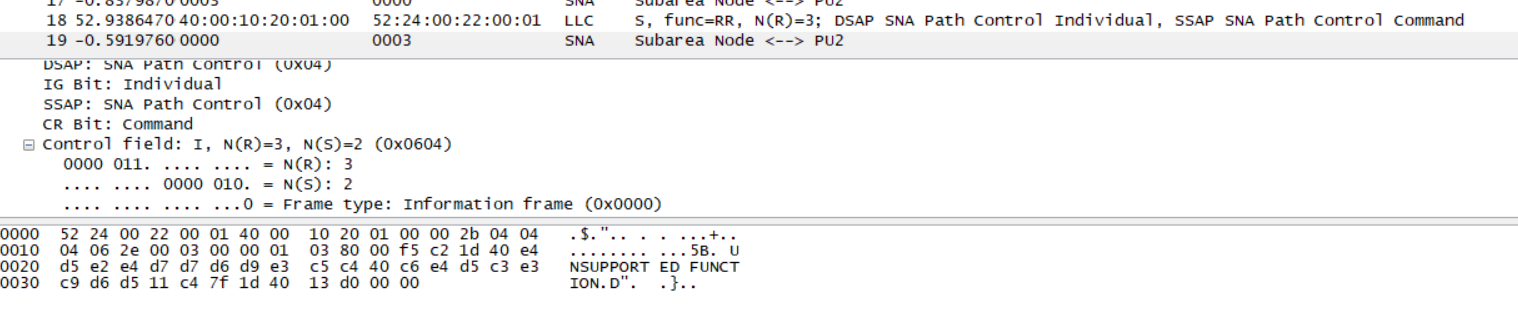
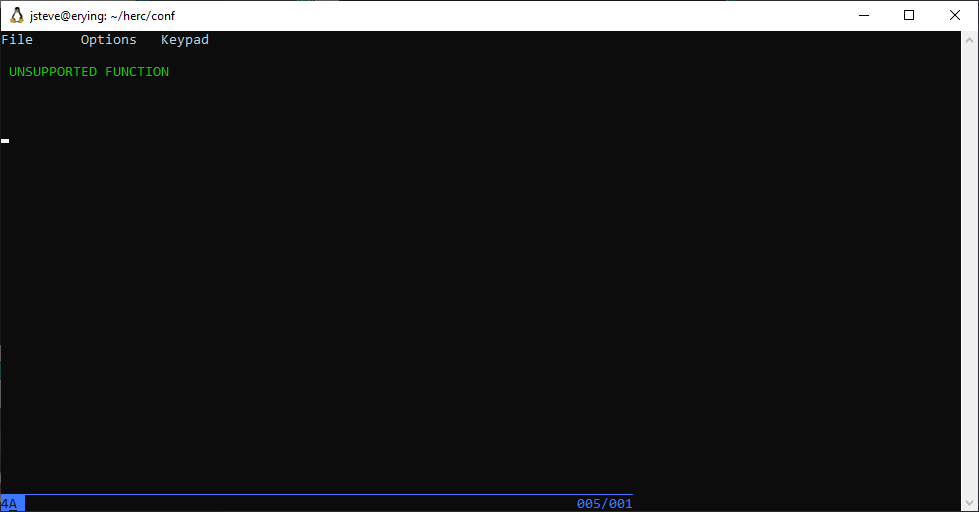
On suspicion that I’ve been talking to the mainframe the whole time is that in the packet trace from Microsoft SNA server I’d see the string UNSUPPORTED FUNCTION in the capture.
The LU goes online, but there just isn’t anything to be displayed. Traffic is constantly flowing but it’s always the same, a blank dead screen.
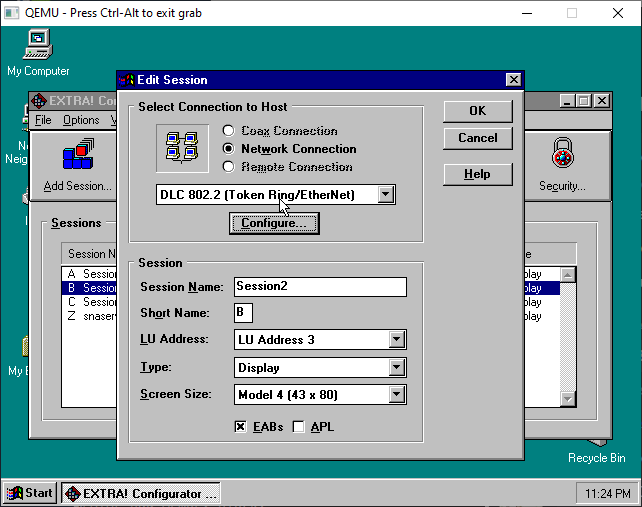
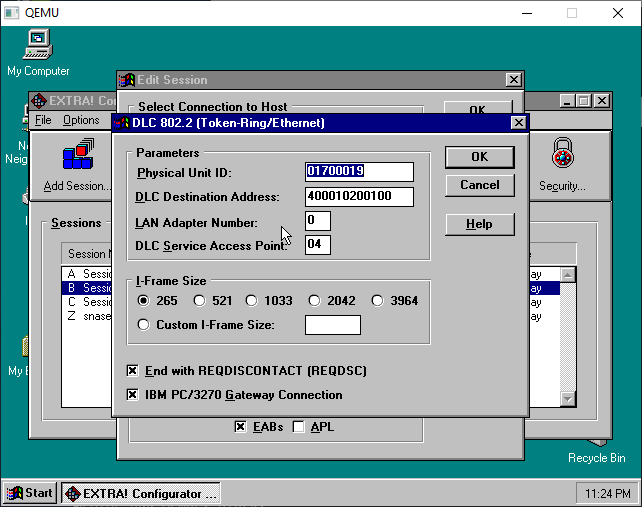
On a fluke I had spotted a copy of Attachmate Extra! 4.20 on eBay for $10. I was able to get someone to get it for me, and fence me a copy of the disks. Configuring Extra isn’t too involved, just set the terminal to type 4, and using the same block/destination address as all the others:
LU #3, and Model 4!
With the usual restricted I-Frame (MTU), and I turned everything on feature wise (it didn’t matter)
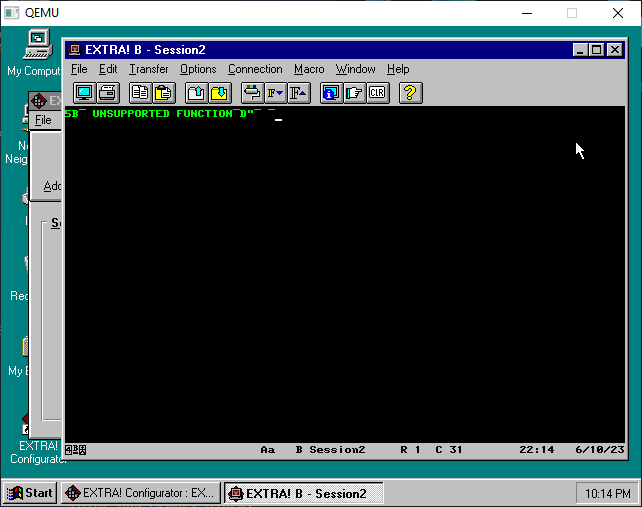
I had fired up both OS/2 & NT and with the same empty screen showing nothing. Next I loaded up Extra on Windows 95, and got this:
Unsupported Function
Well that was unexpected!
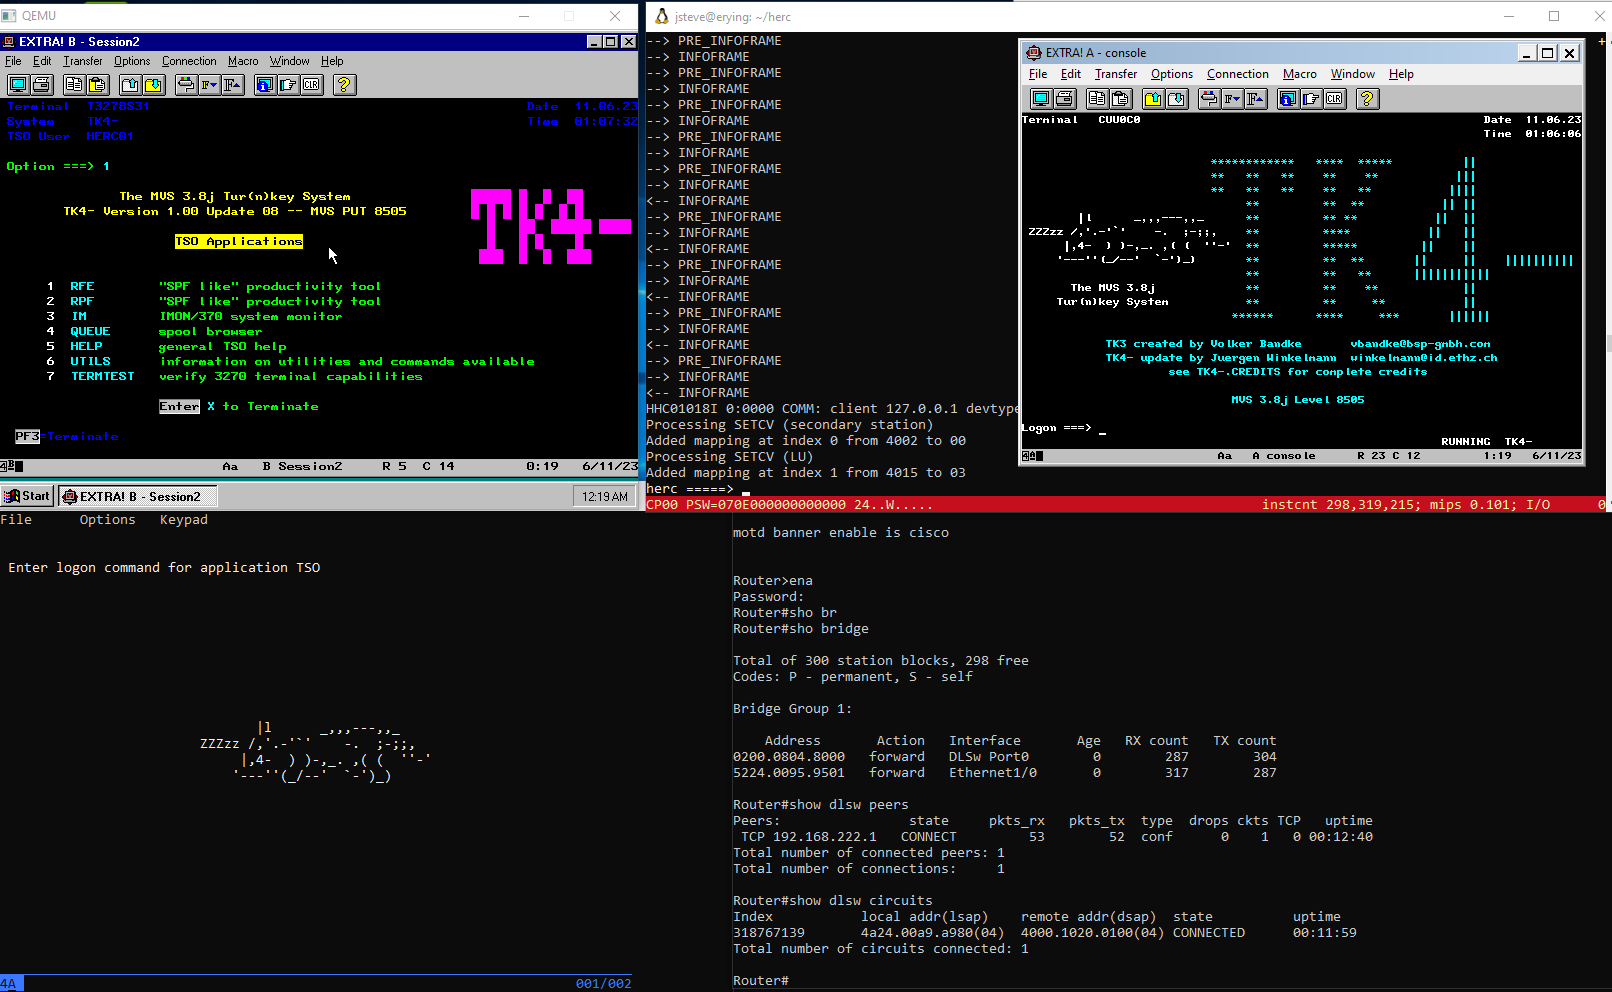
The 3705’s on Hercules can be connected to direclty, so I try c3270 and get this:
Wait, so my suspicion was right?!
I reset the mainframe, and then was greeted with the cat!
Finally!
So what was wrong?!? I’m still not so sure, but turning off the debug on DLSw, let me see that both OS/2 AND Windows NT crash out SNASOL with an abend code of U0020.
I’m sure it means something to someone, but not to me. So this is one of those ‘dont do that if it hurts’ type things.
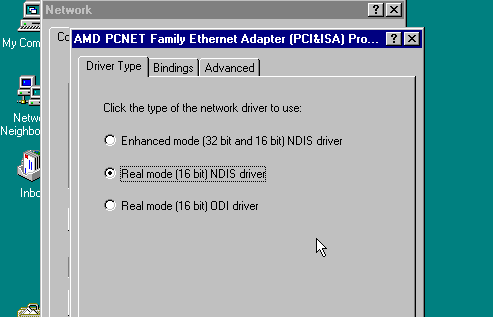
Since I had used Windows 95, as I figured it had more robust networking support than Windows 3.1
Setting up Windows 95 was a minor challenge as Extra! 4 is a Win16 application, and it’s DLC/802.2 support requires you to knock down the 32bit networking support to instead use the 16bit networking drivers. This is what let Extra! attach to it. Of course the following updates/files are needed for Windows 95 on Qemu:
the AMD PCnet driver is built in, so it works the best. Again, I have Dynamips & Qemu using the Microsoft Loopback as their common network, so I can do packet captures, and they both can communicate on the network.
So, of course the other question is, does it work with physical hardware?!
And YES it does!
If anything, using a terminal emulator that doesn’t crash out the host makes it seem all too easy. While I’ve seen SDLC PCI cards on ebay they are rather expensive, and does the ISA card really add anything that you could get over the LAN? Honestly no. Back in the day it really was just what you could get a hold of, and of course logically (virtually) setting stuff up made the 802.2 stuff all the easier to do, instead of leased lines, physical v35 cables, and all that other fun stuff.
With everything said & done, if you want to experience some pseudo fake SNA, go virtual. It’s far more portable, less cables involved, plus it’s self-contained making it more of a conversation piece.
All the hard work is being done by IOS, and it’s functionality like this is why cisco had established itself as king of the multiprotocol networking world. But everything is TCP/IP these days, and Cisco doesn’t commend the same enterprise place as it had once before, making this whole thing a middle point relic of the past. It’s far too new for real FEP/DLC networking, but everything now is TN32720 (telnet 3270).
I guess as a tip for people who buy physical routers is that those super expensive PCMCIA flash cards aren’t needed as long as you have enough RAM. One cool feature of the cisco routers is that the power on bootrom loads up a ‘boot’ version of IOS that is either also burned on ROM, or it’s also in FLASH. You have to remember it was super expensive back then so it may be only a few megabytes of space. The boot IOS can’t route or do anything too useful but it can load the proper IOS from various network sources into memory. My 7200 has one that supports FTP, so I could just drop IOS onto an anonymous ftp server at home.
I guess my ‘old man yells at the clouds’ is that I’ve had to deal with some bug in a remote site where the router didn’t have enough flash to store the image, and the Ethernet cards were too new for the boot IOS to drive, but we had an async card that did work, so I rebooted it to load production IOS over a T1. This one didn’t support FTP, rather it was TFTP, and it took about an hour to load. During that much time I didn’t have console access so I was getting ready to drive the 5 hours to the site, when I barely got onto the highway when I got the call that my ‘fix’ had worked and that the site was online. YAY.
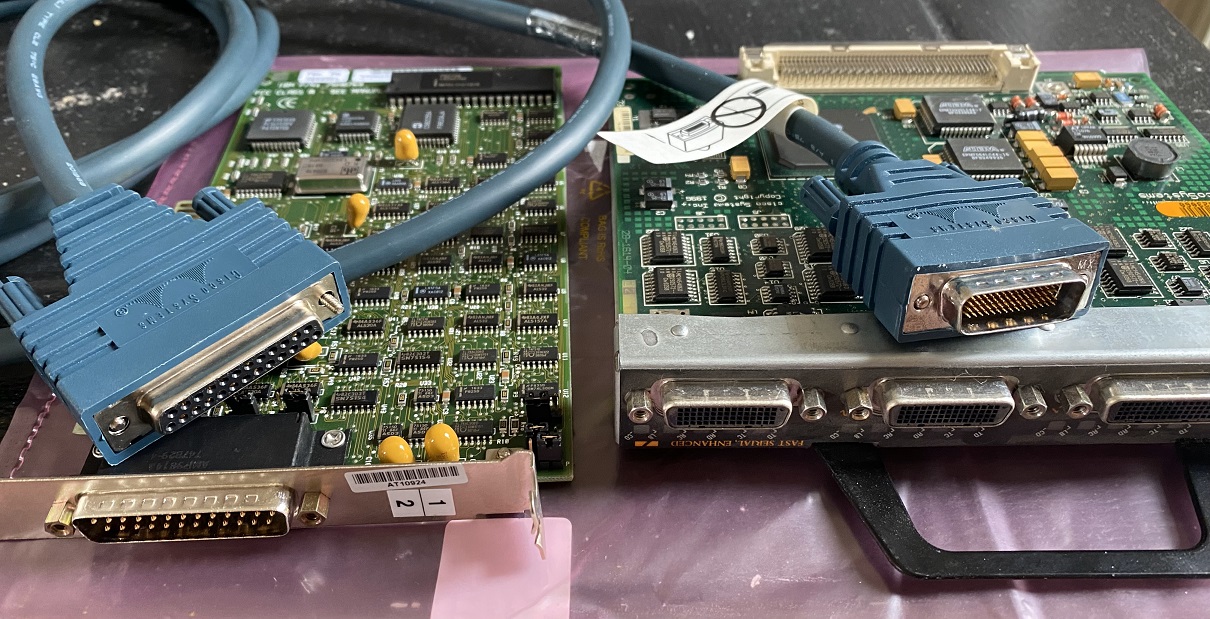
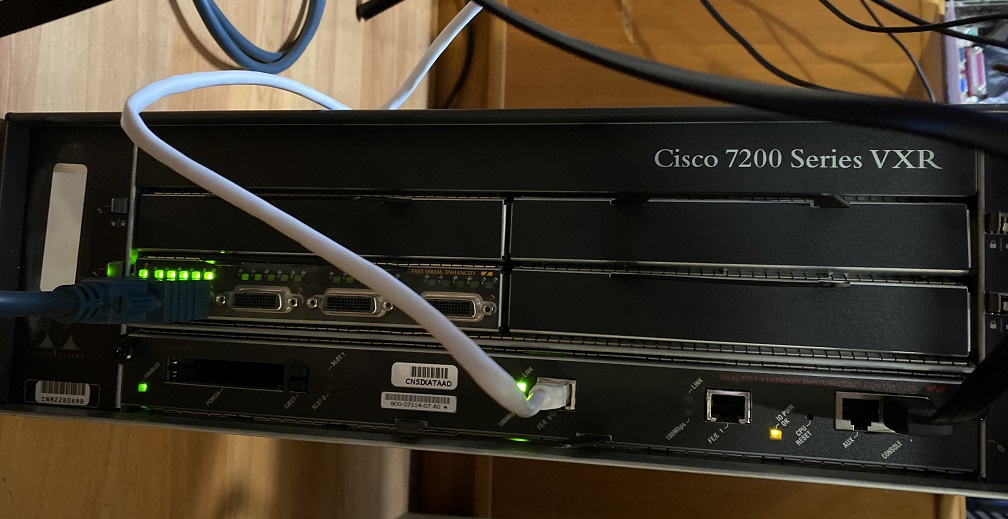
Well today was a special day, I got 2 deliveries, one PC SDLC card, and the other being the 4 port high speed serial card for my cisco 7200.
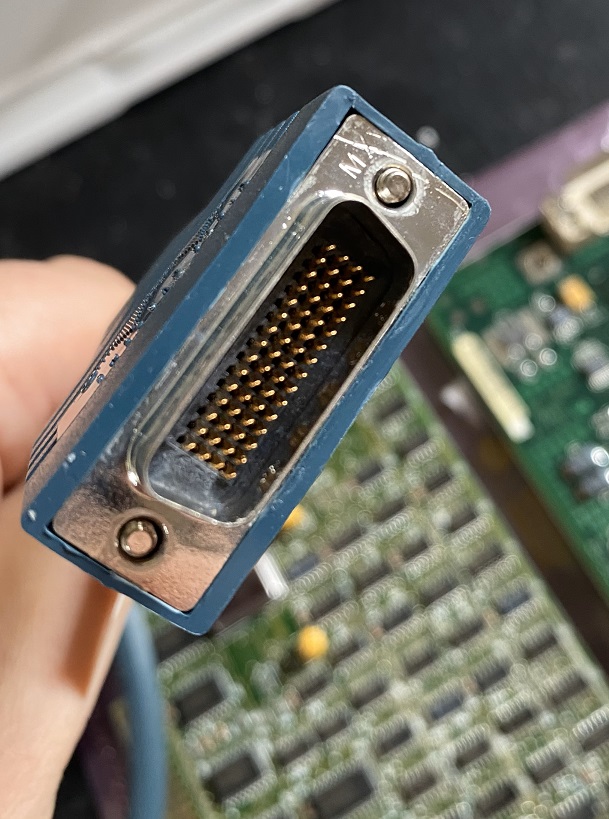
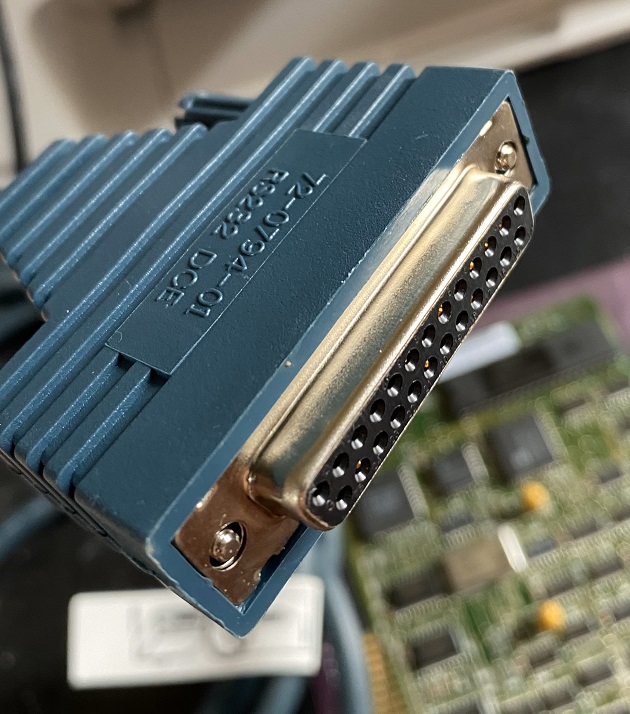
In case you were wondering what was the serial cable, its a CAB-232FC FEM DCE RS-232 cable looks like here is the DB-60 connector side:
And here is the DB-25 side.
VERY RS-232 isn’t it?
Connect the cable to the to the router! Easy!
The router doesn’t have any PCMCIA storage so I configured the thing to get it’s IOS from a FTP server.I have to say that netbooting works great.
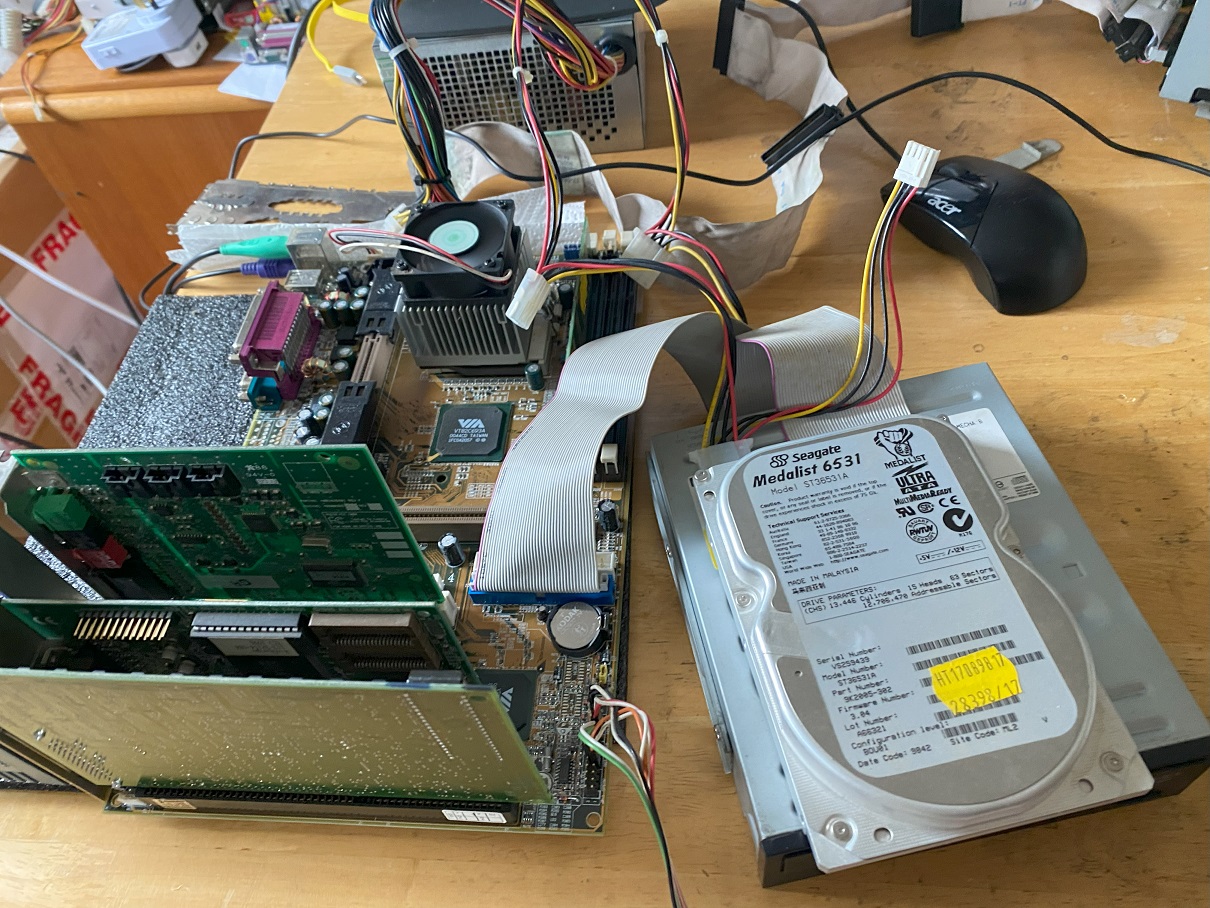
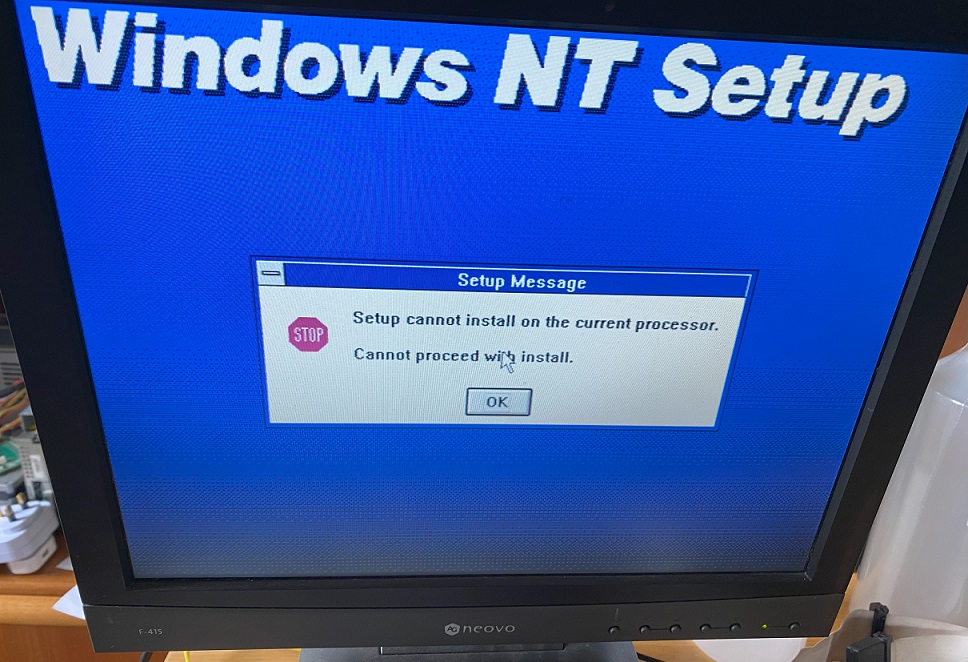
Slot the card into the board I found in the trash that has an ISA slot, and we’re off to the races! I wanted try to replicate my NT setup, so Server 3.5 was installing when of course:
Of course this 400Mhz Celeron is going to break the lookup list as anything beyond Pentium is too much. 🙁 I just installed on Qemu instead, and used MS-DOS backup/restore. Yes it worked!
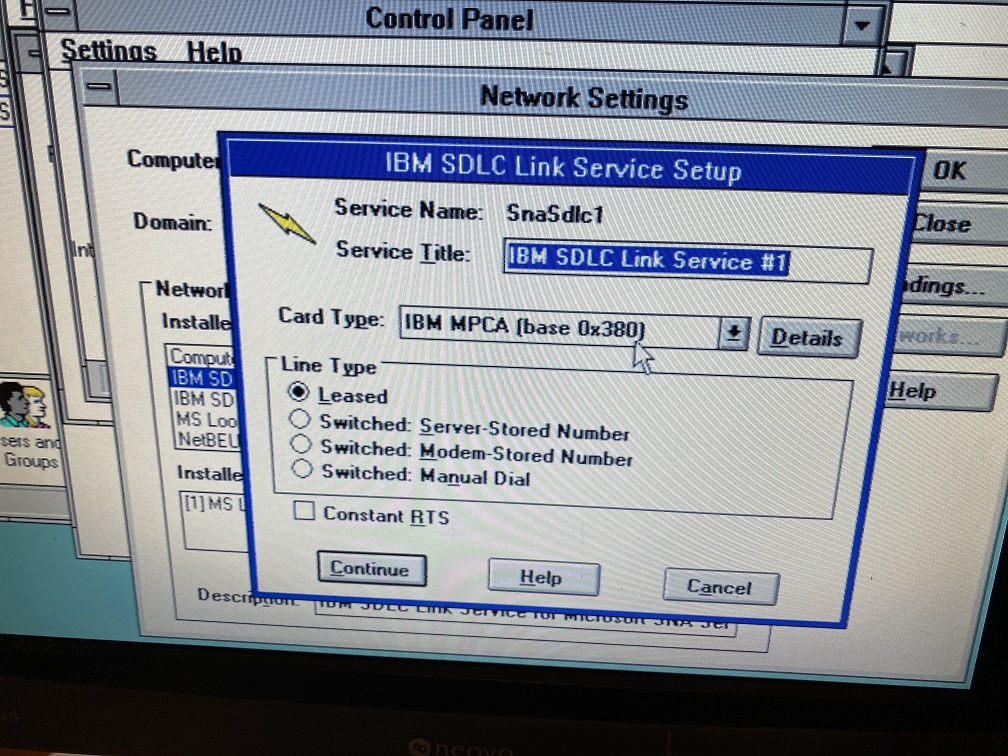
On the SNA server install, I used the IBM SDLC option hoping it was this card I’d bought. I got lucky it was!
Just like 9track.net I kept it ‘leased’ and no constant RTS.
One thing to note about this SDLC card is that it takes IRQ 4 & DMA 1. So there goes any hope of a Sound Blaster or COM1. It’s not the end of the world.
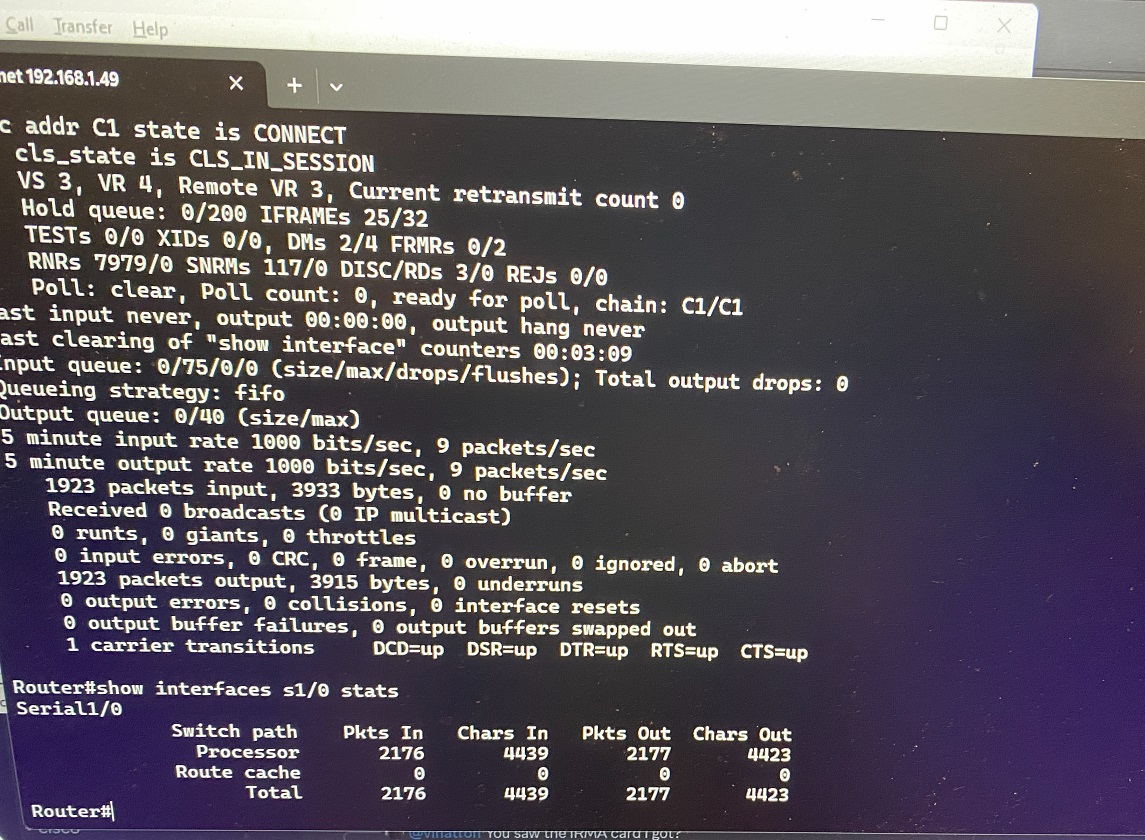
And of course, I got the exact same result as last time.
I don’t know what I’m doing wrong.
I can see the serial interface up and passing traffic, and the DLSW circuit builds and is established.
I’ll either edit this with more details, or just follow up. I’m tired, and my eyes are blurry. But I thought I’d post this much to the world.
Unironically, I had purchased this for a whopping £4.68
No, really here’s the receipt. What a bargain!
Of course this is a legit copy with a legit key. But the online activation servers are all gone, and it looks like I’d have to call someone asking about my 22 year old copy of Windows, that I’ll load up and quickly forget.
Since I’m going to use QEMU, 0.90 with pcap support I thought I’d share the startup options:
I had high hopes for this thing. Clearly misplaced ambitions.
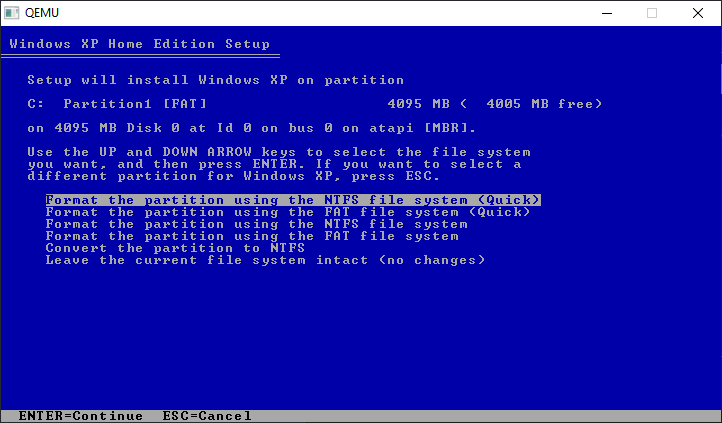
First up, it’s an upgrade version. So that means instead of installing XP I had to waste my time installing NT Workstation 3.51, then installing XP. Yuck. And of course it just want small FAT disks of the 2/4 gigabyte boundary type as it’s 1994. Not the bright future of 2002’s Windows XP.
I don’t know why Qemu 0.90 has issues with XP detecting the CD-ROM drive, but yeah that sucked. I wanted to load up some more insane SNA experiments, but there is no DLC / 802.2 driver for XP Home. wow.
At least once it’s satisfied, we can format the disk as one big happy partition, and we can get on with our lives.
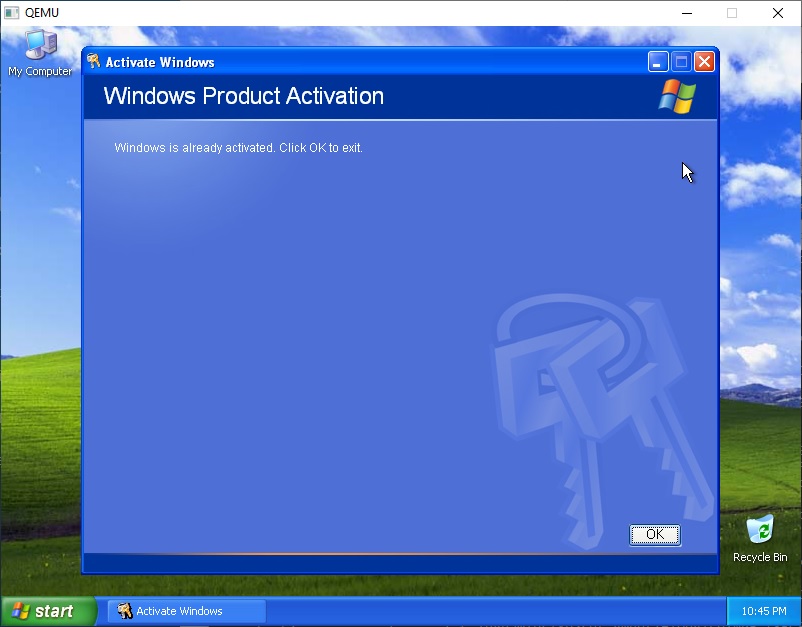
Installation is rather uneventful, however we are instantly reminded that we have only 30 days to go. Since we have that nasty CD-ROM issue that means shutting down, and booting back up, but with this fun program on an ISO image, xp_activate.
I did try to make a call, to activate my Windows, but the connection was terrible and I’m not even sure if these numbers were right. No I mean I know they didn’t work.
So I did what all legit users end up doing, using the crack for my 21 year old copy of Windows.
And just a few clicks later, it was done.
Windows XP Home is activated.
I don’t know if it’s even really going to last, I didn’t try anything else, actually I already deleted it. And the XP folio is back on the bookshelf.
Not only is there no DLC, did you know you can’t uninstall TCP/IP? At least you can unbind it from your NIC. While it does have IPX/SPX there is no built in Netware client. When they said HOME they meant it!
There is a LOT going on in this image, and I’ll try to explain it, but yeah “it’s complicated”.
SNA networking & Hercules has always been a goal for a lot of people, including me as we always wanted to setup some SNA server of some kind. Especially on RISC platforms, as there is only so much fun on SQL server.
Okay I know the practical among you will say, doesn’t it support telnet 3270? Isn’t that good enough? Yes for day to day mundane stuff, absolutely. But I’m not all that interested in that, I wan’t to have the whole ancient network, and I wan’t it self contained and on my desk! Or on a laptop, as I see fit.
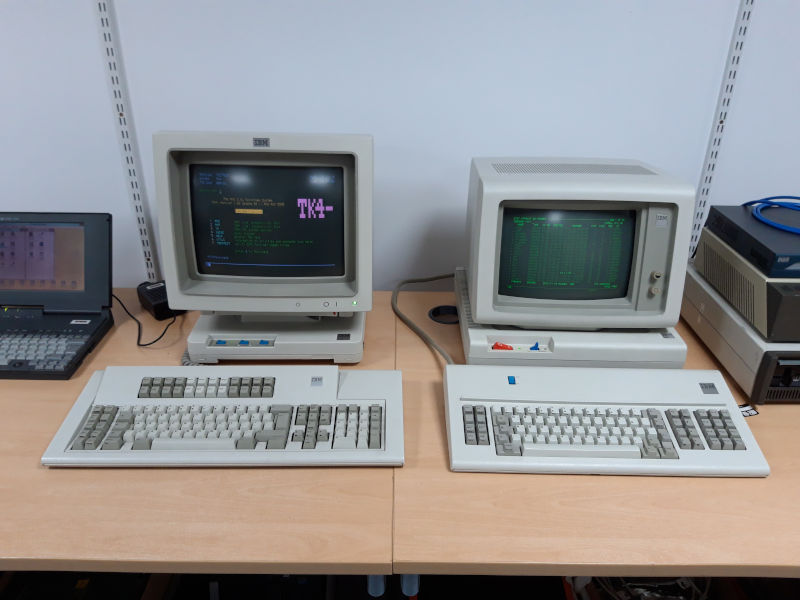
What started this whole adventure was a simple image from 9track.net, showing that being able to connect physical devices to Hercules was indeed possible!
This is a physical IBM 3178 & 3179 terminals talking to TK4- , a MVS3.8j pre-configured system!
The magic that makes this all possible, is a cisco router, running enterprise IOS, with dlsw support.
My setup is going to be inspired by this setup, but not exactly 100% But this is what I’m going to use on Windows 10
Dynamips for the cisco router, running JS-M 12.2(25)S8
Qemu 0.90 with PCAP running Windows NT 3.51 Server along with SNA Server 2.1
I had originally wanted to run the NT server on VMware but for some reason it just hangs trying to initialise the NT kernel. I didn’t bother trying to troubleshoot it, I just jumped to Qemu. Even service pack 5 didn’t help. VMware left me with the virtual network that will NAT if needed, and of course let me telnet to the Dynamips program. The SNA traffic is isolated to the MS Loopback adapter, which will let pcap programs talk to each other.
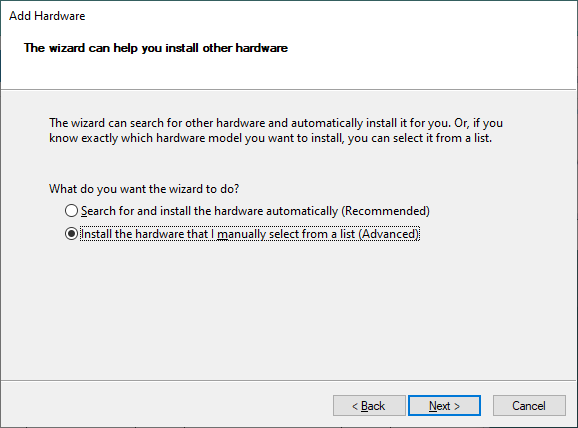
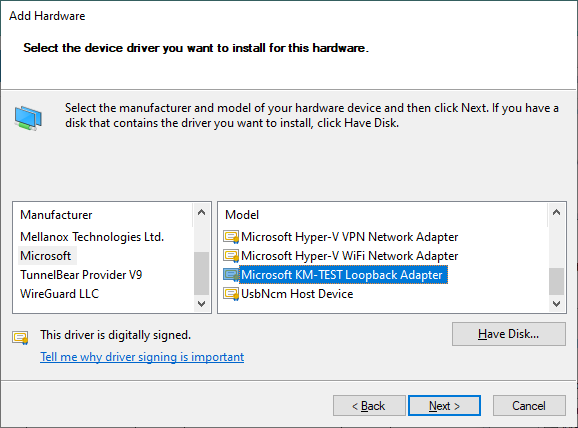
The first thing I did was run ‘hdwwiz’ on Windows 10, and added in the KM-TEST loopback adapter
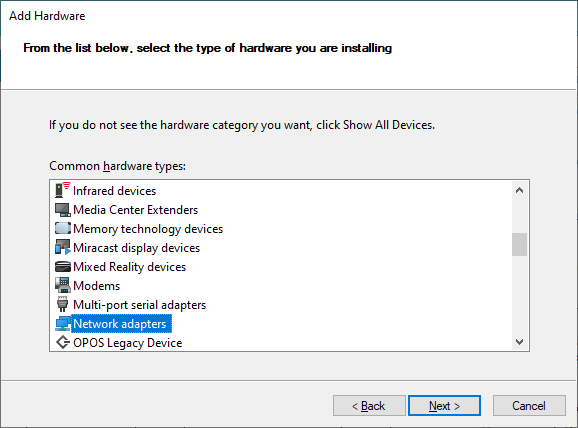
We know what we want, so go to the manuall selection
Network adapters
And select the KM-TEST Loopback Adapter
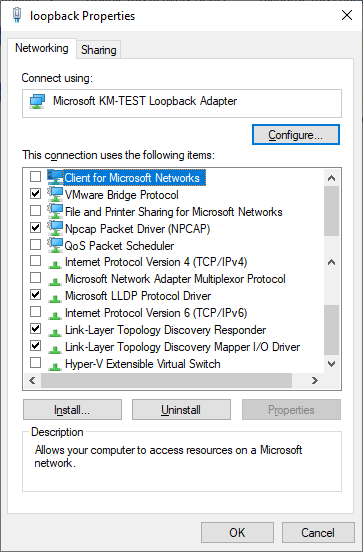
Next I changed the protocols available on the loopback, as I don’t want my Windows 10 host interfering with the SNA network at all.
So the next thing to do is to get your network GUID’s. ethlist.exe from the Dynamips download will get you that:
C:\dynamips>ethlist.exe
Network devices:
  Number       NAME                                     (Description)
  0  \Device\NPF_{3DF0EC5D-7FBE-46DF-ACF8-EF5D8679A473} (loopback)
  1  \Device\NPF_{D9FBD118-B9DF-4C3C-BD9E-07A0E34D8F75} (Local Area Connection* 8)
  2  \Device\NPF_{F5057901-6A30-413A-80E4-4765DA794B7C} (Local Area Connection* 7)
  3  \Device\NPF_{E3D3EC8D-29C3-4B70-B01C-600D3F9ED1D6} (Local Area Connection* 6)
  4  \Device\NPF_{82EEDBC1-899D-416F-BD51-3DBE2287257F} (VMware Network Adapter VMnet8)
  5  \Device\NPF_{3BC364F4-5A15-405D-926C-C594383F0323} (VMware Network Adapter VMnet1)
  6  \Device\NPF_{DDF1FA94-7488-414F-A41A-EC88C1FB0DE4} (Ethernet)
  7  \Device\NPF_{E7CA8F40-4639-410D-B5CA-F402FE69AF5D} (Ethernet 2)
I want the cisco router to have two interfaces, one with TCP/IP for me to be able to telnet into it (maybe other management as well?!) and the other one for the SNA traffic.
Setting up Dynamips
As mentioned above I’m going to use the VMnet1 for TCP/IP to the router, and the loopback adapter for SNA traffic. To try to make things a little easier to read I setup a small batch file that let’s me plug in variables to Dynamips:
set loopback=\Device\NPF_{3DF0EC5D-7FBE-46DF-ACF8-EF5D8679A473}
set vmnet1=\Device\NPF_{3BC364F4-5A15-405D-926C-C594383F0323}
set IOS=c7200-js-mz.122-25.S8.bin
set NPE=npe-200
..\dynamips.exe -P 7200 %IOS%  ^
-t %NPE%  ^
-p 0:C7200-IO-FE ^
-s0:0:gen_eth:%vmnet1% ^
-p 1:PA-4E  ^
-s1:0:gen_eth:%loopback% ^
-p2:PA-4T+
The caret symbol will break up lines on NT, much like the ampersand will on Unix. And this let’s me use clear variables for the networks, IOS & NPE type so it’s nowhere near as complicated to edit.
This will create a cisco 7200 with an NPE-200, with the following cards:
So all my TCP/IP in this example will be using 192.168.199.0/24
As mentioned on the 9track page, all the magic happens on the cisco router. I’ve made a few changes as I may want to try the SDLC in the future to perhaps some other experiment if I can find an emulator that’ll drive it over serial, but for now let’s just get to the config:
!
version 12.2
service timestamps debug uptime
service timestamps log uptime
no service password-encryption
!
hostname dlsw
!
boot-start-marker
boot-end-marker
!
enable password cisco
!
ip subnet-zero
!
!
no ip domain-lookup
!
ip cef
no mpls traffic-eng auto-bw timers frequency 0
call rsvp-sync
!
!
!
!
!
!
!
source-bridge ring-group 1
dlsw local-peer peer-id 192.168.199.10
dlsw remote-peer 0 tcp 192.168.199.1
dlsw mac-addr 4000.1020.0100 remote-peer ip-address 192.168.199.1
dlsw udp-disable
dlsw transparent switch-support
!
interface FastEthernet0/0
 ip address 192.168.199.10 255.255.255.0
 duplex half
 no clns route-cache
!
interface Ethernet1/0
 no ip address
 duplex half
 no clns route-cache
 dlsw transparent redundancy-enable 5555.5555.5000
 dlsw transparent map local-mac 4000.1020.0100  remote-mac 4000.0999.0100
!
interface Ethernet1/1
 no ip address
 shutdown
 duplex half
 no clns route-cache
!
interface Ethernet1/2
 no ip address
 shutdown
 duplex half
 no clns route-cache
!
interface Ethernet1/3
 no ip address
 shutdown
 duplex half
 no clns route-cache
!
interface Serial2/0
 no ip address
 encapsulation sdlc
 no keepalive
 serial restart-delay 0
 clockrate 64000
 no clns route-cache
 sdlc role primary
 sdlc vmac 4000.0999.0100
 sdlc address C1
 sdlc xid C1 01700019
 sdlc partner 4000.1020.1000 C1
 sdlc dlsw C1
!
interface Serial2/1
 no ip address
 shutdown
 serial restart-delay 0
 no clns route-cache
!
interface Serial2/2
 no ip address
 shutdown
 serial restart-delay 0
 no clns route-cache
!
interface Serial2/3
 no ip address
 shutdown
 serial restart-delay 0
 no clns route-cache
!
ip classless
!
no ip http server
!
!
!
!
!
!
control-plane
!
!
dial-peer cor custom
!
!
!
!
gatekeeper
 shutdown
!
!
line con 0
 session-timeout 35791
 stopbits 1
line aux 0
 stopbits 1
line vty 0 4
 password cisco
 login
!
!
end
This sets up the router so I can telnet to it from my desktop at 192.168.199.10, and allows it to talk to the base Windows machine on 192.168.199.1
All the magical MAC addresses come from 9track.net, as he wrote the dlsw hooks, so I just copied that. There is probably a great deal that could be cleaned up, but once I saw the two talking I kind of froze what I was doing.
With that much in place I then jumped to WSL,and built the emulator from github. I cloned it, and renamed that to herc-dlsw. At least for me this was pretty straightforward. The Hercules fork will build with Visual Studio as well, but I knew I was going to need some kind of tn3270 emulator, and I wanted to use x3270, and I had just recently bought this discounted copy of XVision, so of course I wanted to use that.
Despite this catastrophic defect that wasn’t disclosed in the auction.
I downloaded and extracted the TK4- latest distro on WSL. I just created a ‘herc’ directory in my home to house the tk4- release. The next thing to do is overlay your dlsw enabled exe’s and libraries.
cd ~/herc-dlsw/.libs
mkdir x
cp * x
cd x
rm *.o *.lai
cp *.so $HOME/herc/hercules/linux/64/lib/hercules
cp *.la $HOME/herc/hercules/linux/64/lib/hercules
rm *.so *.la
cp * $HOME/herc/hercules/linux/64
Now with the binaries in place, I do need to setup the Xvision VM so I can receive the X11. Of course there is so many other ways to do this, but this is mine:
The important thing is that tcp port 6000 is redirected inwards, and that I’m using the NE2000 card, which on my weird fork will print out the hardware config, so I know how to find the nic.
added SLIRP
adding a [GenuineIntelC♣] family 5 model 4 stepping 3 CPU
added 64 megabytes of RAM
trying to load video rom pc-bios/vgabios-cirrus.bin
added parallel port 0x378 7
added NE2000(isa) 0x320 10
pci_piix3_ide_init PIIX3 IDE
ide_init2 [0] s->cylinders 203 s->heads 16 s->sectors 63
ide_init2 [1] s->cylinders 0 s->heads 0 s->sectors 0
ide_init2 [0] s->cylinders 2 s->heads 16 s->sectors 63
ide_init2 [1] s->cylinders 0 s->heads 0 s->sectors 0
added PS/2 keyboard
ps2.c added PS/2 mouse handler
added Floppy Controller 0x3f0 irq 6 dma 2
installing PS/2 mouse in CMOS
  Bus  0, device   0, function 0:
    Host bridge: PCI device 8086:1237
  Bus  0, device   1, function 0:
    ISA bridge: PCI device 8086:7000
  Bus  0, device   1, function 1:
    IDE controller: PCI device 8086:7010
      BAR4: I/O at 0xffffffff [0x000e].
  Bus  0, device   1, function 3:
    Class 0680: PCI device 8086:7113
      IRQ 0.
  Bus  0, device   2, function 0:
    VGA controller: PCI device 1013:00b8
      BAR0: 32 bit memory at 0xffffffff [0x01fffffe].
      BAR1: 32 bit memory at 0xffffffff [0x00000ffe].
And in this case it’s 0x320 IRQ 10. XVision being it’s own level of disappointment, I’ll have to cover it further, and later but suffice to say it at least catches the x3270 so I can get onto the console.
Setting up Hercules
Editing conf/tk4-_default.cnf is pretty easy as it’s on Linux and you can use VI.
First get MVS up and running. You have to run the ‘console_mode’ script to see what is going on.
cd herc/unattended
./set_console_mode
cd ..
./mvs
It’s not all that difficult XVision is using SLiRP, so it’s listening on all my IP addresses so I just do a simple
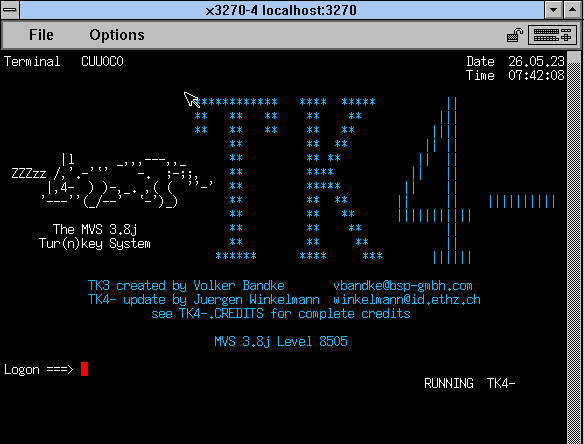
export DISPLAY=192.168.1.72:0
nohup x3270 &
And the emulator will pop up in Qemu. Just connect to localhost:3270 and you’ll be greeted by the login pannel:
Credentials are HERC01 / CUL8TR
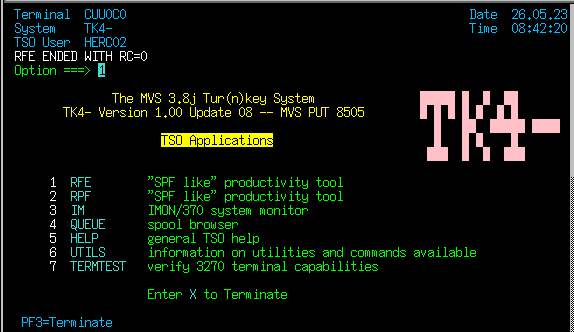
I would HIGHLY recommend following the tutorial to get used to submitting a simple COBOL program. It walks through the key concepts of locating a file, and viewing it on MVS. Something that up until yesterday was out of my league.
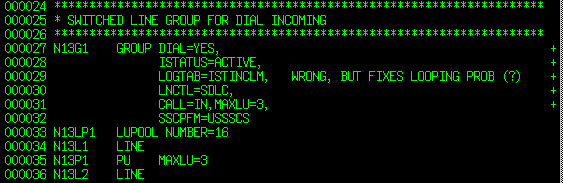
We need to edit the file S3705 on SYS1.VTAMLST
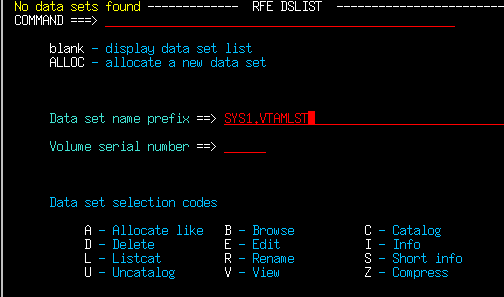
Basically it’s 1,3,4 from the main pannel:
or RFE, Utilities, DSLIST
Type in the Volume name, then tab over to the left of the volume and put in V to view
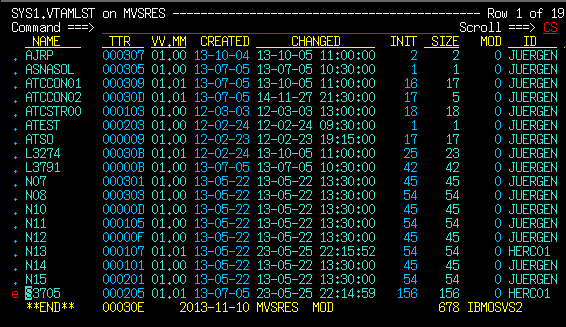
Now we will get a list of all the files. We want to edit S3705, so you can tab/arrow down, but sure to put an `E’ next to it, then hit enter so we can edit the file
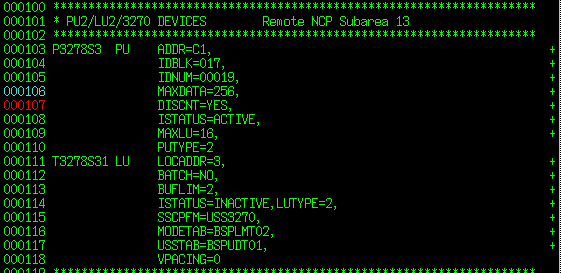
F7/F8 will page down/page up as needed. As mentioned we are interested in Subarea 13, PU type 2.
The line we are changing is the MAXDATA or MTU size for this unit. Since we are doing dlsw, or an emulated serial link, we need to knock it down to 256. Notice all the plus signs on the right hand? THOSE ARE IMPORTANT! Not only do they need to exist, but they also have to be on the far right.
For those wondering the MTU sizes on the client side by media type are as follows: And notice that the host size is different, as this takes in account of packet headers.
Making sure to overtype the 3780, to a 256, and ensuring the + sign hasn’t moved you can hit enter, cursor to the top and type in SAVE.
We can then edit the N13 file, changing line 35 to have MAXLU=3
Hopefully this clears up editing VTAM files.
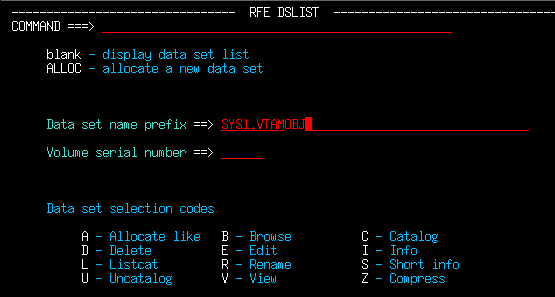
As mentioned the easiest way to regen the system is to delete the old object files. So hit f3 a few times and get back to the dataset list
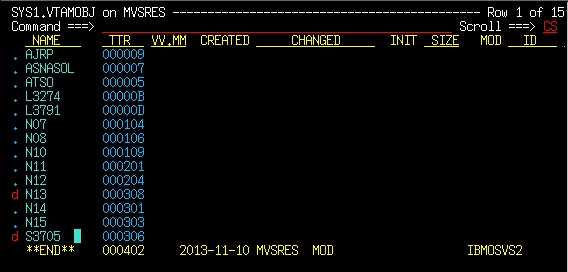
This time we want the VTAMOBJ set. Go and ‘V’iew it like last time and we will get the list of files:
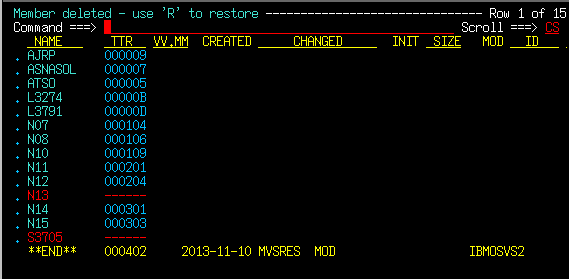
Now we are going to put a ‘d’ next to N13 and S3705. This will flag them for deletion. Hit enter!
The files are now gone! On the next boot they will be rebuilt.
I just hit F3 a bunch of times and it’ll drop to some TSO shell
From here you can shutdown the system. It’ll take a few minutes, but you can start it up again just the same way you brought it up. Remember to attach your console.
Setting up SNA Server
Just like Dynamips, I setup a batch file, as the default one is just far too long to read:
@echo you need to figure out your nic name..
@echo something like
@echo \Device\NPF_{XXXXXXXX-XXXX-XXXX-XXXX-XXXXXXXXXXXX}
set loopback=\Device\NPF_{3DF0EC5D-7FBE-46DF-ACF8-EF5D8679A473}
set vmnet1=\Device\NPF_{3BC364F4-5A15-405D-926C-C594383F0323}
qemu -m 64 -L pc-bios ^
-hda SBS15.vmdk ^
-soundhw sb16,adlib ^
-net nic,model=pcnet,macaddr=52:24:00:22:00:01 ^
-net pcap,devicename=%loopback% ^
%1 %2 %3 %4 %5 %6
This will setup a small machine with 64MB of ram, a single AMD PCNet adapter on the loopback interface. I installed Windows NT 3.51 from the Small Business Server 1.5 setup. I don’t know why VMware + NT 3.51 didn’t get along, maybe it’s my Erying, Or maybe it just plain doesn’t work, I’m not sure, and far too impatient to troubleshoot it.
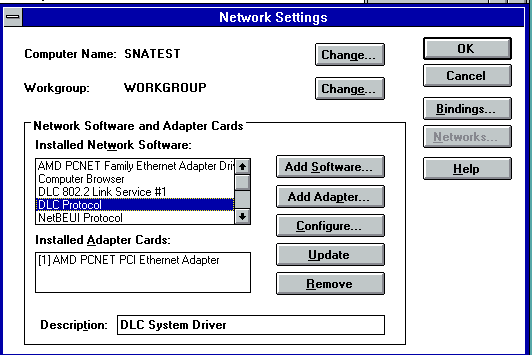
It’s very important that you do add the DLC Protocol during setup. It’s in the ‘Add Software’ part. I kept my NT very simple with only NetBEUI and DLC protocols. At the moment I’m not that interested in actually networking the NT, and if I was, I would add a second NIC, just like what I did for Dynamips.
Setting up NT isn’t that interesting, but SNA server is. I did use the 2.11 on the Back Office CD, but for completeness sake of testing I tried the oldest one I could find, and 2.1 beta from June, Build 2.1.0.216.
I left the network name & control point name blank as I just want terminal, I’m not even going to think that LU6.2 applications on such an ancient version of MVS was even possible.
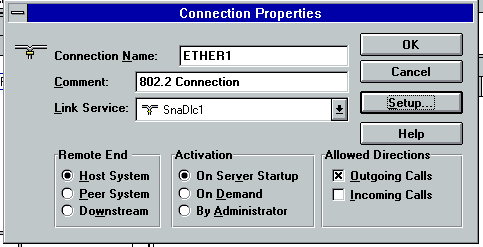
This is pretty much default, the Link service basically sets itself up as we only have the one NIC.
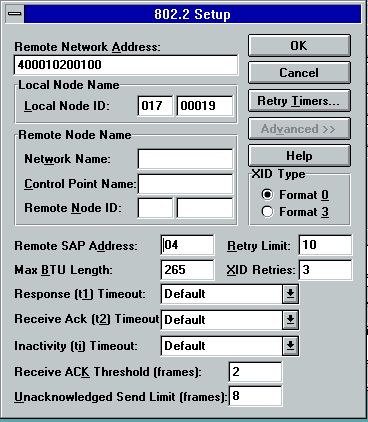
Take note of the remote network address. 400010200100 which came from above the address we directly point to the dlsw. Also it’s form the 9track blog.
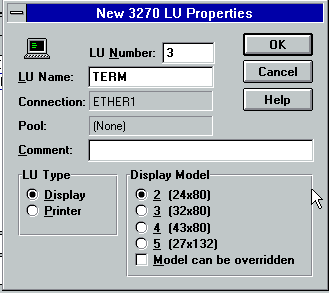
Insert a 3270 LU for us to try to talk to Hercules.
I’m pretty sure it was hard coded to be a model 2.
I turned off the ability for the model to be overwitten.
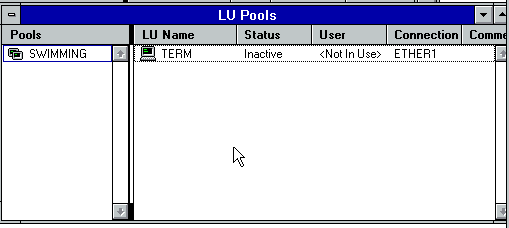
Create a pool, I called it swimming, because of ‘reasons’. I made it a type 2 pool and added the terminal to it.
Next I added the EVERYONE user, and gave them access to the SWIMMING pool
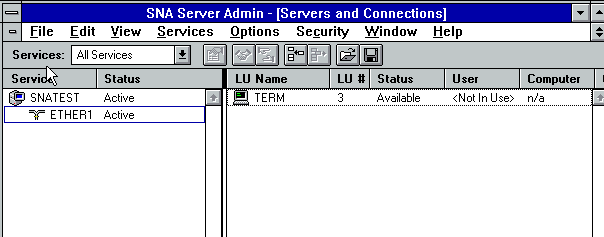
Finally we are ready to save the config, and do the hand holding and start up. If the stars aligned you will see them go ACTIVE/ACTIVE and the terminal will go Available.
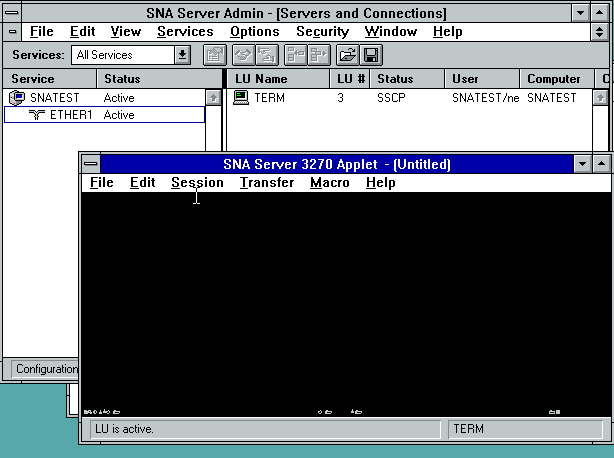
Sadly the terminal won’t go live, it’s stuck in SSCP.
And this is as far as I can go. I have to think that with either something far older protocol wise for the PC, such as IBM Personal Communications/3270 for Windows V2.0 (v4 didnt work either), or a far newer Mainframe software version would support whatever it is SNA server wants to give us the crazy dream of running SNA self contained.
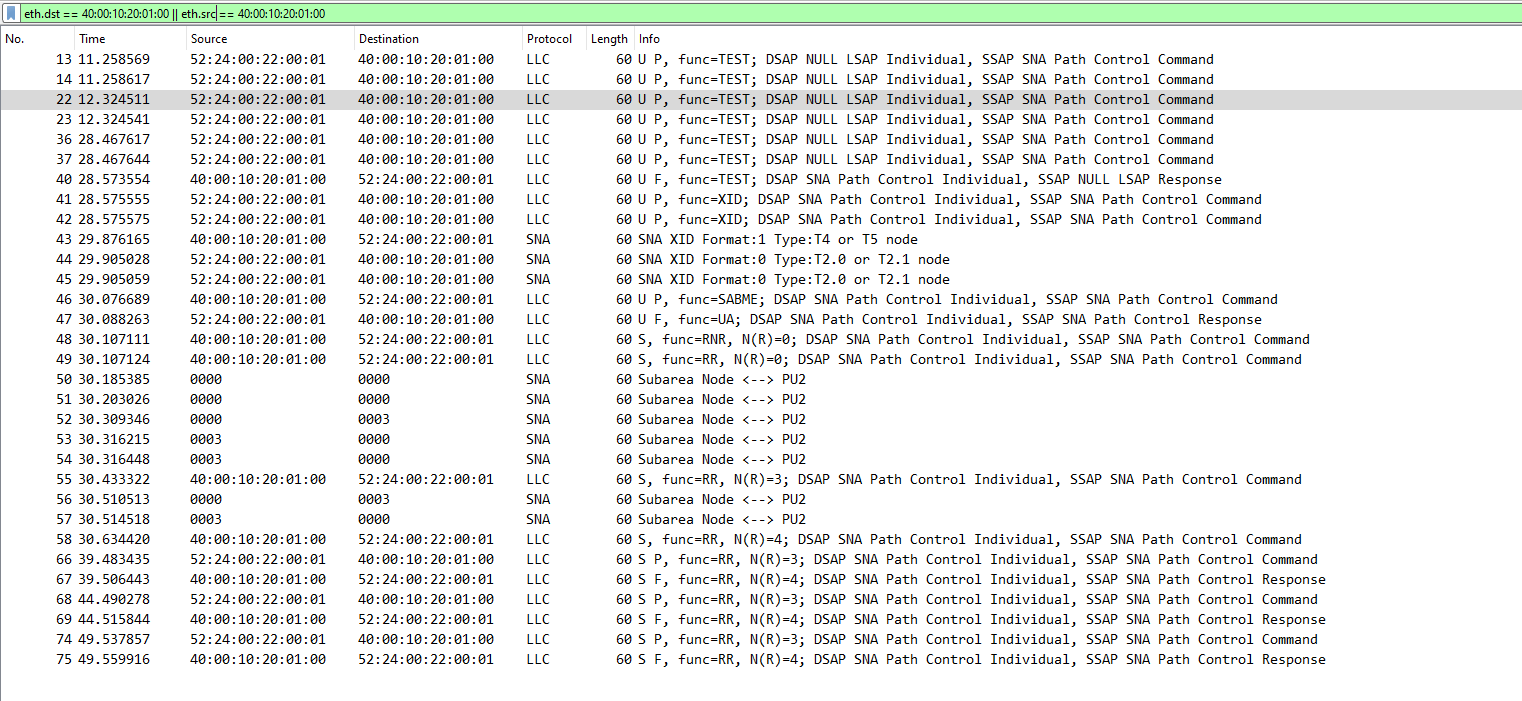
Running Wireshark on the loopback network I see this message:
UNSUPPORTED FUNCTION
Sadly this is as far as I can take you. I do want to give a special thanks to Vinatron & blackbit for trying to troubleshoot this with me. Best we can figure is that TK4- is just too old.
Troubleshooting
From the cisco router try dlsw commands like this:
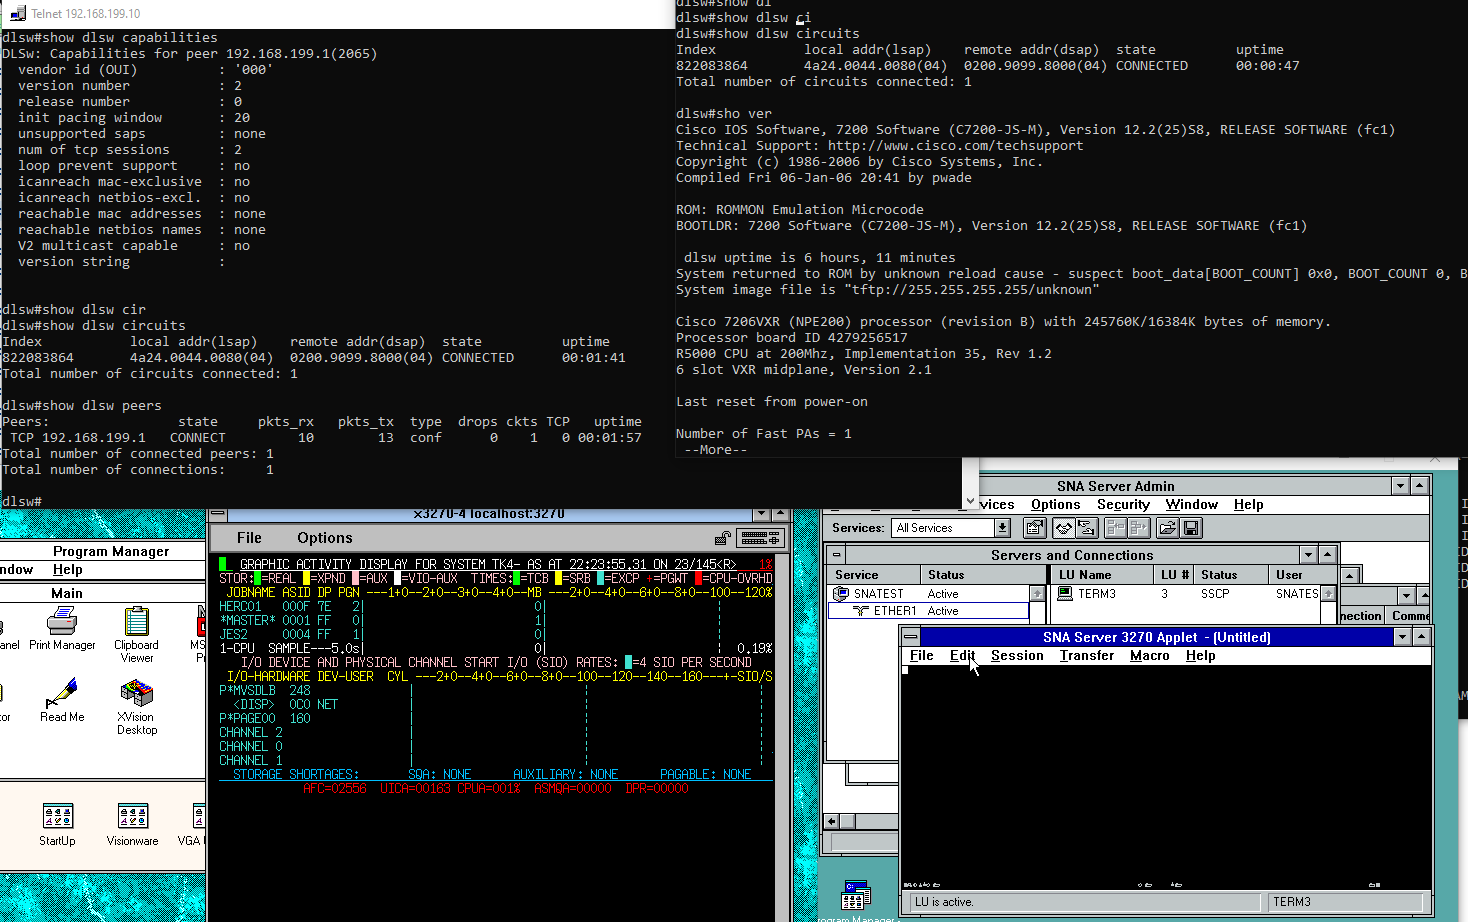
dlsw>sho dlsw circuits
Index           local addr(lsap)    remote addr(dsap)  state          uptime
2281701660      4a24.0044.0080(04)  0200.9099.8000(04) CONNECTED      00:02:23
Total number of circuits connected: 1
This does show the connection. Notice that ‘show bridge’ will show nothing in this config.
Be sure to check peers as well:
dlsw>show dlsw peers
Peers:                state     pkts_rx   pkts_tx  type  drops ckts TCP   uptime
 TCP 192.168.199.1   CONNECT         10        13  conf      0    1   0 00:05:07
Total number of connected peers: 1
Total number of connections:     1
Make sure your interfaces are ‘up/up’ and passing traffic
FastEthernet0/0 is up, line protocol is up
  Hardware is DEC21140, address is ca00.48f4.0000 (bia ca00.48f4.0000)
  Internet address is 192.168.199.10/24
  MTU 1500 bytes, BW 100000 Kbit, DLY 100 usec,
     reliability 255/255, txload 1/255, rxload 1/255
  Encapsulation ARPA, loopback not set
  Keepalive set (10 sec)
  Half-duplex, 100Mb/s, 100BaseTX/FX
  ARP type: ARPA, ARP Timeout 04:00:00
  Last input 00:00:00, output 00:00:00, output hang never
  Last clearing of "show interface" counters never
  Input queue: 0/75/0/0 (size/max/drops/flushes); Total output drops: 0
  Queueing strategy: fifo
  Output queue: 0/40 (size/max)
  5 minute input rate 1000 bits/sec, 2 packets/sec
  5 minute output rate 2000 bits/sec, 2 packets/sec
     12768 packets input, 1439279 bytes
     Received 3609 broadcasts (0 IP multicast)
     0 runts, 0 giants, 0 throttles
     0 input errors, 0 CRC, 0 frame, 0 overrun, 0 ignored
     0 watchdog
     0 input packets with dribble condition detected
     9999 packets output, 1037736 bytes, 0 underruns
     0 output errors, 0 collisions, 1 interface resets
     0 babbles, 0 late collision, 0 deferred
     0 lost carrier, 0 no carrier
     0 output buffer failures, 0 output buffers swapped out
dlsw>show int eth1/0
Ethernet1/0 is up, line protocol is up
  Hardware is AmdP2, address is ca00.48f4.001c (bia ca00.48f4.001c)
  MTU 1500 bytes, BW 10000 Kbit, DLY 1000 usec,
     reliability 255/255, txload 1/255, rxload 1/255
  Encapsulation ARPA, loopback not set
  Keepalive set (10 sec)
  ARP type: ARPA, ARP Timeout 04:00:00
  Last input 00:00:02, output 00:00:02, output hang never
  Last clearing of "show interface" counters never
  Input queue: 0/75/0/0 (size/max/drops/flushes); Total output drops: 0
  Queueing strategy: fifo
  Output queue: 0/40 (size/max)
  5 minute input rate 0 bits/sec, 0 packets/sec
  5 minute output rate 0 bits/sec, 0 packets/sec
     52426 packets input, 5148287 bytes, 0 no buffer
     Received 12336 broadcasts (0 IP multicast)
     0 runts, 0 giants, 0 throttles
     0 input errors, 0 CRC, 0 frame, 0 overrun, 0 ignored
     0 input packets with dribble condition detected
     36383 packets output, 2465490 bytes, 0 underruns
     0 output errors, 0 collisions, 3 interface resets
     0 babbles, 0 late collision, 0 deferred
     0 lost carrier, 0 no carrier
     0 output buffer failures, 0 output buffers swapped out
dlsw>
And of course check WireShark to see if there is any handshake:
And of course check the Hercules logs to make sure your VTAM rebuilt, look for ERROR or anything related to S3705 or N13.
So this is probably nothing that exciting for most people, but for me, I wanted to have a Terminal Server onto a DECnet network. Sure I could have probably just done one nice with tun/tap, dumped all the protocols on there, and called it even. But for some reason I wanted 2 NICs to keep the IP on one side, and DECnet on the other.
One thing I wanted was an internal bridge for DECnet only traffic, and since I just need MSRDP access, SLiRP can handle a single TCP port redirect.
The flags are as always pretty simple once you work them out:
And the two network scripts starting with nt4tse-up:
#!/bin/bash
echo starting $1
ip tuntap add mode tap tap1
ifconfig tap1 up
ifconfig tap1
brctl addif decnet0 tap1
brctl show decnet0
echo done with tuntap
And the nt4tse-down:
#!/bin/bash
echo shutting down $1
ifconfig tap1 down
brctl delif decnet0 tap1
brctl show decnet0
ip tuntap del mode tap tap1
echo done shutting down $1
for completeness here is the bridge config in /etc/netplan/50-cloud-init.yaml
This way I have an IP bound bridge for things that talk IP, and a raw bridge, decnet0 that has my non IP decnet stuff on there. Naturally it’ll have my SIMH VAX on there:
# brctl show decnet0
bridge name     bridge id               STP enabled     interfaces
decnet0         8000.aede9f227e7b       no              tap0
                                                        tap1
Also the ability to mount directories as fake fat drives had it’s syntax change as well
So over on Modular Circuits, Andras had posted a promising ‘UNICOS Update‘ which had detailed that 2 CD-ROM’s of Unicos had surfaced on archive.org cray-cd1 & cray-cd2. Along with posting the updated source to github, so I had no choice to replicate the experiment!
First the install is INSANELY slow. It requires you to setup a Linux (or unix) machine with rsh. Surprisingly there is a rsh-server package for Ubuntu 22.04. Basically it boils down to following the instructions. Although with WSLv2 I ended up making the bridge manually with:
brctl addbr craybr
ip tuntap add mode tap tap1
ifconfig tap1 up
brctl addif craybr tap1
ifconfig craybr 172.16.0.1 netmask 255.255.255.0
It’s coded in the example configs to use tap1, but there you go. It’s a pretty straightfoward install but the decompression on the cray side takes the installation hours. As an experiment I changed the commands from rcp to remsh to gzip -dc the files locally on my PC, which had the benefit of of being much faster, and not taking up space.
I went ahead and uploaded both of my installs for anyone wanting to play OS tourist enough to check out UNICOS but not wanting to sit through the install.
The C compiler is.. ancient. and very touchy. You’ll need to add /usr/gen/bin to the path, and explicitly add the path for the linker like this:
/usr/gen/bin/cc zap.c -L/usr/gen/lib
Although the breakage is.. pretty epic. I had pretty much no luck bringing over any of my favorites. There should be a much better / modernish C compiler and Fortran compiler, although I’m not sure if it’s on these CD-ROM’s or I’m just massively ignorant of UNICOS, because I never got a chance to be anywhere near a legit supercomputer.
I don’t know how the other various linux distros handle this but I found this by accident:
Nov 17 12:04:25 ukweb pppd[4943]: Using interface ppp0
Nov 17 12:04:25 ukweb pppd[4943]: Connect: ppp0 <--> /dev/pts/0
Nov 17 12:04:25 ukweb pptpd[4942]: GRE: Bad checksum from pppd.
Nov 17 12:04:25 ukweb systemd-udevd[4944]: Using default interface naming scheme 'v249'.
Nov 17 12:04:25 ukweb pppd[4943]: peer from calling number 1.1.1.1.1 authorized
Nov 17 12:04:25 ukweb pppd[4943]: MPPE 128-bit stateless compression enabled
Nov 17 12:04:27 ukweb systemd-networkd[592]: ppp0: Link UP
Nov 17 12:04:27 ukweb systemd-networkd[592]: ppp0: Gained carrier
Nov 17 12:04:27 ukweb pppd[4943]: found interface br0 for proxy arp
Nov 17 12:04:27 ukweb pppd[4943]: local  IP address 192.168.0.1
Nov 17 12:04:27 ukweb pppd[4943]: remote IP address 192.168.23.10
Nov 17 12:05:28 ukweb systemd[1]: Stopping PoPToP Point to Point Tunneling Server...
Nov 17 12:05:28 ukweb pppd[4943]: Terminating on signal 15
Nov 17 12:05:28 ukweb pppd[4943]: Connect time 1.1 minutes.
Nov 17 12:05:28 ukweb pppd[4943]: Sent 0 bytes, received 6937 bytes.
Nov 17 12:05:28 ukweb systemd-networkd[592]: ppp0: Link DOWN
Nov 17 12:05:28 ukweb systemd-networkd[592]: ppp0: Lost carrier
With the emphasis on “local IP address 192.168.0.1”. Which is *NOT* in my config. I went as far as adding a bridge to satisfy the proxy arp! Netplan is some yaml thing and yeah not a big fan.
And then I found it after doing what i should have done, and grep around to find out that pptpd.conf should actually live in /etc
Yeah that’s right, there is 2 of them although they should be the same. A symlink and a restart later, and now I get this:
Nov 17 12:19:56 ukweb kernel: [  112.718861] PPP MPPE Compression module registered
Nov 17 12:19:56 ukweb pppd[1002]: MPPE 128-bit stateless compression enabled
Nov 17 12:19:58 ukweb systemd-networkd[599]: ppp0: Link UP
Nov 17 12:19:58 ukweb systemd-networkd[599]: ppp0: Gained carrier
Nov 17 12:19:58 ukweb pppd[1002]: found interface br0 for proxy arp
Nov 17 12:19:58 ukweb pppd[1002]: local  IP address 192.168.23.1
Nov 17 12:19:58 ukweb pppd[1002]: remote IP address 192.168.23.10
MUCH much better. I don’t know if this is anything worth wriging about, but if I can save someone else an hour of wondering why the config isn’t working and why their pptp is always defaulting to 192.168.0.1 and why it’s wreaking havoc with any default home router, where here it is.
You’ll need to have the ethernet driver handy, or better loaded. Since I had disabled the NIC on install it’s not loaded. And since I’m still using a cellphone for internet I extracted the file somewhere else and copied in some patches. I’ve managed to reproduce this twice now, so I guess it’s good to go. Apparently, this just works in later versions, but this is very touchy.
Change the directory to /pcnet , and let it run It will give errors but thats okay. All being well it won’t crash AIX, otherwise you’ll want to restore your hardisk. You did make a backup beforehand right?!
I don’t think it matters but I run this afterwards:
odmchange -o CuAt -q "name=ent0 and attribute=busio" /cdrom/lance_ch.asc
odmget -q "name=ent0 and attribute=busio" CuAt
shutdown -h now
halting does take forever
As tempting as it is to kill the emulator, wait for it to complete. Otherwise you may have to do the whole thing agian.
For me the value attribute was never preserved, so we get to do it again on reboot/restart:
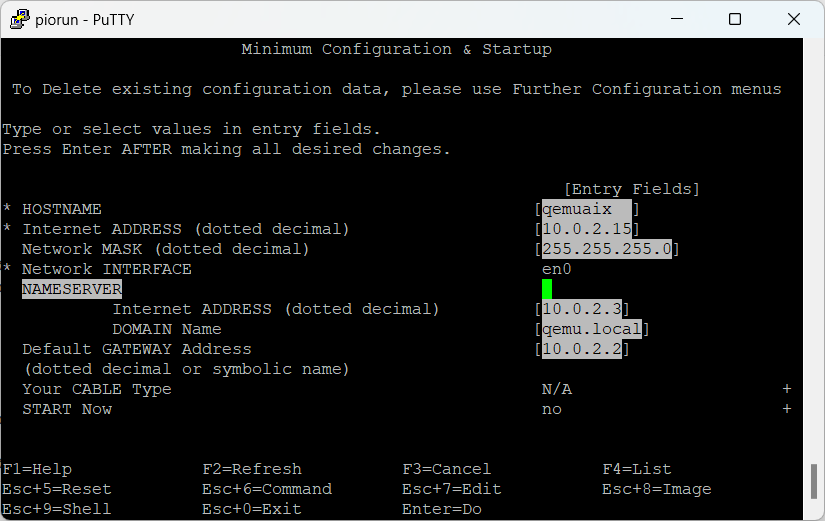
odmget -q "name=ent0 and attribute=busio" CuAt
mount /cdrom
odmchange -o CuAt -q "name=ent0 and attribute=busio" /cdrom/lance_ch.asc
rmdev -l ent0
mkdev -l ent0
ifconfig en0 10.0.2.15
ping -c 1 10.0.2.2
If everything went well this time you should get a ping reply! Great! Now to configure the system for real.
smitty -> communication -> tcpip -> minimum -> en0
simple slirp
As always I configure my system for slirp. We’re almost there! Now to pad the DNS records for slirp:
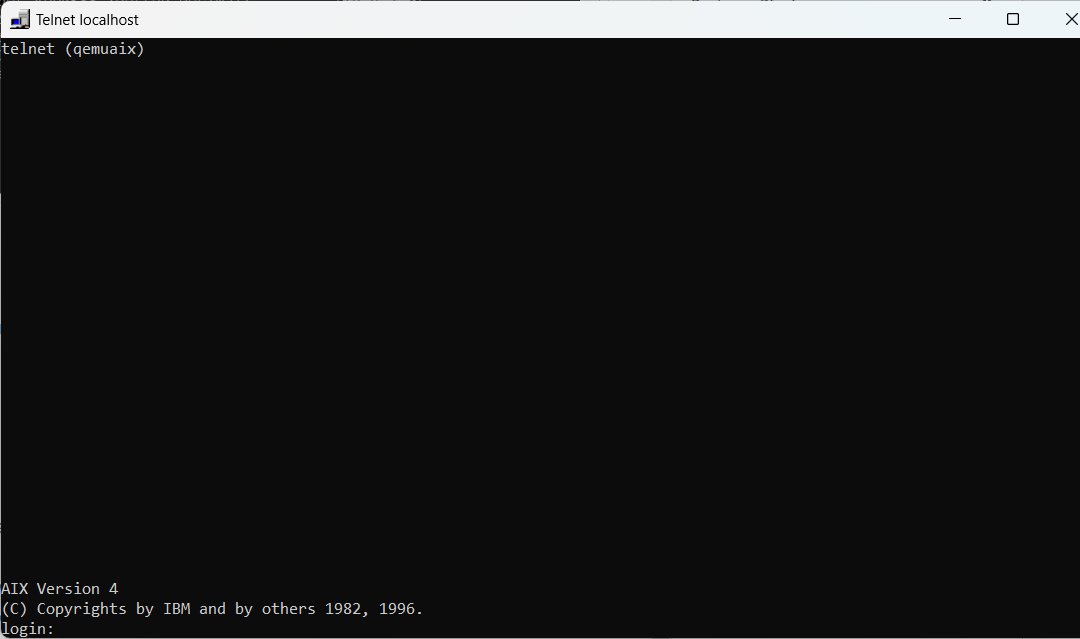
If everything goes well, you will have a patched up pcnet driver that works (well mine does)
It works!
The big test is to of course reboot. Then you’ll know for sure.
I have tried this a few times, and yeah it can crash when adding the drivers, so I had to restore a few times. I would say 1/3 times worked flawlessly. So be patient. And backup!
Manage Consent
To provide the best experiences, we use technologies like cookies to store and/or access device information. Consenting to these technologies will allow us to process data such as browsing behavior or unique IDs on this site. Not consenting or withdrawing consent, may adversely affect certain features and functions.
Functional
Always active
The technical storage or access is strictly necessary for the legitimate purpose of enabling the use of a specific service explicitly requested by the subscriber or user, or for the sole purpose of carrying out the transmission of a communication over an electronic communications network.
Preferences
The technical storage or access is necessary for the legitimate purpose of storing preferences that are not requested by the subscriber or user.
Statistics
The technical storage or access that is used exclusively for statistical purposes.The technical storage or access that is used exclusively for anonymous statistical purposes. Without a subpoena, voluntary compliance on the part of your Internet Service Provider, or additional records from a third party, information stored or retrieved for this purpose alone cannot usually be used to identify you.
Marketing
The technical storage or access is required to create user profiles to send advertising, or to track the user on a website or across several websites for similar marketing purposes.