Running Graylog on Windows

For those who don’t know Graylog is a neat little event logging aggregate & search utility. Of course when I say ‘little’ its kinda on the massive size. It’s one of them new age web two-point-oh things, that of course has a few interesting dependencies.

  • MongoDB
  • OpenSearch

While I was looking at doing a deployment elsewhere, I went to get the latest versions directly from the vendors instead of relying on apt/yum/whatever. And much to my surprise, both Mongo & OpenSearch both have native Win64 versions! What a great time! Of course these will change, but for now

I’ve stashed a copy over on archive.org if anyone is insane enough to try this. One thing as of Graylog 5.xx is that it does say to stick with a MongoDB v6. So that’s what I did.

MongoDB

One thing to keep in mind is that the MongoDB is used for the configuration of the cluster, as Graylog is usually configured in a HA cluster, but there doesn’t need to be such an emphasis on the MongoDB as the size of the database isn’t so massive.

MongoDB Compass

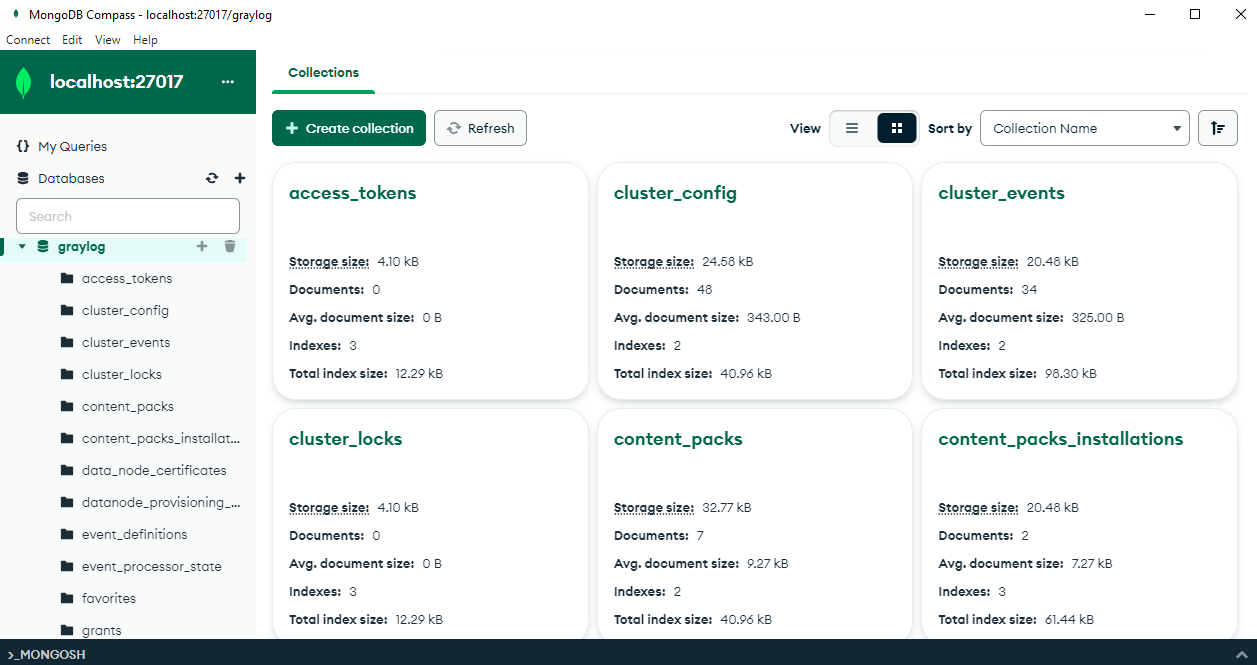
MongDB has a nice UI Compass, for exploring stuff. Although browsing around you’ll see it really is just system config stuff. So you won’t be needing some 100GB array for this stuff, more so VM’s for clustering it out if you want to go all high availability.

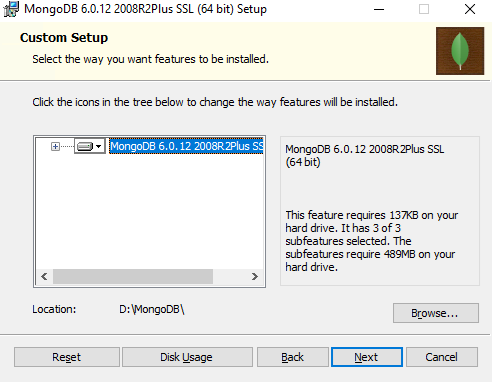
There isn’t much to say about the MongoDB install, just set it to a drive that you want.

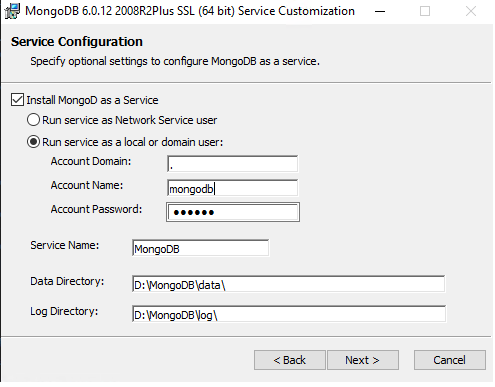
Of course set it up as a service, make the user if needed/desired (I did!). I went one step further and compressed the data directory since it’s on NTFS. I don’t think it mattered too much, its been a few days and it’s only 300MB give or take. The graylog dataset is very tiny as mentioned it’s just the configuration, so it wont be that much.

After the install is done, start the service, and you can then launch Compass, and you should be able to connect to your local database. And that’s it!

OpenSearch

OpenSearch is where all the ‘magic’ happens, where the data gets written, along with where your searches through the logs run. If you want to emphasis something, this is it.

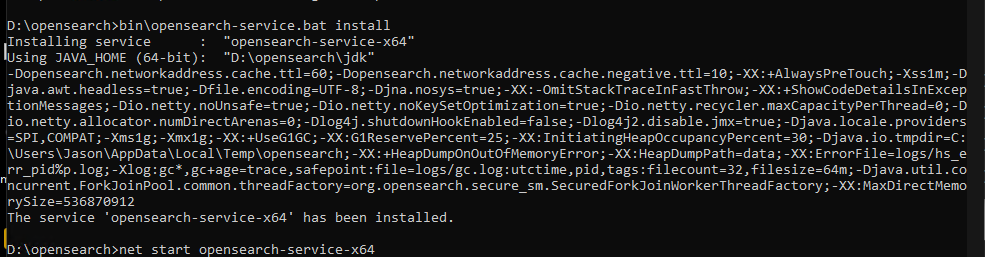
OpenSearch didn’t have an install program, rather just a batch file to run and start it. There is a opensearch-service.bat file to install the service.

Install the opensearch service

There are a few config changes I had to make:

cluster.name: graylog
http.port: 9200
plugins.security.disabled: true

After those changes to config\opensearch.yml you can install and run the service. You can then hit the service via http as http://127.0.0.1:9200 and you should get something similar to this.

OpenSearch up and running

Graylog

As you may have seen from the downloads there is no Windows version of Graylog available for download. HOWEVER it’s a JAVA app. So other than one weird Unixisim of where to keep the config file, it’s just a java thing.

I did need a Linux install to set the required passwords. Although for this sake I used the admin/admin for maximum security, so you can always just work this diff into the server.conf file.

--- graylog.conf.example        2023-11-15 09:05:28.000000000 +0000
+++ server.conf 2023-11-30 21:53:13.580405300 +0000
@@ -54,10 +54,10 @@
 # Generate one by using for example: pwgen -N 1 -s 96
 # ATTENTION: This value must be the same on all Graylog nodes in the cluster.
 # Changing this value after installation will render all user sessions and encrypted values in the database invalid. (e.g. encrypted access tokens)
-password_secret =
+password_secret = ihEUzuJNJOOIVYaNB29ZHZimi438NxKKzSys5UH6O9CoE7jfsrygCbuzzLzkK6hk0xdDb6e8wyAmTNhD7g9JMNZHXr1q40Ps

 # The default root user is named 'admin'
-#root_username = admin
+root_username = admin

 # You MUST specify a hash password for the root user (which you only need to initially set up the
 # system and in case you lose connectivity to your authentication backend)
@@ -65,7 +65,7 @@
 # modify it in this file.
 # Create one by using for example: echo -n yourpassword | shasum -a 256
 # and put the resulting hash value into the following line
-root_password_sha2 =
+root_password_sha2 = 8c6976e5b5410415bde908bd4dee15dfb167a9c873fc4bb8a81f6f2ab448a918

 # The email address of the root user.
 # Default is empty
@@ -102,7 +102,7 @@
 # If the port is omitted, Graylog will use port 9000 by default.
 #
 # Default: 127.0.0.1:9000
-#http_bind_address = 127.0.0.1:9000
+http_bind_address = 192.168.1.5:9000
 #http_bind_address = [2001:db8::1]:9000

 #### HTTP publish URI
@@ -192,6 +192,7 @@
 #
 # Default: http://127.0.0.1:9200
 #elasticsearch_hosts = http://node1:9200,http://user:password@node2:19200
+elasticsearch_hosts = http://127.0.0.1:9200

 # Maximum number of attempts to connect to elasticsearch on boot for the version probe.
 #
@@ -489,7 +490,9 @@
 #auto_restart_inputs = true

 # Enable the message journal.
-message_journal_enabled = true
+# message_journal_enabled = true
+# https://github.com/Graylog2/graylog2-server/issues/12949#issuecomment-1219146839
+message_journal_enabled = false

 # The directory which will be used to store the message journal. The directory must be exclusively used by Graylog and
 # must not contain any other files than the ones created by Graylog itself.

There is a few weird things in this config, The first one being the bind address to the external NIC, the elasticsearch_hosts being set to http as we ended up removing the SSL as Graylog didn’t like the self signed certs. However, since it’s all loopback traffic on the same machine, it does seem a bit silly to be encrypting to yourself. The other weird gotcha was message_journal_enabled, which fails after a few hours on both WSLv1 & a Win64 native. I don’t know why but it’s a common problem on non EXT2FS based filesystems, and sadly the solution everywhere is just turn it off.

Starting Graylog is kind of easy once you work out the CLI from the Linux script, using the JVM from OpenSearch. Take note of the log4j2, the one from that big deal vulnerability in all the fancy web apps.

\opensearch\jdk\bin\java.exe -Dlog4j2.formatMsgNoLookups=true ^
 -Djdk.tls.acknowledgeCloseNotify=true ^
 -Xms1g -Xmx1g -XX:+UseG1GC ^
 -XX:-OmitStackTraceInFastThrow ^
 -jar graylog.jar server -f server.conf ^
 -p graylog.pid 

I run this manually. With any luck you’ll see it connect to the databases and go live!

2023-12-02 15:37:37,749 INFO : org.mongodb.driver.cluster - Monitor thread successfully connected to server with description ServerDescription{address=localhost:27017, type=STANDALONE, state=CONNECTED, ok=true, minWireVersion=0, maxWireVersion=17, maxDocumentSize=16777216, logicalSessionTimeoutMinutes=30, roundTripTimeNanos=29209200}
2023-12-02 15:37:45,518 INFO : org.graylog2.storage.providers.ElasticsearchVersionProvider - Elasticsearch cluster is running OpenSearch:2.11.0
2023-12-02 15:37:48,593 INFO : org.graylog2.bootstrap.ServerBootstrap - Graylog server 5.2.1+4337e8c starting up
2023-12-02 15:37:48,594 INFO : org.graylog2.bootstrap.ServerBootstrap - JRE: Eclipse Adoptium 17.0.8 on Windows 10 10.0
2023-12-02 15:37:48,594 INFO : org.graylog2.bootstrap.ServerBootstrap - Deployment: unknown
2023-12-02 15:37:48,595 INFO : org.graylog2.bootstrap.ServerBootstrap - OS: Windows 10
2023-12-02 15:37:48,595 INFO : org.graylog2.bootstrap.ServerBootstrap - Arch: amd64
2023-12-02 15:37:48,694 INFO : org.graylog2.bootstrap.ServerBootstrap - Running 67 migrations...

And from there you ought to be ready to run!?

I don’t want to re-install but it should offer a chance to setup the self signed certificate maintenance, and then you are dumped into the system. One nice thing on Windows is you can create UDP 514 Syslog captures with no silly port reflection. Although you could run them in WSLv1 or VM’s entirely by having all of this as native Win64 makes the memory and performance overhead much lower.

Apache

I use graylog to capture my blog’s Apache stats.

In my apache site config under the logging I added this:

LogFormat "{ \"version\": \"1.1\", \"host\": \"%V\", \"short_message\": \"%r\", \"timestamp\": %{%s}t, \"level\": 6, \"_user_agent\": \"%{User-Agent}i\", \"_source_ip\": \"%a\", \"_duration_usec\": %D, \"_duration_sec\": %T, \"_request_size_byte\": %O, \"_http_status_orig\": %s, \"_http_status\": %>s, \"_http_request_path\": \"%U\", \"_http_request\": \"%U%q\", \"_http_method\": \"%m\", \"_http_referer\": \"%{Referer}i\", \"_from_apache\": \"true\" }" graylog_access

CustomLog "|/usr/bin/nc -u 127.0.0.1 12201" graylog_access

Of course, keeping in mind that I do front with Cloudflare, so the source_ip will probably be different for you. Netcat does the job nicely, and since it’s WSLv1 all the TCP/IP is unified so it can intermix just fine.

GELF UDP

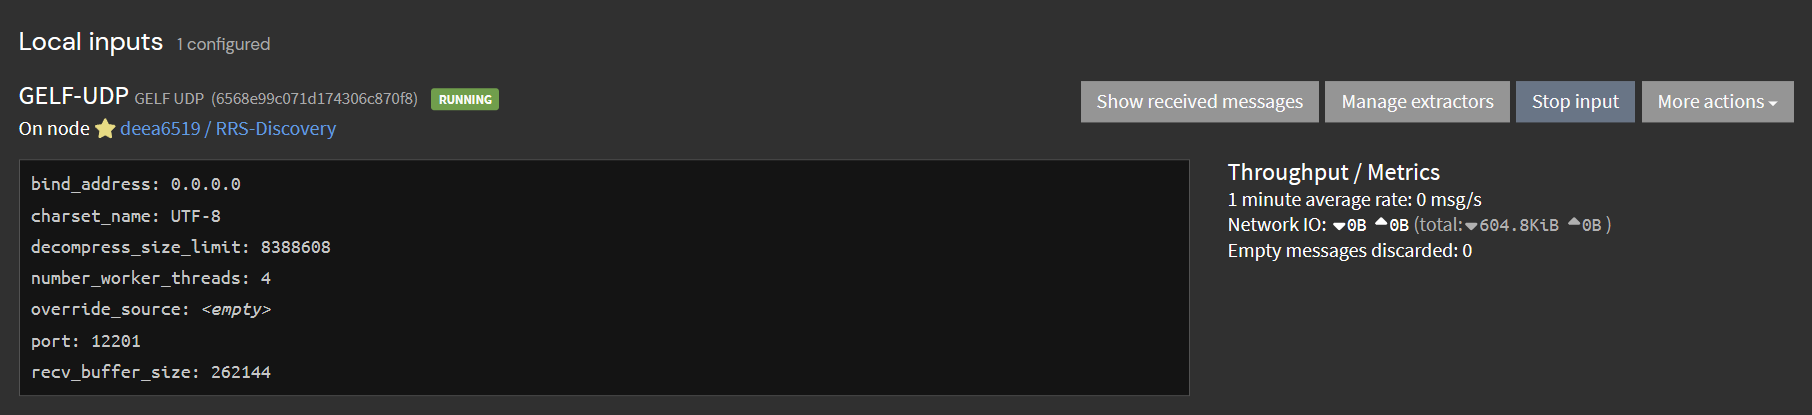
Setting up the input as the stock boring GELF-UDP was a snap, and in no time apache is now sending the access log to Graylog in GELF, and all is well. It’s great!

I know that my setup is.. far from normal, and I do have quite a few VM’s but this old machine is more than capable of hosting this site, a few others, along with the overhead of Graylog.

IBM Xeon workstation

Would I recommend this in production? I have to think that since so much of this is now available on native Win64 that at least 2/3rd of it is capable. I’m not to worried about the potential of Graylog dropping data if the host is interrupted as everything else is here. I can understand if other people have very different thoughts on that. Not everyone wants to run a 90’s datacentre on some old machine tucked under the Christmas Tree, but I guess I’m weird enough to do so.

I suppose the where to go from here, is to get everything else logging to graylog so I can build dashboards, and reports. But that sounds like a lot of work, and at the moment I think this is a good enough place to stop. I should add that it’s been running for nearly 2 days now, so that’s good enough for prime time right? RIGHT?!

Joining NT 4 to a SAMBA Domain Controller

or the Unbridled rage of living on the trailing edge.

I hosted a Porting Party last where where I setup my Dec Alpha as a terminal server allowing people from all over the world to connect in and cross compile software for the 64bit version of Windows for the Dec Alpha. While many problems were overcome, and many more remain, I have to say the most annoying thing was joining a domain hosted by a SAMBA server.

In my mind, I though the easiest way to get files in & out of the Alpha was not to use something like IIS/FTP where it would probably lead to end-less issues with text/binary/active/passive modes, but rather I should rent a VPS, install the OS default SAMBA and just map drives. The benefit of the VPS is that it has a public address, so no NAT is required. The VPS had an option for either CentOS (no) or Debian 10. I went with the Debian, and did an in place upgrade to 11, then 12. Nothing special.

I’d never actually used SAMBA as a domain controller before, but I thought this would be a fun experiment. So the idea is then that the VPS running SAMBA is the Domain Controller, and my Alpha joins it as a member server. Everyone else can use Windows or any SAMBA client and map drives, and then copy files to the VPS, and then copy back and forth from the Alpha to the VPS. This part worked fine.

What didn’t work was SAMBA version 4.

I had come up with this config, based on the fragments of the default config, and and hints from samba.org.

[global]
    netbios name = PDC
    passdb backend = tdbsam
    server max protocol = NT1
    username map = /usr/local/samba/etc/username.map
    workgroup = ALPHAPARTY
    server string = Samba Server
    security = user
    hosts allow = 127.0.0.1, <<<peoples networks...>>>
    load printers = yes
    log file = /usr/local/samba/var/log.%m
    max log size = 50
    passdb backend = tdbsam
    local master = yes
    os level = 33
    domain master = yes
    preferred master = yes
    domain logons = yes
    wins support = yes
    dns proxy = no
    add user script = /usr/sbin/useradd %u
    add group script = /usr/sbin/groupadd %g
    add machine script = /usr/sbin/adduser -n -g machines -c Machine -d /dev/null -s /bin/false %u
    delete user script = /usr/sbin/userdel %u
    delete user from group script = /usr/sbin/deluser %u %g
    delete group script = /usr/sbin/groupdel %g
[homes]
    comment = Home Directories
    browseable = no
    writable = yes
[printers]
    comment = All Printers
    path = /usr/spool/samba
    browseable = no
    guest ok = no
    writable = no
    printable = yes
[public]
    comment = share for everyone
    path = /public
    public = yes
    writable = yes
    printable = no
    creaet mask = 0777

I had endless issues with the machine account not being either created correctly or not being authenticated. I tried manually creating it, to no avail. No matter what I tried it didn’t work.

Working with NT 4.0 must be depreciated or something but no matter what I tried IT JUST DIDN’T WORK.

Feeling outraged, I purged the old Samba, downloaded the source code to 3.6.25, built that, and using the same configuration I had tried to put together, it just worked.

Dec Alpha joining the SMB Domain

Adding users was somewhat straight forward:


useradd -M -s /bin/bash neozeed
passwd neozeed
/usr/local/samba/bin/smbpasswd -a neozeed
/usr/local/samba/bin/smbpasswd -e neozeed
mkdir /home/neozeed
chown neozeed /home/neozeed/

Creating both a Linux user & directory, and the SAMBA credentials. On the terminal server, all that remains was assigning a local home directory & profile directories, as you really don’t want those over the WAN.

I have no idea if this is a warning to others, or whatever the larger issue is.

Porting Party II

At any rate I’ll be running another porting party this coming weekend. I can host cross compiling fine, but we need people with the 64bit Whistler beta installed to test. The best way to get details is over on discord. Lately the IRC bridge is down more than it’s up, and I can’t effectively send out passwords & get your network block to allow access to the RDP, since I’m not going to open up worldwide access to a Windows NT 4.0 SP5 machine.

Porting Party II

So for anyone interested in porting their C/C++ to either the 32bit Alpha Windows, or 64bit Alpha Windows come join us on discord!

I’ll fire up the Alpha on Friday afternoon GMT and expect the event to run all weekend!

64bit computing on a budget

With all that Dec Alpha talk, and how hard it is to get hardware, and how seemingly exclusionary it is, I thought I would try to touch on a more available 64bit ‘risc’ platform, for the masses!

While a couple years ago I had touched on running Windows 10 on the Raspberry Pi 4, in the brave new world of 2023 getting ahold of a pi4 is expensive, hard to find, and kind of depressive, which lead me to this (old) but exciting project, the Renegade Project!

Long story short, there exists enough drivers & information to facilitate a port to the Snapdragon 845, a 64bit System On a Chip( SOAC!), meaning that if you have a device with this chip it *can* be slightly possible to install Windows 10 onto it.

system compatibility matrix, for ants.

Glancing at the system matrix, to me the glaring hole is Charging. 3 systems outright support it, all of them from Xiaomi, the Xiaomi Mix 2s, Xiaomi Mix 3 & the Xiaomi PocoPhone F1. Looking around eBay to start this adventure I found a PocoPhone F1!

Getting the Phone

This seemed like a good start, 29.99, 128GB of flash storage, and I’d later learn 6GB of RAM. The first problem came from Xiaomi. Turns out that the phone was still locked, the seller had neglected to logout from his Xiaomi account. Even worse though he had forgotten his login and password. Calling Xiaomi support was basically worthless. Without unlocking the phone on a reset to root the phone lead me to this:

Locked!

I got lucky however after talking to the seller, he agreed to go above and beyond and we were able to unlock the phone together. So everything went well. If you do buy one of these phones used, MAKE SURE TO CHECK THE XIOAMI login id! It has to be unlocked and blank so you can register it and get the unlock. It will require a valid email & phone number + sim for it to send/receive SMS codes.

Access to the site is very up & down, so I archived what I had downloaded to unlock the phone here. miflash_unlock_en_7.6.602.42.7z

I should add that we’ve cleared the first few hurdles of precuring the device and unlocking it. And I’m glossing over stuff. Getting to this point was not easy and took a week. The unlock process is not intuitive, and I’m sure many phones are sold out there that have their google access wiped, but have not been logged out all the way, or the flash erased. I can’t show you mine as I ended up erasing Android but be aware of this!

Getting ready for Windows

Basically on the Android side there is three main modes, the boot, the recovery and the ‘fastboot’ mode. Holding power & down brings you to fastboot, where using the fastboot tool you can load an image from your PC into ram and execute it. EDK2 UEFI firmware, is the first part or the renegade project you’ll encouter. It’s really powerful, allowing you to not only boot into Windows, but it also supports a linux disk target mode, allowing you to partition and access the flash directly from a PC. Naturally this is SUPER dangerous, and backup your modem files!

With the phone unlocked softbooting E2DK you can put it into a target disk mode, connect it to a pc and partition away!

disk mode… for ants!

The guide (section 1.2) advices pushing the disk tools to the phone booted up in twrp-3.7.0_9-0-beryllium.img. Honestly its easier to just partition it on your computer. HOWEVER if you were to use Windows, there is a slight issue:

The device may no longer be able to boot into fastboot mode

I ran into this issue and thought I had bricked my phone. I was actually in the middle of researching how to do a physical hard reset, and place it into EDL mode (taking it apart and finding which pads to short, when I found this section of the troubleshooting guide, where it’s the partition names. So instead, I ended up doing the partitioning on a Virtual Machine using VMware and Ubuntu.

(parted) print
print
Model: SAMSUNG KLUDG4U1EA-B0C1 (scsi)
Disk /dev/block/sda: 123GB
Sector size (logical/physical): 4096B/4096B
Partition Table: gpt
Disk Flags:

Number  Start   End     Size    File system  Name        Flags
 1      24.6kB  41.0kB  16.4kB               switch
 2      41.0kB  73.7kB  32.8kB               ssd
 3      73.7kB  524kB   451kB                bk01
 4      524kB   786kB   262kB                bk02
 5      786kB   1049kB  262kB                bk03
 6      1049kB  1573kB  524kB                keystore
 7      1573kB  2097kB  524kB                frp
 8      2097kB  4194kB  2097kB               bk04
 9      4194kB  8389kB  4194kB               misc
10      8389kB  16.8MB  8389kB               logfs
11      16.8MB  33.6MB  16.8MB               oops
12      33.6MB  50.3MB  16.8MB               devinfo
13      50.3MB  67.1MB  16.8MB               bk05
14      67.1MB  134MB   67.1MB  ext4         persist
15      134MB   201MB   67.1MB  ext4         persistbak
16      201MB   268MB   67.1MB               logdump
17      268MB   403MB   134MB                minidump
18      403MB   1275MB  872MB   ext4         cust
19      1275MB  1342MB  67.1MB               recovery
20      1342MB  1611MB  268MB   ext4         cache
21      1611MB  123GB   121GB                userdata

Before I did anything, this is what the phone partition table looked like. It’s an exceptional amount. The new parted v 3.0 that is recommended to use, doesn’t support the resize command so I had to manually do the numbers after destroying partition 21.

Originally, I had made a 32Gb partition to keep some Android functionality but somewhere it just stopped booting. But I didn’t care.

rm 21
mkpart userdata ext4 1611MB 32G
mkpart esp fat32 32G 32.5G
set 22 esp on
mkpart win ntfs 32.5GB 123G

21      1611MB  32.0GB  30.4GB  ext4         userdata
22      32.0GB  32.5GB  499MB   fat32        esp         boot, esp
23      32.5GB  123GB   90.5GB  ntfs         win         msftdata

Obviously dont follow this. I’m only providing output as an example.

If I were more patient, I guess I would have dd’d the entire phone to get a full entire backup. But I didn’t get this phone to run Android, so I really don’t care.

There is a LOT of disks being presented to Windows, in case you ever wondered how those 128GB flash devices get sold with only 114GB of user space.

So many partitions!

And even that 112GB is actually usable!

Remember the system partition needs the boot,esp flags, and the windows partition is msftdata. Also make sure the partition names are either single words, or NO words. Spaces will kill the fastboot mode.

I put all the disks that are presented in offline mode, so I don’t get confused. Make sure you are going to mess with the right volumes when formatting after the partitioning. This is NOT for the novice, it would be easy to not only brick the phone but screw up your existing install. If you have physical disks attached you don’t absolutely need, remove them or put them offline to make sure you don’t screw up.

I used diskpart to select the appropriate volumes and format them.

select disk 8
select volume 5
format quick fs=fat32 label="System"
assign letter="S"
select volume 6
format quick fs=ntfs label="Windows"
assign letter="W"

This isn’t a guide, just a reflection of what I went through.

With the disk now formatted, it’s a matter of selecting an OS to install.

I had really bad luck picking random versions of Windows, so I looked until I could find a confirmed working version in this video, Rodando o Windows 10 ARM nativamente em um Dispositivo Android (Pocophone F1 + UEFI). Long story short, it’s Windows build 210521-1658 with version 0.4 of the bootloader. Long story short I messed with LOTS of Windows on ARM driver sets, before I finally had the brave idea to just load it with no drivers:

booted

But that image is far too stale, and expires out very quickly, reducing any useful functionality once it’s connected to the internet. So it’s something that probably could be fixed, but it’s far easier to just grab an image that’s newer.

The x86_64 image I’m using now is 19045.3031, so I guessed to pick something comparable on ARM64. I used something called 19045.3031_arm64_en-us_professional, although it too was out of date, but Windows update brought it up to 22H2 19045.3086 . I had tried the downloader tool and apply all the updates offline, but I had issues. I suspect now in retrospect it was drivers.

Another thing I learned the hard way is that some of these images have multiple OS images installed. I guess it’s de-duplication, along with compression, but be sure to index the image first! I accidentally installed a Home version. Yuck.

dism /Get-ImageInfo /imagefile:install.wim

Index : 1
Name : Windows 10 Home
Description : Windows 10 Home
Size : 17,706,743,995 bytes

Index : 4
Name : Windows 10 Pro
Description : Windows 10 Pro
Size : 17,836,320,420 bytes

So just don’t go wildly apply image #1. I wasted too much time on that one.

But in the release I’m using it’s image #1. I checked. Trust me.

dism /apply-image /ImageFile:10.0.21390.1.co_release.210521-1658_arm64fre\install.wim /index:4 /ApplyDir:W:\

The S volume needs to be populated with the UEFI boot files. I had foolishly thought the boot.wim file would include the boot files, but instead bcdboot can set it up based on the location of a Windows install.

bcdboot W:\Windows /s S: /f UEFI

The next thing to do is install the drivers.

I was lucky enough to get some insight into some driver combination to work, and I came up with this much:

minimal 2210.1-fix
USB beryllium v2.0rc2
FG beryllium v2.0rc2

The key of course is that there is a minimal set in 2210.1-fix that will bring the system up with working USB. The FG package brings in enough of the power management to know the battery status.

dism /Image:W: /Add-Driver /Driver:drivers /Recurse

The drivers are not signed, so that means we need to change a bunch of boot flags. I also turned on debugging so have Windows dump core files, so you can run analysts on them with Windgb.

S:
cd S:\EFI\Microsoft\Boot
bcdedit /store BCD /set "{default}" testsigning on
bcdedit /store BCD /set "{default}" nointegritychecks on
bcdedit /store BCD /set "{default}" recoveryenabled no
bcdedit /store BCD /set "{default}" debug on

Of course the catch being that with no drivers loaded it’s in a super basic mode, with no USB, no touch screen, no power management, no wifi no nothing. So it’s a brick. But at least we’ve reproduced enough to show that you can boot Windows.

Sadly, loading all the drives from 2210.1-fix or beryllium v2.0rc2 lead to this:

the cracked glass adds to the feeling.

Add in a much needed OTG adapter and a mouse or keyboard, and you can complete the installation.

However, since I left off the majority of the device drivers as I didn’t want to spend forever trying to track it down, I used a random USB to Ethernet adapter and thankfully It just worked!

Accessing the phone over RDP.

I added a fancy USB 3.0 ‘dock’ with USB-C connector that you can plug a charger into, so that not only can the phone stay connected to power, but there is room for the Ethernet. It also has HDMI, perhaps is the drivers were more stable, it could be a viable desktop? And I have what I wanted, which was a non Intel/AMD 64bit platform that is hopefully more reliable than the Alpha64 platform, and maybe something to do some kind of contrast of the past vs future

This was NOT a simple thing to go through. I would be extremely hesitant to advise other people to follow suit. But in the off chance anyone who wants to do it, might have a better idea of what is involved.

Read the Troubleshooting guide & the Installation guide. Keep notes! I would have absolutely given up, without keeping notes.

Even simple tracking of disasters like this at least helped me along:

210521-1658
10.0.21390.1.co_release.210521-1658_arm64fre
boot-beryllium Version 0.4.1.img
boot-beryllium-ebbg Release - 2210.1.img

boot-beryllium-ebbg Release - 2210.1.img

boot-beryllium-ebbg Release - 2210.1.img

boot-beryllium-ebbg Release - 2210.1.img
no drivers

no drivers

v1.1.1


v1.1


FocalTechTouch v2.0rc1


v2.0rc1
INTERNAL_POWER_ERROR

installer


SYSTEM THREAD EXCEPTION NOT HANDLED


SYSTEM THREAD EXCEPTION NOT HANDLED

installer


SYSTEM THREAD EXCEPTION NOT HANDLED

Sorry the table doesn’t format well.

TL;DR don’t do it, unless you don’t mind spending too much time on this. Get a used Surface X instead.

AXP64 2210 Installation Media Reconstruction

Yes, Neko is ALPHA64 Powered!

Introduction

Unfortunately, during this amazing period, the Dec Alpha I had acquired specifically for this research had died. However, I was able to find an amazing group of people to not only go through with this research but take it upon themselves to provide an amazing working ISO image release! Needless to say, this is beyond my knowledge, and this is obviously a guest post

Background

In ~1997, Microsoft started work on a project dedicated to porting Windows NT to use 64-bit addressing on 64-bit machines. Before this, Windows NT used the 32-bit mode or ABI of 64-bit machines. This effort was internally referred to as “Sundown”, otherwise referred to as “Win64”. The ports consisted of not only to the Itanium/IA-64 architecture (which later shipped as Windows XP 64-Bit Edition) but also to the 64-bit DEC Alpha architecture.

Compaq dropped support for Windows on Alpha in mid-1999, and Microsoft stopped the development of 32-bit Windows NT for Alpha soon afterwards, with Windows 2000 build 2128 (RC2) being the last build. Due to a lack of physical IA-64 hardware and the slowness of the simulator, Microsoft continued to work on the AXP64 port of Windows till mid-2000, to help fix general issues related to 64-bit addressing. You can read more about this project here.

In May 2023, a disk image containing an installation of an AXP64 build of Windows XP (Whistler) build 2210 was discovered by a guest reader of this site, and a team (amarioguy, neozeed, pivotman319, starfrost and Tenox) was later assembled to help make this release possible.

Why Repack To ISO

When I saw the news about this build, I asked my friends why didn’t neozeed or Tenox share the full disk image, they told me that the disk image contained PII (Personally Identifiable Data) and neeozeed would like to have them removed first. I have some experience with cleaning up Windows builds, so I joined their Discord server and offered to help, then I got sent a full sector dump of that disk. I scanned the build 2210 partition with a file recovery tool that I stole from a data recovery shop when I worked there, and to my amazement, quite a few files in the deleted \$WIN_NT.~LS directory (a place for holding temporary setup files) survived (more importantly, setupdd.sys, txtsetup.sif, setupldr and the hiv*.inf files). Since all the files required for a clean install from ISO/CD are there, this build can be repacked into an ISO which is guaranteed to contain no personal information!

Recovery

The first thing I did was I recovered all of the files in the deleted \$WIN_NT.~LS directory, but since the integrity of files recovered from NTFS and FAT partitions cannot be guaranteed, I checked every single one of them. Most of those files were Microsoft Cabinet (CAB) archives, so I wrote a tool called CabChk to verify that 1) they are valid CAB archives, 2) there is only one file per archive, 3) the name of the compressed file is the same as the name of the archive and 4) the compressed file extracts fine. This helped me to verify most of those 4600 files, but I had to verify the remaining 300 or so files by hand because they’re not CAB archives and that task alone took days to complete. After verifying all the recovered files, it turned out that 85% of them survived while the remaining 15% didn’t.

Repacking

A lot of those overwritten files are actually in the Windows directory (NT64) of that 2210 install, so I copied them out and recompressed the appropriate ones. I set my computer to the time zone Microsoft used and compressed them with the Cabinet Tool (CABARC) parameters Microsoft used. Microsoft used UTC-8 and the following CABARC parameters:

CABARC -m LZX:21 N [output_cab] [input_file]

After repacking and copying over the files, the number of missing files went from about 650 all the way down to roughly 30 :).

Missing User Mode Setup Stub

Unfortunately, usetup.exe was one of those 30 or so files. It doesn’t do much as it’s a stub, but nonetheless without it, text mode setup won’t start. My original idea was to decompile I386 build 2211’s usetup.exe (as it has only about 20 functions) and recompile it for AXP64 with the toolchain discovered earlier on, but I had to wait for someone to cross compile it on an Alpha for me. While I was waiting, I searched that partition for substrings in the I386 usetup.exe and I got a match!

It’s compressed, but since LZNT1 is a simple and weak-ish compression algorithm, you can sort of recognise the original data. I cobbled together an LZNT1 decompressor and decompressed that 32 KiB chunk, and indeed it’s the AXP64 usetup.exe!

E:\Projects\LZNTTool>LZNTTool -d "E:\Whistler 2210 AXP64 Recovery\usetup_compressed_0.bin" "E:\Whistler 2210 AXP64 Recovery\usetup_0.bin"
Decompression successful.

E:\Projects\LZNTTool>wsl hexdump -C -v -s 0x600 -n 0x200 "../../Whistler 2210 AXP64 Recovery/usetup_0.bin"

I then searched for strings expected to be in the second 32 KiB chunk and then the third chunk and so on, until I got all of them recovered. After decompressing all of the 5 chunks, I concatenated them together into one single executable and yay, we now have the original AXP64 usetup.exe!

E:\Projects\PEChkSum>PEChkSum "E:\Whistler 2210 AXP64 Recovery\usetup.exe"
Expected checksum is: 0x00035E4E
Actual checksum is: 0x00035E4E

"E:\Whistler 2210 AXP64 Recovery\usetup.exe" is valid.

Broken Driver Cabinet

pivotman319 pointed out to me that some files in driver.cab were dead, and indeed, Setup did not work with that broken cabinet:

Crash to the NT firmware Monitor

There were 2 copies of driver.cab on that disk, sadly the deleted one in $WIN_NT.~LS got overwritten and the one in \NT64\Driver Cache\axp64… well, 68 errors 😢:

Looking at the broken files, I noticed a pattern – all of them came from 3 blocks – 5, 36 and 37. What on Earth are “blocks”? Well, let’s talk about how CAB archives work first.

Files in CAB archives are stored in blocks, where each block stores 1 or more files. When files are added to a CAB archive, they are all concatenated together into one big file. The concatenated big file is then split into multiple sub-blocks (with default size of 0x8000 bytes) and each of them gets compressed and then concatenated together to form the compressed block. So, for small corruptions (bit-rots and etc.), theoretically only 0x8000 bytes are lost and the rest should still be recoverable, but tools like 7-Zip will refuse to extract anything beyond the point of corruption.

Now looking at the corruption in driver.cab, 2 of the 3 blocks can be fully recovered because we have all of those files in uncompressed form. Block 5 contains mostly printer-related files that are arch- and build-independent, so they can all be borrowed from build 2211 i386. Block 37 has only 1 broken file (win32k.sys) which exists on the hard drive (in system32). To fix these blocks, I simply took the uncompressed files, compressed them and replaced the broken blocks with the newly created ones.

And after fixing block 37:

I then ran my CabScan tool on the fixed CAB and as expected, there is only one bad sub-block left:

E:\Projects\CabScan>CabScan "E:\Whistler 2210 AXP64 Recovery\driver (fix).cab"
Offset 0x0253FD75:
    Expected checksum is 0x568C0AC3
    Checksum is 0x1CEBB9DE
    Original size is 0x00008000
    Compressed size is 0x00003862

Detected 1 bad sub-block(s) in 1 bad block(s).

So, what can we say about the corruption?

  1. Size: 4 bytes
  2. Location: Last 4 bytes of a 0x2000 section
  3. Pattern: Starts with 00 F0 (possibly the result of a buggy NTFS driver)

Knowing these, I immediately located the 4 corrupted bytes in block 36:

So how did I recover those 4 bytes, did I brute force them? Nope, I used the checksum to calculate them! Here is the checksum algorithm Microsoft used for CAB archives:

CAB checksum algorithm

And as you can see, it’s very simple, so it took me almost no time to work out the 4 missing bytes (4A ED 16 71) from the checksum 0x568C0AC3! With block 36 fixed, as expected, all files are now good!

Buggy Setup Loader

I thought I got everything necessary recovered and fixed, so I packaged up the files and sent them to G-Nug85 to test… and it didn’t work:

It failed to find A321064.PAL in the [SourceDisksFiles] section of txtsetup.sif. Well, this is an AXP64 build and A321064.PAL is a 32-bit PALcode image… why would it be there? Needless to say, copying that file to the disc image didn’t help. I have literally spent days on this stupid issue and who would have expected this:

E:\Whistler 2210 AXP64 Recovery>wsl strings -t x SETUPLDR | wsl grep -i '.pal'
  91f68 A321064.PAL

The culprit of the problem was they hard coded the name “A321064.PAL”… in the setup loader executable… how stupid!

We can tell from this that Microsoft has never made ISOs or discs for AXP64 builds, otherwise they would’ve found and fixed this bug. Well, maybe they did eventually try installing AXP64 builds from disc, because it’s fixed by the time of Windows XP SP1, but that’s long after this build:

#if defined(_AXP64_)
        SlGetDisk("a121165.p64");
#else
        SlGetDisk("A321064.PAL");
#endif

Oh well, I replaced the hard coded “A321064.PAL” with “a121165.p64” and what do you know, it’s working!

Finishing Touches

That install went smoothly, but one error did pop up during second stage setup:

A missing driver – big deal, hey? We actually have the build 2209 AXP64 version of this driver, so I injected it to the ISO and Setup happily accepted it.

I’ve also copied the Arc Installation Program (ARCINST) from Windows 2000 build 2128 AXP32 to the AXP64 directory of the ISO, because it is required for disk partitioning if you don’t have AlphaBIOS (and yes, it works because it’s not a Windows executable).

Supported Machines

Microsoft compiled several HALs for this build, but not all of them are listed in txtsetup.sif, the following machines are supported by default:

  • Digital Personal Workstation A-Series
  • Digital AlphaServer 4×00 5/xxx Family
  • Digital AlphaServer/AlphaStation 1200 5/xxx Family
  • Digital Alpha 21264/Tsunami Uniprocessor
  • Digital Alpha 21264/Tsunami Multiprocessor

The following machines may be supported if you replace textsetup.sif with a modified version:

  • Digital Alpha EB164
  • Digital Alpha PC164SX
  • Digital Alpha XL 300/366 Family
  • Digital AlphaPC 164LX
  • Digital AlphaServer 1000 5/xxx Family
  • Digital AlphaServer 1000a 5/xxx Family
  • AlphaServer 800 5/xxx (Corelle)
  • AlphaStation 600A 5/500 (Alcor Primo)

We have only tested this build on the Digital Personal Workstation A-Series, AlphaServer DS10 and the AlphaServer 800, so there is no guarantee that the other HALs work (though they should).

Also, since this is a checked build, it does run slower than a retail build, and by default it will expect you to have a kernel debugger attached. Be sure to add the /NODEBUG flag to the bootloader to improve performance. I had noticed the SDL spite test demo going from 60fps to 70fps on my Alpha Personal Workstation 500a before it had died.

For Preservation

As I have said earlier on, Microsoft has never made ISOs/discs for AXP64 builds, so please don’t preserve the ISO file (eg: don’t upload it to BetaArchive). I know BA prefer ISOs over folder dumps, so let me tell you this mrpijey, the ISO is a franken-build with a patched Setup Loader and files from 2128, 2209 and 2211. We have a folder dump of the original files from the \NTDev network share with original high-precision timestamps just for preservation, so please for the sake of preservation, use this. Also don’t even think about creating an ISO out of the folder dump, you’ll end up with a non-existent thing that doesn’t work.

Download

ISO for Installation: https://mega.nz/file/q5AhhDJR#MsLYxxvmAdYDQ101fUHoGyzJ5Pk0EFsc2xdYH1p9qxQ
Whistler 2210 axp64 installable

Folder Dump for Preservation: https://mega.nz/file/r5gE3RxQ#4VfviMdQo44wJZT0df0cw8o4kE30lvSQKBZklma0mtg

Modified TXTSETUP.SIF For Other Machines: https://mega.nz/file/zsBVAJDD#5oQVM6U2AwseTJ54lOmN1E7BHTDFuwOuWdZOykmXP8E

Special Thanks

  • to the person who sent us the disk image
  • to Microsoft for not wiping that disk before throwing it away
  • to pivotman319 for verifying recovered files and finding missing files
  • to Tenox for testing
  • to G-Nug85 for testing and providing photos used in this post
  • to Furball for testing
  • to lbdm for testing
  • to myself… I guess?

Special Offer – Windows 2000 RC2 AXP32 Full ISO

The ISO on BetaArchive is the same as the ISO on WinWorld, which was originally named usa_2128_axpfre_win2000.pro_beta3_cairo.iso… hmm, that doesn’t sound very ‘Microsoft’!

Yep, definitely not original. Even worse, SETUP.EXE is broken/truncated:

The fact that the AXP32 2128 ISO we’ve had for over a decade is both unoriginal and incomplete is truly shocking! Well, I have something to offer – an at least complete Windows 2000 build 2128 AXP32 ISO from my private collection:

The SETUP.EXE in this ISO is good and complete! The CDIMAGE parameters used to build this image matches what was used to build ISOs of AXP32 builds from the same era and the disc label (W2PAS_EN) is much more sensible than “Cairo_2128”. The only thing that doesn’t make sense is the timestamp – 1999-09-23 12:00:00. Microsoft used 1999-09-10 as the timestamp for all other copies of build 2128, so I’m not sure why this one is different. It’s worth noting that all files from the incomplete ISO also have the strange 1999-09-23 timestamp, so I guess it’s not a coincidence ¯\_(ツ)_/¯.

Download: https://mega.nz/file/qoYyUbLB#oKArX_Qqh_kjnESnT6dQD8NGTg05_CMhKMxW4FKuhjEWindows 2000 build 2128 DEC Alpha

Windows 2000 64-bit for Alpha AXP

(this is a guest post by Antoni Sawicki aka tenox)

Hinted by friends on Discord, Neozeed recently “discovered” a Win64 compiler for AXP64 / ALPHA64. It came as part of Windows Platform SDK from 1999. Microsoft wanted developers to test-compile their code to see if it’s “64bit ready”, well ahead of the 64bit hardware even being available. However, this was just a cross-compiler and there was no way of running any of the binaries. That is until Itanium eventually came out, after infamously long delays. The Win64 project for AXP64 and IA64 was code name “Sundown”.

Trying the compiler, just for fun, I built Alpha64 version of Aclock – with zero hopes of ever being able to run it. There are some known surviving machines with AXP64 stored at Microsoft Archives. In fact I saw one with my own eyes, last time I visited there some 10 years ago:

DEC Alpha with AXP64 Windows at Microsoft Archives.
DEC Alpha with AXP64 Windows codename “Sundown”, at Microsoft Archives, 2014

The machine in picture above was featured in a blog post by Raymond Chen, which is a must read. It will give you background info on the whole Alpha 64bit situation. Sadly, 64-bit Alpha AXP Windows was never released outside of Redmond.

And that would be the end of the story… if not for one generous reader, who contacted Neozeed after his previous post, and shared a disk image… containing non other but a 64bit build of Windows 2000 for Alpha AXP! The reader got it from a lot of random hard disks, bought from an e-waste, years ago and completely forgot about it until they saw the blog post!

The image was previously installed on Digital Personal Workstation. Having a PWS500 with ZuluSCSI handy, I was able to slap the image on an SD card and boot it up:

Windows 2000 Alpha64 Splash Screen

The system BSOD shortly after. Turns out, this is a checked (debug) build and requires a permanently attached kernel debugger to even boot up. Initially WinDbg and kd.exe refused to work, as the target CPU did not match the host (the exact error code is: KD Version has unknown processor architecture). After some deliberation and help from friends, I learned that alphakd.exe can be run on x86 machine to cross debug an Alpha target. Most importantly it works with AXP64!

Another problem was that the system came up with “Found New Hardware” wizard and there was no functioning keyboard and mouse to click through it. Yes, I tried safe mode, VGA mode, etc., but nothing worked. The system was completely stuck on this dialog:

Fortunately, the network card worked. Neozeed and I built and hacked in to the registry an rlogin daemon. Finally solved the PNP fuckup by remotely executing a VBScript that clicked through 20+ “found new hardware” and “install unsigned driver” dialogs. Eventually, a PCI to ISA bridge was found and keyboard and mouse came up!

Aclock running on 64bit Windows on Alpha AXP

Unfortunately there are no identifying marks that would definitely prove that this is a 64bit Alpha AXP build. The only way to tell is because there is no WOW, even for AXP32. You can’t run 32bit Alpha binaries. It will only run executables produced with the ALPHA64 compiler. This also means in practice there is no self hosted, native compiler. You have to cross compile on 32bit NT4 or 2KRC.

For sake of search engines the build number is 2210, the full string: 2210.main.000302-1934.

Update I have copied and ran a x86 `winmsd.exe` from Windows NT 4.0 and this came out:

How is it possible to run x86 binary? Because of Fx!32.

Update: So what else is in the image?

First of all, everyone is asking about Pinball… Yes, it’s there, but it won’t start:

In addition, I can’t open the event details. Maybe one day we can debug it with NTSD.

Other than that, it has some basic stuff, the every other Windows would have. Internet Explorer 5.5, agent: Mozilla/4.0 (compatible; MSIE 5.5; Windows NT 5.0). Sadly msinfo32 doesn’t work, unable to connect to a service.

The image, similar to other private builds, comes with Internal Developer Workstation (IDW). It’s a set of developer tools, that most of (but not all) were released in Platform SDK and/or Windows Resource Kit.

There are a bunch of unix like utilities, cp, mv, ls, kill, etc.:

build.exe version 4.03.2209

It can build for AXP32 and IA64:

There also are two famous text editors, Microsoft Editor aka MEP / Z and Stevie, VI clone:

Lastly, lets explore 64bit Alpha AXP gaming scene! While Pinball doesn’t work, IDW comes with an impressive amount of games. Microsoft engineers must have been busy playing these while waiting for builds to complete…

64-bit gaming on Alpha AXP

We have 4 different card games, FreeCell, Solitaire, Gold and Cruel. Also Taipei game, TicTactics, Reversi, Minesweeper and Snake.

AXP64 NT also has fully working OpenGL Screensavers:

If you want to see this live in action. We going to be exhibiting on VCF West 2023 in August, alongside other NT RISC machines. Come and see us!

Hiding in plain sight: The 64bit Dec Alpha C compiler

Of all the Microsoft Windows NT versions, the few of the rare ones include:

  • The i860 version, the original N-Ten that put the NT in NT.
  • The DEC 5000/MIPS version
  • The Clipper version
  • The SPARC/LE version
  • The HP9000/HPPA version
  • The AXP64/ALPHA64 port, the first 64bit version of 2000

Sadly, I don’t have any leads on any of the above. But while I was looking for the first public Win64 compiler that I could remember, it was just the frontend to the Itanium compiler, not letting you actually compile anything. Anyways I was able to find these two downloads:

And both of them have the same Win64 SDK, which includes this quick note in the readme:

Platform SDK support for Win64(tm)

This release of the Platform SDK will allow you to test-compile your
code for Win64. It supports the new 64-bit data types and pre-beta
releases of an IA64 compiler and an ALPHA64 compiler and linker.

1999 Platform SDK

It’s the same thing on both discs from what I remember.

Installing the SDK is certainly a product of it’s time, with a seemingly incredible amount of products to support.

I haven’t tested yet, but I have to wonder how integrated all the tools are into Visual C++. Stay tuned?!

Also there was still POSIX support. Windows 2000 was the last to support all the subsystems.

And of course, the star of the attraction, the 64 bit Test Compiler. There is an incredible amount of products and options to select, It must have been absolute chaos at Microsoft in the late 90s!

If you are on an intel based system, the 64bit compiler will be the top half of the Itanium compiler. It lacks the C2.DLL so it will not emit any assembly or object files. There is no linker libraries either, so for all intents and purposes it’s useless.

However, if you were to install this super preliminary SDK on a Dec Alpha you would instead discover a version 13 build of Microsoft C/C++

Microsoft (R) & Digital (TM) Alpha C/C++ Optimizing Compiler Version 13.00.8499
Copyright (C) Microsoft Corp 1984-1999.
Copyright (C) Digital Equipment Corporation 1992-1999.
Copyright (C) Compaq Computer Corporation 1998-1999.
All rights reserved.

The Visual C++ 6.0 on the Dec Alpha however is a version 12 compiler. So this is a big surprise for AlphaNT users!

And added to version 13 are these flags:

  /Ap32 enable P32 model
  /Ap64 enable P64 model (default)

That’s right! It turns out that the AXP64 compiler set has been hiding in plain sight for DECADES. I know that it’s so unlikely that we’d ever see any public release of a 64bit version of Windows for the Alpha, but oddly enough the compiler, headers and libraries are all there. YES You can make full EXE’s for AXP64/Alpha64. Of course with no OS, so it’s not like you can run them.

The compilers have been tested on NT 4.0 Terminal Server & 2000 RC2.

For anyone wondering here is how I ran it to compile then link a 64bit exe:

C:\proj>cl /c /Ap64 mt.c /Fomt64.obj
Microsoft (R) & Digital (TM) Alpha C/C++ Optimizing Compiler Version 13.00.8499
Copyright (C) Microsoft Corp 1984-1999.
Copyright (C) Digital Equipment Corporation 1992-1999.
Copyright (C) Compaq Computer Corporation 1998-1999.
All rights reserved.

mt.c

C:\proj>link mt64.obj /MACHINE:ALPHA64
Microsoft (R) Incremental Linker Version 6.20.8528
Copyright (C) Microsoft Corp 1992-1999. All rights reserved

There is no point sharing the EXE as I mentioned above, there is nothing to run it on. But for the heck of it, here is uuencode compiled into assembly in both 32bit & 64bit mode.

I can’t imagine why, but for people who want to take them apart you can download the tools here.

Sadly as of today, there is no way to test. There is one surviving machine with Windows 2003 AXP64, outlined in an article by Raymond Chen. Its a great read about how Alpha64 NT port came to be. The machine is still sitting in Microsoft Archives. Hopefully one day someone can dig it out.

That said there is also version 13 compilers for both Itanium & AMD64. Although we can do stuff with the AMD64 port which I will try to write into something a bit more.. sane.

I found this a few weeks ago, and thanks to @tenox for giving me Alpha access to play a little with this hidden gem. It’s still crazy we’ve all had Alpha64 tool access the entire time.

Not as fun as Win64 Itanium, the earliest AMD64 Windows I can find

It does feel a lot like Windows XP for the Itanium, that strange half world of existence. It’s also from September 2003, the release image being named: 5.2.3790.1069.srv03_spbeta.030905-1850_amd64fre_client-professional_retail_en-us-AB1PXFRE_EN.iso

I’m sure if you google around you can easily find it.

To install you apparently need an early AMD 64 processor, otherwise it’ll trap on the installer. Back in 2004, I got a newly refurbished AMD Athlon 64 3200+ processor, from Tiger Direct. The machine was only a few months old, and I was able to get an early XP build for it. Oddly enough it’s simple enough to install on Qemu. I was able to use 0.90 & 7.20, jumping at extremes, although the PCI NIC IRQ’s do jump around on 0.90 preventing the networking from working.

I had a LOT of trouble getting a bootable hard disk image out of this for some reason. So I’ve found keeping C around 2,000 Megabytes, and installing MS-DOS 5/6 got me a bootable system. Also preserving the FAT disk. Not sure why but doing formats of FAT or NTFS always seemed to result in a non bootable disk

qemu-system-x86_64w.exe -cpu Opteron_G1-v1 -hda 2g.vmdk -m 512 -M pc-i440fx-2.0 -net nic,model=rtl8139,netdev=f00 -netdev user,id=f00,hostfwd=tcp::5555-:3389 -usb -usbdevice tablet  -accel tcg,thread=multi

Special thanks to RoyTam for the suggestion of the USB tablet & turning TCG multithreaded for v7+ of Qemu

Setting up is pretty normal.

You do get 360 days to use the beta. More than enough for simple testing. I’ve seen that the timebomb doesn’t work correctly so it may work forever. But it’s so rough around the edges, I can’t see anyone trying to run this native in 2023.

Notice it’s all AMD branding. Intel officially didn’t have their EMT64 Pentium 4’s, although IBM was pushing Intel hard to get them out the door. And I think they held off on a larger x86_64 launch as Intel had not publicly caved.

And in no time you are up and running. I find the mouse really weird on Qemu, so I always enable the remote desktop function and find it much easier to deal with.

One of the advantages of RDP is that audio redirection does work, so you can play pinball!

One annoying thing (to me) is that the SysFader process will hang all the time locking explorer.exe . Along with that it’ll leave phantom UI elements haning around like the Run… above. Yes, its annoying!

The solution is of course System Properties, and Performance, and either disable the Fade elements, or just turn off all the ‘eye candy’ which basically doesn’t really exist for this release anyways.

While there is some DirectX support, it is most likely just simple GDI passthrough, and of course no acceleration as the OpenGL screensavers run incredibly slow.

And thanks to betawiki.net for some hints & tips. I haven’t tried the VMware path, since AFAIK there is no other NIC drivers for this release.

As mentioned, hardware support is VERY limited. The single audio driver is a MPU401 port. This obviously was meant for an exceptionally limited audience.

The one thing I cannot find, is any version of a Platform SDK that targets AMD64 so early. The earliest I can find is version 14 from 2005.

The 2005 compiler does have this note:

The Microsoft® C/C++ AMD64 Processor Family-targeting compiler is a cross-compiler targeting the AMD64 processor family. The compiler runs on an x86 or AMD64 computer running Microsoft Windows® XP or Microsoft Windows® Server 2003. It is the compiler used for Microsoft® internal development and is used for building Microsoft Windows NT®, Microsoft SQL Server®, and other major applications. For debugging we suggest the use of WinDbg for AMD64. Visual Studio Whidbey will support the use of the Visual Studio debugger for debugging AMD64 applications.

2005-06 – 2944.0 – Platform SDK for Windows Server 2003 SP1 (April 2005 Edition)

With the compiler being:

Microsoft (R) C/C++ Optimizing Compiler Version 14.00.40310.41 for AMD64
Copyright (C) Microsoft Corporation. All rights reserved.

If anyone knows of anything earlier, I’d love to know! If only for the sake of messing around with it.

Missing Neko98

Neko on ARM

With the collapse of my vpsland archive, Neko has become lost once more again. Thankfully I had some fragment backups so I have been able to bring Neko back from the grave. again.

First I dumped everything I had over on sourceforge. With a bit more digging I found the old RISC versions as well. I even found the Itanium version, although I lost the ARM version. Im not sure I have an 8gb pi4 anymore, but I’d like to get one when/if prices stop being insane. Anyways I also uploaded the source to github, since it’s more hip and acceptable for zoomers. I do have to say the git mirror command was everything I’d hoped it’d be.

git push --mirror https://github.com/neozeed/neko98.git

It literally was that easy.

I put a binary built with Visual C++ 2010 SP1 over there too. Although if you need Visual C++ 2010 runtimes, I put them on sourceforge.

Also I should add in the settings make sure you click “Always On Top”, otherwise Neko will be hidden to the desktop surface and you won’t see him.

I hope you enjoy!

Space Cadet 3D Pinball reverse engineered!

With all the controversy over 64bit pinball, and where and how things appeared, then disappeared to the discovery that the x64 version was a thing, but it was left off the install manifest but shipped on CD, along with my simple script to just extract it, the problem was that ARM32/64 users were left in the cold.

Don’t get me wrong, the original 32bit exe runs fine under emulation, but who wants emulation when you can have NATIVE CODE?! You’d have to try to find the source code (lol good luck!) or reverse engineer the program. And that’s what happened, enter:

k4zmu2a/SpaceCadetPinball: Decompilation of 3D Pinball for Windows – Space Cadet (github.com)

64bit ARM Pinball!

I’m using Visual Studio 2019 to build this, and it was great it *just worked*. Hurray!

There is also a rebuild going on for SDL to bring Space Cadet Pin Ball to Linux and beyond. The only downside is that it uses a number of ‘new C++ features’ locking out older platforms. I’d done some work to dumb it down although there is a bit of this new fangled C++ I’m unsure of what is going on. So that means, unfortunately Itanium users are left in the dark, as Visual Studio 2010 is too old.

AMD64 Pinball extravaganza!

With all the talk of 64bit versions of Pinball I thought I’d share simple script to extract Pinball from an XP x64 CD-ROM so you can take it with you. It’s portable so thats nice too, although it doesn’t use any wad/pak/zip files so all the assets are loose files:

expand f:\amd64\font.da_ font.dat
expand f:\amd64\pinball.da_ pinball.dat
expand f:\amd64\pinball.ex_ pinball.exe
expand f:\amd64\pinball.in_ pinball.inf
expand f:\amd64\pinball.mi_ pinball.mid
expand f:\amd64\pinball2.mi_ pinball2.mid
expand f:\amd64\sound1.wa_ sound1.wav
expand f:\amd64\sound104.wa_ sound104.wav
expand f:\amd64\sound105.wa_ sound105.wav
expand f:\amd64\sound108.wa_ sound108.wav
expand f:\amd64\sound111.wa_ sound111.wav
expand f:\amd64\sound112.wa_ sound112.wav
expand f:\amd64\sound12.wa_ sound12.wav
expand f:\amd64\sound13.wa_ sound13.wav
expand f:\amd64\sound131.wa_ sound131.wav
expand f:\amd64\sound136.wa_ sound136.wav
expand f:\amd64\sound14.wa_ sound14.wav
expand f:\amd64\sound16.wa_ sound16.wav
expand f:\amd64\sound17.wa_ sound17.wav
expand f:\amd64\sound18.wa_ sound18.wav
expand f:\amd64\sound181.wa_ sound181.wav
expand f:\amd64\sound19.wa_ sound19.wav
expand f:\amd64\sound20.wa_ sound20.wav
expand f:\amd64\sound21.wa_ sound21.wav
expand f:\amd64\sound22.wa_ sound22.wav
expand f:\amd64\sound24.wa_ sound24.wav
expand f:\amd64\sound240.wa_ sound240.wav
expand f:\amd64\sound243.wa_ sound243.wav
expand f:\amd64\sound25.wa_ sound25.wav
expand f:\amd64\sound26.wa_ sound26.wav
expand f:\amd64\sound27.wa_ sound27.wav
expand f:\amd64\sound28.wa_ sound28.wav
expand f:\amd64\sound29.wa_ sound29.wav
expand f:\amd64\sound3.wa_ sound3.wav
expand f:\amd64\sound30.wa_ sound30.wav
expand f:\amd64\sound34.wa_ sound34.wav
expand f:\amd64\sound35.wa_ sound35.wav
expand f:\amd64\sound36.wa_ sound36.wav
expand f:\amd64\sound38.wa_ sound38.wav
expand f:\amd64\sound39.wa_ sound39.wav
expand f:\amd64\sound4.wa_ sound4.wav
expand f:\amd64\sound42.wa_ sound42.wav
expand f:\amd64\sound43.wa_ sound43.wav
expand f:\amd64\sound45.wa_ sound45.wav
expand f:\amd64\sound49.wa_ sound49.wav
expand f:\amd64\sound49d.wa_ sound49d.wav
expand f:\amd64\sound5.wa_ sound5.wav
expand f:\amd64\sound50.wa_ sound50.wav
expand f:\amd64\sound528.wa_ sound528.wav
expand f:\amd64\sound53.wa_ sound53.wav
expand f:\amd64\sound54.wa_ sound54.wav
expand f:\amd64\sound55.wa_ sound55.wav
expand f:\amd64\sound560.wa_ sound560.wav
expand f:\amd64\sound563.wa_ sound563.wav
expand f:\amd64\sound57.wa_ sound57.wav
expand f:\amd64\sound58.wa_ sound58.wav
expand f:\amd64\sound6.wa_ sound6.wav
expand f:\amd64\sound65.wa_ sound65.wav
expand f:\amd64\sound68.wa_ sound68.wav
expand f:\amd64\sound7.wa_ sound7.wav
expand f:\amd64\sound713.wa_ sound713.wav
expand f:\amd64\sound735.wa_ sound735.wav
expand f:\amd64\sound8.wa_ sound8.wav
expand f:\amd64\sound827.wa_ sound827.wav
expand f:\amd64\sound9.wa_ sound9.wav
expand f:\amd64\sound999.wa_ sound999.wav
expand f:\amd64\table.bm_ table.bmp
copy f:\amd64\WAVEMIX.inf WAVEMIX.INF

Naturally you’ll want to substitute F:\ with whatever drive letter your CD-ROM/ISO file is mounted on.

And thanks to a long needed feature in Windows 10 you can verify that yes indeed it is a 64bit version.

Or skip the pain, and download the first currently available AMD64 version here: pinball-3790-1069.7z

Isn’t that awesome?! Obviously ARM64 users are left out in the dark, as far as I know there was no ARM64 versions of Windows XP. As a matter of fact, was there any public versions of Windows XP for ARM? Naturally the Surface RT shipped with 8.0

Anyways at long last we can have our 64bit pinball despite the weird bugs, and how the plunger is mostly hidden no doubt due to yet more weird floating point/integer size inconsistencies