Microsoft Editor

(This is a guest post by Antoni Sawicki aka Tenox)

In a recent blog post Wanted: Console Text Editor for Windows I lamented about lack of a good console/cmd/PowerShell text editor for Windows. When researching for the article I made rather interesting discovery. There in a fact has been a native Windows, 32bit, console based text editor. It was available since earliest days of NT or even before. But let’s start from…

…in the beginning there was Z editor. Developed by Steve Wood for TOPS-20 operating system in 1981. Some time after that, Steve sold the source code to Microsoft, which was then ported to MS-DOS by Mark Zbikowski (aka the MZ guy) to become the M editor.

M editor

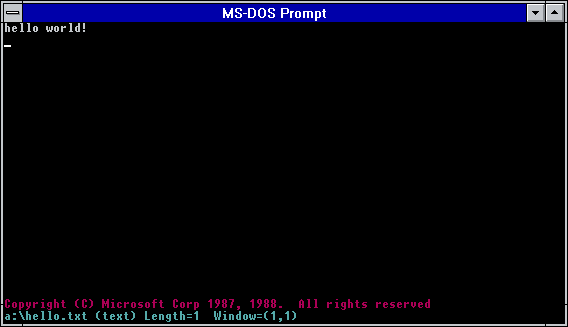
The DOS-based M editor was included and sold as part of Microsoft C 5.1 (March 1988), together with the OS/2 variant, the MEP editor (perhaps M Editor Protected-mode). The official name of M/MEP was simply Microsoft Editor. The same editor was also available earlier (mid-1987) as part of the MS OS/2 SDK under a different name: SDKED. Note that normally SDKED insists in operating in full screen mode. Michal Necasek generously spent his time and patched it up so that it can be run in windowed mode for your viewing pleasure.

SDKED on OS/2

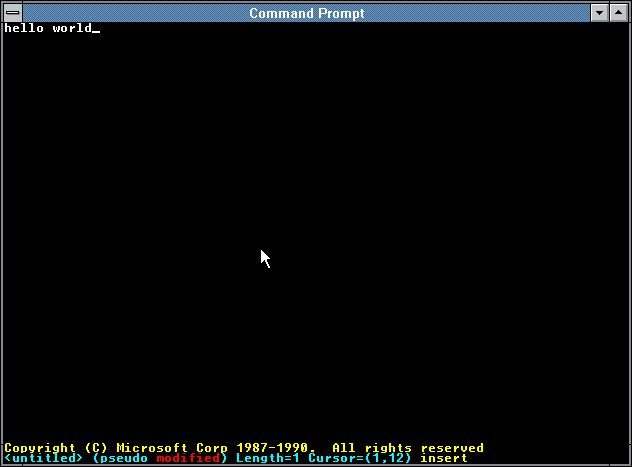
However my primary interest lies with Windows NT. The NT Design Workbook mentions that in the early days a self-hosting developer workstation included compiler, some command line tools and a text editor – MEP. Leaked Windows NT builds sometimes include IDW, Internal Development Workstation, which also seem to contain a variant of the same editor. In fact some these tools including MEP.EXE can be found on Windows NT pre-release CD-ROMs (late 1991) under MSTOOLS. It was available for both MIPS and 386 as a Win32 native console based application.

MEP on Windows NT Pre-Release

The editor was later also available for Alpha, i386, MIPS, and PowerPC processors on various official Windows NT SDKs from 3.1 to 4.0. It survived up to July 2000 to be last included in Windows 2000 Platform SDK.

M editor
M editor from NT SDK 3.1 running on Alpha AXP
MEP from NT SDK on Windows NT 4.0

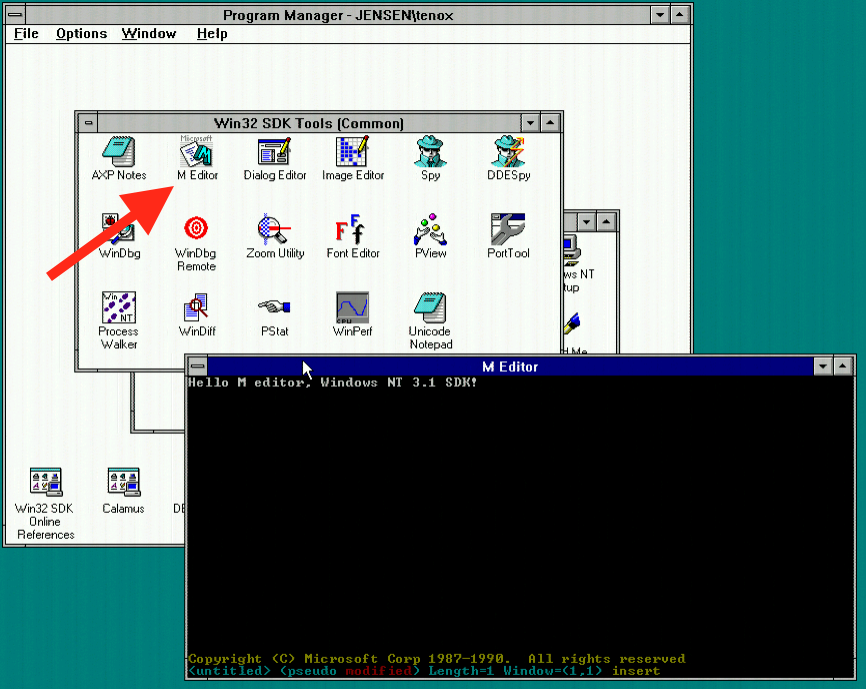
The Win32 version of MEP also comes with an icon and a file description which calls it M Editor in NT 3.1 SDK and later Microsoft Extensible Editor.

From time perspective, it was rather unfortunate that this gem was buried in the SDK rather than being included on Windows NT release media. However I can understand that the editor wasn’t very user friendly or intuitive, compared to say edit.com from MS-DOS. It came from a different era and similar to VI or Emacs, didn’t have “PC user friendly” key bindings or menus.

But that’s not the end of the story. The editor of many names survives to this day, at least unofficially. If you dig hard enough you can find it on OpenNT 4.5 build. For convenience, this and other builds including DOS M, OS/2 MEP and SDKED, NT SDK MEP can be downloaded here.

Digging through the archive I found not one but two copies of the editor code, lurking in the source tree. One under the name MEP inside \private\utils\mep\ folder and a second copy under name Z (which was the original editor for TOPS) in \private\sdktools\z folder. MEP was included in Platform SDK, while Z was only available as part of IDW.

Doing a few diffs I was able to get some insight on the differences. Looks like MEP was initially ported from OS/2 to NT and bears some signs of being an OS/2 app. The Z editor on the other hand is a few years newer and has many improvements and bug fixes over MEP. It also uses some specific NT only features.

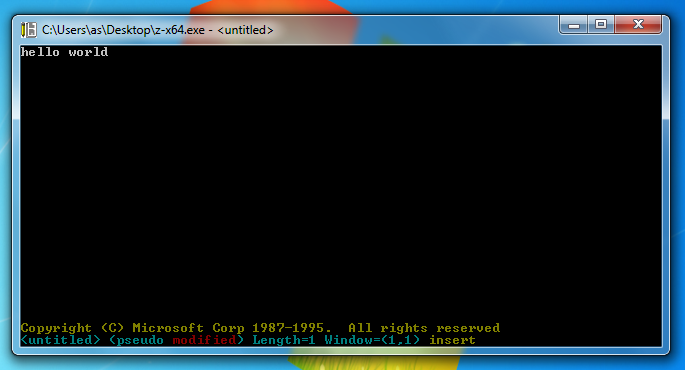
Sadly the internal Z editor was never released anywhere outside of Redmond. All the versions outlined so far had copyrights only up to 1990, while Z clearly has copyright from 1995. Being a few years newer and more native to NT I wanted to see if a build could be made. With some effort I was able to separate it from the original source tree and compile stand alone. Being a pretty clean source code I was able to compile it for all NT hardware platforms, including x64, which runs comfortably on Windows 10. You can download Z editor for Windows here.

Z editor on flashy Windows 7 x64

But how do you even use this thing?

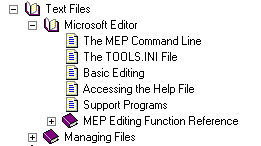
Platform SDK contains pretty solid documentation in tools.chm.

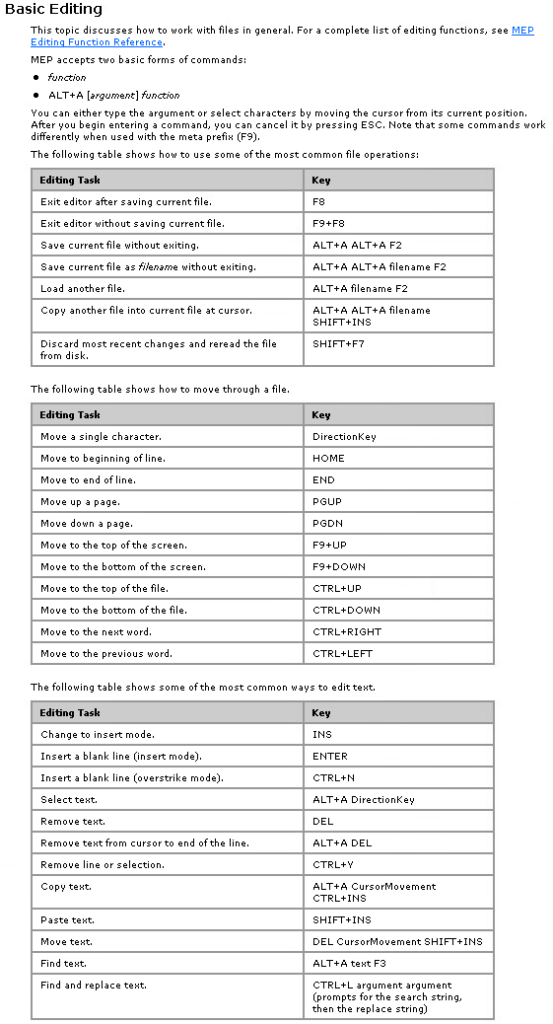
Here is a handy cheat sheet:

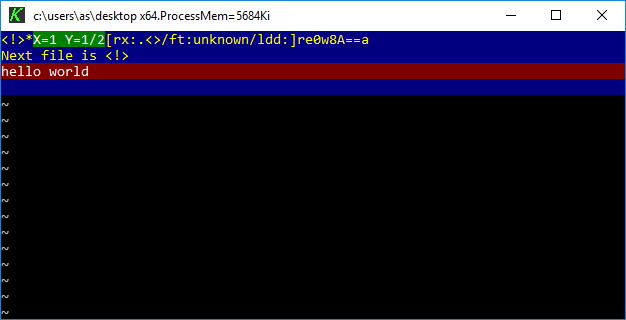
Last but not least there is a modern open source re-implementation of Z editor named K editor. It’s written from scratch in C++ and LUA and has nothing to do with the original MEP source code. K is built only for x64 using Mingw. There are no ready to run binaries so I made a fork and build.

K editor on Windows 10 x64

The author Kevin Goodwin has kindly included copies of original documentation if you actually want to learn how to use this editor.

Getting Qemu’s NetWare 3.12 onto the LAN with Tun/Tap

I could also call this ‘going with the flow’… So instead of fighting the system, like I usually do today we are going to do things the way everyone else enjoys doing things, and that is building stuff with tun/tap and bridges.

YUCK.

Ok, so I’m using Windows, and that is what I’m assuming you are as well for this ‘guide’.

The first thing you’ll need is the tun/tap driver for Windows, and the easiest way to get that is via OpenVPN.  The next thing you’ll need is Qemu, again I’m just using the pre-compiled stuff right here.

Go ahead, and install them both.  With OpenVPN installed, when you open your control panel, and check out your network interfaces you’ll see something like this:

One NIC, One Tap

One NIC, One Tap

Good.

Now for my example, I’m going to add another TAP interface.  TAP’s are only good for a 1:1 relationship with the VMs.  Yes, that is why I prefer something else, but again we are going to do things today the way everyone else does them.

Now for me, I run the ‘addtap’ batch file located in the C:\Program Files\TAP-Windows\bin folder as Administrator, and this now gives me two TAP adapters.  I highly recommend disabling TCP/IP v4 and v6 on the TAP adapters, along with the MS client/server stuff.  We are only using these for bridging the VMs so we dont’ need the host computer to participate in this network.

Now for the fun part.  I’m assuming you have your NetWare server and client images all ready to go (I guess I can go over installation again some other day), and now we get to bind each one to a SINGLE TAP instance.  Also don’t forget that each machine needs a UNIQUE MAC address.  One of them can use the default settings, but the other one cannot.

I’m going to start my server like this:

\Progra~1\qemu\qemu-system-i386.exe -m 16 -hda netware312.disk -device ne2k_isa,netdev=usernet,mac=52:43:aa:00:00:11,irq=10,iobase=0x300 -netdev “tap,ifname=Local Area Connection 2,id=usernet”

As you can see, this gives me a NE2000 on port 0x300, IRQ 10 and sets the MAC address to 52:43:aa:00:00:11 .  And this sets it on the first TAP adapter, lovingly called “Local Area Connection 2″ because the primary adapter is called “Local Area Connection“.  Also take note of the quotes in this command line, as it’ll encapsulate the full default name of the TAP adapter.  The other alternative is to just rename the adapters, but where is the fun in that?

Now for my client:

\Program Files\qemu\qemu-system-i386.exe” -m 16 -hda client.disk -soundhw sb16,adlib,pcspk -device ne2k_isa,irq=10,iobase=0x300,netdev=usernet -netdev “tap,ifname=Local Area Connection 3,id=usernet”

As you can see the primary difference here is that it’s connected to “Local Area Connection 3” which is my second TAP interface.

Now with both virtual machines running the interfaces will turn on!

But as you’ll quickly discover, neither machine can talk to each-other, as they are islands so to speak.

Two virtual machines on islands.

Two virtual machines on islands.

Now for the fun part, we highlight the two TAP interfaces, right click, and turn on the built in bridge function of Windows!

highlight and select

highlight and select

And once that is done, a new Network Bridge interface will show up, transfer what layer 3 settings there are, and then setup the layer 2 bridge between the TAP interfaces.

Bridge activating...

Bridge activating…

And once the bridge interface has gone live, give spanning tree 15 seconds to do it’s thing, and YES you can now login to the NetWare server!

Logging in from the MS-DOS VM to the NetWare 3.12 VM

Logging in from the MS-DOS VM to the NetWare 3.12 VM

And there you go!  This is the ‘approved’ way to do virtual networking with Qemu.

Now I know what you are thinking, this is great for VM’s and all that jazz, but what if I say have an office FULL of old PC’s and I want them onto my new fangled ancient server?

No problem, right click on the bridge, and select delete.  This will put everything back the way it was, sending the VMs back to their own TAP interfaces.  Now select all the interfaces, and then setup a bridge (I suppose you could edit the existing one to include the physical interface…) and now once the bridge has been setup, it’ll now be talking out the local Ethernet interface.

One quick note, bridging and WiFi tend to not go hand in hand.  Some interfaces will work, but the rule seems to be the vast majority of setups will not.  So don’t complain if yours didn’t work, you are just part of the 99.99999%.  And if you did get yours to work, well good for you.

Building Qemu 1.1.1-1 for Win32

I still can’t see how to build this for win64 … 🙁

The first major stumbling block on Win32 is glib, and again going back to the MinGW wiki there is a good laundry list of how to bootstrap Glib on MinGW.

Things you’ll need:

Be sure to run ming-get install for the following:

  • gcc
  • g++
  • libiconv
  • zlib
  • libz
  • gettext
  • msys
  • msys-perl
  • msys-m4

Install Python.. Nothing to fancy from what I gather Qemu still requires you have a level 2 Python, not 3 …

Build libffi

This should be the usual dance of configure & make / make install…  But sure to at least run configure like this:

./configure –prefix=/mingw

Build Glib without pkg-config

Be sure to add Python to your path..

PATH=/c/Python27:/c/Python27/DLLs:$PATH
export PATH

Glib is packed with something called ‘xz’ so hopefully you have xzcat .. Otherwise add it!

export LIBFFI_CFLAGS=’-I /mingw/lib/libffi-3.0.9/include’
export LIBFFI_LIBS=-lffi
export lt_cv_deplibs_check_method=”pass_all”
export CFLAGS=”-O0 -g -pipe -Wall -march=i486 -mms-bitfields -mthreads”
export CPPFLAGS=”-DG_ATOMIC_OP_USE_GCC_BUILTINS=1”
export LDFLAGS=”-Wl,–enable-auto-image-base”
configure –prefix=/mingw –with-pcre=internal –disable-static –disable-gtk-doc –enable-silent-rules

* You may have some weird issue where when running configure it tells you it cannot create executables, or you get a bunch of weird errors trying to paste in the CFLAGS line.. For me the MinGW prompt was stripping the quotes and the leading – to the -O0 (disable optimization) bit.  I don’t know what on earth its issue was, but I had to type that line in manually.

Then do the make/make install dance. This will take a WHILE. At least with -pipe it’ll run each stage of GCC on multiple processors… But yeah.. This is intense to build.  Good thing we get to do it twice.

I also ran into some weird error in the GIO directory where it couldn’t find my Python, and was looking for python2.5 .. So I copied python.exe to python2.5.exe …

PYTHON = /usr/bin/env python2.5

pkg-config

Naturally pkg-config depends on Glib2, and pkg-config to build… Which of course is a circular problem, much like Glib2 requires pkg-config to build.   So to configure it, it goes something like this now that we’ve built a Glib2 ..

export GLIB_CFLAGS=”-I/mingw/include/glib-2.0 -I/mingw/lib/glib-2.0/include”
export GLIB_LIBS=”-lglib-2.0″
configure –prefix=/mingw

At the same time I can’t help but wonder if this version of pkg-config can use it’s own Glib with the following config:

configure –prefix=/mingw –with-internal-glib

Anyways with any luck we can now build & install pkg-config.  This only takes a few seconds..

Glib2 (again)

From this point you should open a new MinGW prompt window, as you don’t want the old CFLAGS screwing things up.  Re-eport the Python path/dll vars and now we can get on to building glib2 (again!) …

configure –prefix=/mingw;make;make install


SDL

This should be somewhat straightforward …

configure –prefix=/mingw;make;make install

In the old days we built zlib, but now we can just quickly add in the package (as we did way above) so we should.. now be ready for the main event!


And now we can finally build Qemu 1.1.1-1!!!

Now there is a few things I like to tweak, the first is in the configure script, I like to add in AdLib support.  Look for the line

audio_card_list=”ac97 es1370 sb16 hda”

and add adlib into the list

audio_card_list=”ac97 es1370 sb16 hda adlib”

Next I like to modify hw/pc.c and alter the ISA NE2000, as Qemu doesn’t like to share IRQ 9 with the card, so it is just easier to remove the 0x300/IRQ 9 definition.

static const int ne2000_io[NE2000_NB_MAX] = { 0x300, 0x320, 0x340, 0x360,
0x280, 0x380 };
static const int ne2000_irq[NE2000_NB_MAX] = { 9, 10, 11, 3, 4, 5 };

to this:

static const int ne2000_io[NE2000_NB_MAX] = { 0x320, 0x340, 0x360,
0x280, 0x380 };
static const int ne2000_irq[NE2000_NB_MAX] = { 10, 11, 3, 4, 5 };

The next tweak deals with the ability to use older qcow2 disk images… I guess converting them to RAW with an older version of Qemu, then using the new version of Qemu to convert them back into qcow2’s may be a “good ideaâ„¢” but for now modifying the source is a quicker fix.

Comment out the “return -EINVAL;”  in block/qcow2.c

if (ext.len > end_offset – offset) {
error_report(“Header extension too large”);
//return -EINVAL;
}

Now one fun thing I’ve noticed is that building with the default O2 flags Qemu will crash out the moment you access a hard disk image.  It appears that coroutine-win32 is at issue (again?).  So the “easy” way I address it is to first build qemu as normal, and verify that if you attach a hard disk image (any kind) and try to access it, partition it etc, it should crash.  Next remove the file coroutine-win32.o , and edit the file config-host.mak and change the CFLAGS that specify

CFLAGS=-O2 -g

to

CFLAGS=-O1 -g

Now run make again, and it *should* just rebuild coroutine-win32.o with the lesser optimization flags, and relink all the exe’s.  If I’ve done this right, you should now have a working Qemu.

You can go ahead and strip the binaries if you so please, but that should be it.

PHEW.  For anyone who wants my build, but doesn’t want to go through this ‘exciting’ process, you can find the Win32 i386 build here.

Weird scaling in action .. Control+ALT+u kind of undoes it, but it just doesn’t look right and it is far too slow.

In preliminary testing I’ve found this version to be MUCH slower than 0.15.1 .. I think it has something to do with it wanting to scale the SDL window.  Also I’ve had issues with various network cards not initializing with the BIOS that ships with this version of Qemu so I’ve included the bios directory from 0.15.1 .  And lastly yes the disk images… I’ve had major issues with my qcow2 disks, and disk corruption with this build.  I’ve gone ahead and  included the qemu-img tool from 0.15.1 so you can convert qcow2 to raw, then use the 1.1.1 tool to take them from raw back into qcow2 … But I’d probably only do it as a test.

You may want to kick the tires on this version but 0.15.1 really blows this one away…

Virtual PC 2007 issues with TAB and ESCAPE keys on Windows 7 sp1

The hits keep rolling.

Well no doubt if you are still using VPC 2007, at some point you’ve probably found under Windows 7 sp1, the tab & esc keys stop working. According this page, you can create a local security policy to allow %appdata%\microsoft\vritual pc\vpckeyboard.dll to be runnable by all.

So just open up your LSA tool and…… You’ll quickly find out that Home versions have lovingly cut this functionality out.

But the only ‘fix’ is to simply run it as administrator.

Oh well I guess the hint is that Virtual PC for Windows thing, that took vpc from a virtualization solution into a crappy host for IE 6 (way to destroy a product), and they took out the sound blaster and floppy drive support. Nothing like a reducing functionality as a way forward.

A quick Neko x64 update!

Oh no!

Oh no!

For anyone who’s been using neko x64 on Windows Vista or Windows 7 and seeing something like the above, it turns out the fix was really easy and really simple. As mentioned by mikesword221, all you have to do is make it ‘always on top’.

Just right click on the cat in the task bar (he may be hiding, check under the up arrow…)

And make your settings something like this:

Configure Neko

Configure Neko

Then hit ok and Neko will now look normal, with no more ghosting.

Later on I’ll have to make an installer, and fix it so that neko is always on top.

Glorious Neko returned!

Glorious Neko returned!


Windows 7 shipped….

I don’t know how you could have missed it as it’s been everywhere…..

To commemorate the occasion Burger King of Japan is releasing…. a 7 patty burger.

Windows 7 Whopper

Windows 7 Whopper

Yeah, i know… weird.
Anyways for the people that will be upset about the whole XP mode thing, when they find out they need a cpu that supports visualization extensions (as not all new ones do!) Don’t forget that Virtual PC 2007 sp1 is still an option.
Another interesting thing is that you can install from a USB stick instead of the DVD media if you have some machines without working DVD ROM’s or perhaps NO optical media at all…
Follow the instructions here.
Although it’s terribly simple. Run diskpart, youll probably want to do a list disk to make sure your USB is indeed disk’1′. it is for me, but it may be anything else. DONT ZAP YOUR HARD DISKS!!

DISKPART

SELECT DISK 1

CLEAN

CREATE PARTITION PRIMARY

SELECT PARTITION 1

ACTIVE

FORMAT FS=NTFS QUICK

(Format process may take few seconds)

ASSIGN

EXIT

Then from the Windows 7 DVD go to the boot directory and run:

BOOTSECT.EXE/NT60 K:

 
Assuming that K is your flash drive.
 
Then finally copy the DVD onto the flash card

XCOPY D:\ K:\ /E/C/H/Q/K


Then you just have to adjust your boot priority and you’ll be off and installing… I got my machine installed in under 20 min this way.
 
Sorry this isn’t all so emulation but that’s life…. Anyways Qemu 0.90 runs on the release version!.. I’m hoping other stuff does as well.

On using SQL 4.21

Ok, I know it’s been all retro SQL server but bear with me… MSDE/SqlExpress is just too small for some pet project, and I want to run my SQL natively… So it’s 4.21 for now.

Anyways, I thought I’d mention that to run SQL 4.21 on Windows 7, you’ll need the userenv.dll from a Vista computer, just copy it to where your i386 files are so you can run the setup, even if it complains about your x64 dll as ‘The image file c:\sql\i386\userenv.dll is valid but is for a machine type other then the current machine…’. Let it continue and it’ll still run. Also remember to set it to 256 colors in the compatibility tab or you’ll never get to use any radio boxes… It still barfs initializing the services, but it’ll let you run the server, and slap down a working master database from a blank installed machine (say from NT 4.0..) Naturally you’ll have to comment out the line in setup.inf about the client access DLL dbnmpntw.dll, and register c:\sql\binn;c:\sql\dll yourself in the system’s path environment variable…

Oh and since I’m using such an ancient engine, one thing that is kind of annoying is that .net 3.5 only wants to talk to SQL Server 7.0 and higher. However using ODBC you can force it to talk to the ancient 4.21a

Here is what I’m using in my c# to talk to the sql server:

string myConnString = “Driver={SQL Server};Server=.;Database=datamine;Uid=sa;Pwd=”;
OdbcConnection myConnection = new OdbcConnection(myConnString);
OdbcCommand myCommand = new OdbcCommand(query, myConnection);
myConnection.Open();
OdbcDataReader myReader = myCommand.ExecuteReader();
myReader.Close();
myConnection.Close();

So with a little tweak you can get it running on Windows 7, and have .net talking to the database.

Another note is be sure to run the sqladmin tool, and hit the ‘system’ button, then under the manage menu, select the system configuration. By default it won’t accept remote connections, and limits itself to 6MB of ram! You’ll want to bump up its system limits. I’d also say use tempdb in ram, as you probably have more ram in your computer then any server back from 1992… I have 8GB for example on my desktop.

Just don’t forget that something this ancient won’t grow your databases for you… I’m pretty sure you can add additional database devices, and expand the DB, but it will be a while until I fill my first DB… Also you’ll probably find that a lot of the fancy SQL features you’ve grown to like are gone, but surprisingly it still offers a good base. And it’s like 25Mb for the complete install… A pittance by modern standards…

Windows XP Mode in Windows 7

Well it seems to be all the rage in the world of emulation on Windows 7. Windows XP mode, from the user standpoint is just like the old days of WIN/OS2 from OS/2 2.0 and above.

While WIN/OS2 used specialized device drivers that could ‘punch thru’ the virtual machine, and render each window on the OS/2 PM display, Windows XP mode, takes the Citrix like approach of using Terminal Services (RDP) to initiate a remote display to the local desktop.

Since RDP is the mechanism used, only XP and above will work, sorry Windows 2000 users. Another minor (is it?) annoyance is that the new version of Virtual PC has NO floppy driver support! It also seems to not have sound support, although it’s totally unverified at the moment. I’ll have to snag a VHD with MS-DOS pre-installed along with whatever integration tools I have around.

Anyways, the install is a snap, you can find all the components here.

Setup is straight forward, just install the Virtual PC component, then Windows 7 will want to reboot. Then install the Windows XP msi file (it’s over 450MB) and you’ll get a fully installed copy of Windows XP ready to go, and best of all you don’t have to configure anything. Start Windows XP in a “normal” desktop environment, install whatever it is you want to run. Publishing apps to the Windows 7 desktop is easy, just paste a shortcut under the “all users” start menu, and the screen will blink and it’s available.

The down side, is that other OS’s seem to perform poorly under this version of VPC. The mouse is very erratic on RHEL 4 that I had to setup to emulate a production environment. Also you need to have a CPU with the new virtualization extensions. It seems this VPC version is more like the hypervisor in 2008, then like the old Virtual PC we all knew. I almost wonder if there is a way to run VPC 2004 or 5 on Windows 7 natively for running older stuff…

It will be interesting to see where Microsoft goes with this, as this could leave a major rift in their product lineup. And as I’m sure a few people will find out, just because you have a ‘new’ machine doesn’t mean the CPU is up to the task… Not all new CPUs have the virtualization environment built in…

Another issue I’ve been having is that the network from time to time disconnects and will remain disconnected… It seems if you shut down & power the VM on/off (no hibernation!) eventually the NAT adapter will reconnect. Clearly it’s a beta. Also it won’t let you publish solitary, pinball, nor any of the other games. However it will let you publish cmd.exe so you can run them that way.


OS/2 vs Windows 7

I installed the latest RC of Windows 7 x64 today, and while going thru the latest wall papers I saw one that looked surpisngly familiar…..

Then it hit me, this looks a LOT like the old light house from OS/2 2.0! To check I quickly installed a copy of OS/2 2.0 on Qemu 0.90 (which works on Vista, unlike 0.91).

Lighthouses into the new world...


While it may be the same place from a different angle, the similarity is kind of funny. At the time OS/2 2.0 was the new striking consumer 32bit OS, and here I am on the new striking consumer 64bit OS… with more or less the same wall paper from a different perspective.

The more things change, the more they stay the same!